The Shopping Cart preference page allows the administrator to provide instructions and activate HTML friendly boxes. Administrators can also select custom Transaction fields to appear on the Payment step for the checkout process. The preferences defined on this page affect the Shopping Cart, Payment, and Receipt pages.
To set the shopping cart preferences, go to .
| PERMISSION NAME | PERMISSION DESCRIPTION | CATEGORY |

Localization
From the language drop-down in the upper-right corner, select the appropriate language, if applicable.
Activate Shopping Cart
Activate Shopping Cart Functionality - Select this option to activate the shopping cart functionality for the division. By default it is unchecked. When checked it gives users in the division the ability to purchase more than one LO at a time using the shopping cart.
Define Instructions
Enter instructions that will display to users on the Shopping Cart and Checkout screens. The maximum number of characters for each field is 3000.
Preferences
The maximum number of characters for these fields is 3000. Click the Edit icon to format the message.
- Formatted Message Box Above - Select this option to include an HTML message that displays above the shopping cart.
- Formatted Message Box Below- Select this option to include an HTML message that displays below the shopping cart.
- Payment Page Message Box - Select this option to include an HTML message that displays on the Payment Page.
- Billing Text Box - Select this option to include HTML information or instructions related to billing that display in the billing area. Note: This text box is not used when the new Shopping Cart interface is enabled.
- Payment Text Box - Select this option to include HTML information or instructions that display above the Payment Method drop-down list.
- Review Page Message Box - Select this option to include an HTML message that displays on the Order Review Page.
- Thank You Page Message Box - Select this option to include an HTML message that displays on the Thank You Page. When the new Shopping Cart interface is enabled, this message box also appears on the Checkout - Confirmation page. Click the List of Available Tags link to view the tags that can be used when customizing the Thank You Page Message Box.
- Hide Shopping Cart Widget When Cart is Empty - Select this option to hide the Shopping Cart link when the cart in empty.
- Show the User's Cost % - Select this option to display the user's cost percentage on the Receipt page if the user's cost percentage is less than 100% (i.e., if the organization is paying a portion of the cost)
- Display system generated recommendation - The box is unchecked by default. Checking the box enables a system-generated list of recommended training to display at checkout in the shopping cart or on the LO Details pop-up. The list is generated by using the portal's purchase history. In the Show items to be recommended field, use the drop-down to select the number of recommended trainings that will appear on the list, from 1-5.
- Display admin defined recommended training - The box is unchecked by default. Checking the box enables a Recommendations tab to display when editing an LO in Course Catalog, under which administrators can create a customized list of recommended training. In the Show items to be recommended field, use the drop-down to select the number of recommended trainings that will appear on the list, from 1-5.
Custom Fields
The Custom Fields section allows administrators to add up to four custom Transaction fields that will appear on the Payment page of the shopping cart checkout process. In addition, the email tags for custom Transaction fields can be added to the Thank You Page Message Box.
Add Custom Field
This option allows administrators to select from existing custom Transaction fields to add to the Shopping Cart Preferences page. The fields that are added can then be configured to display on the Payment page of the shopping cart checkout process.
To add a field:
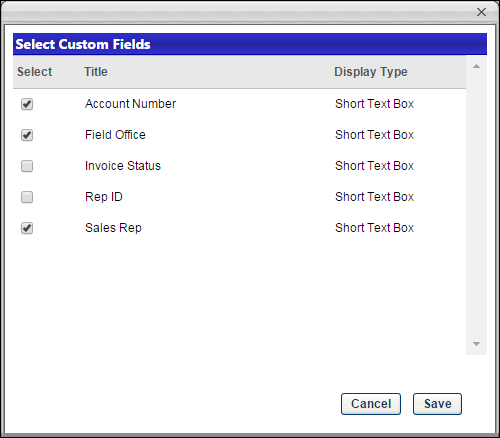
- Click the Add Custom Field link. This opens the Select Custom Fields pop-up. The pop-up displays all active custom Transaction fields that have been created, regardless of the availability settings defined for the fields. The field title and type also display.
- Check the box in the Select column next to each field you would like to add. Up to four fields can be added.
- Reorder the fields in the pop-up to define the order in which the fields display on the Payment page of the shopping cart. The fields will also display in this order in the custom fields table on the Shopping Cart Preferences page.
- Click . This adds the fields to the custom fields table.
Manage Custom Fields
Click Manage Custom Fields to open the Transaction tab of the Custom Field Administration page. From there, administrators can add or edit custom Transaction fields.
Custom Fields Table
The custom fields table displays all custom Transaction fields that have been added from the Select Custom Fields pop-up. The following columns display in the table:
- Field - This column displays the name of the field.
- Display on Shopping Cart - Check the box in the column to display the field on the Payment page.
- Response Required - Check the box in the column to require users to complete the field.
- Delete - Click the Delete icon
 to delete the field from the Shopping Cart Preferences page. When deleted, the field no longer displays on the
Email Tags for Thank You Page Message Box
Email tags for custom Transaction fields can be added to the Thank You Page Message Box. Click the List of Available Tags link in the Thank You Page Message Box field to view the tags. To add the tags to the message box, click the Edit icon to open the text box and add the tags. There is no limit to the number of custom Transaction field email tags that can be added to the message box.
HTML Safe List
The system only accepts certain customizable HTML elements in the WYSIWYG Editor. Elements that are not acceptable display as text. See Safe Listed Customizable Elements.
Overwrite Settings
Select this option to overwrite custom settings for child division OUs. If you overwrite custom settings for child division OUs, the selected settings are applied to both new and existing child OUs. Any previously customized child OUs are updated with the selected settings.
- If there are no customizations to the child OU, then the parent OU customizations are applied to all child OUs.
- Overwrite custom settings checkbox setting
- If this option is selected, all child OU customizations are deleted from the database, which means the parent OU customizations will be applied to new and existing child OUs.
- If this option is unselected, all existing child OU customizations will remain unchanged, and any new child OUs will inherit the parent OU customizations by default.
- If a child OU has been customized to display any widgets, then regardless of the parent OU customizations, the child OU customizations are applied.
- If a child OU has been customized to hide all widgets, then parent OU customizations will take precedence and will be applied.
Cancel/Submit
Click to cancel changes to the preference settings.
Click to submit changes to the preference settings.