Create Custom Certificates
When creating or editing a custom certificate, a Telerik HTML editor is used. For additional information about the editor, visit http://demos.telerik.com/aspnet-ajax/editor/examples/default/defaultcs.aspx.
Once the user completes the training, the certificate is available on the Training Details page for the LO. Users can view and print the certificate from this page. Managers and administrators can also view and print the certificate when accessing the user's transcript.
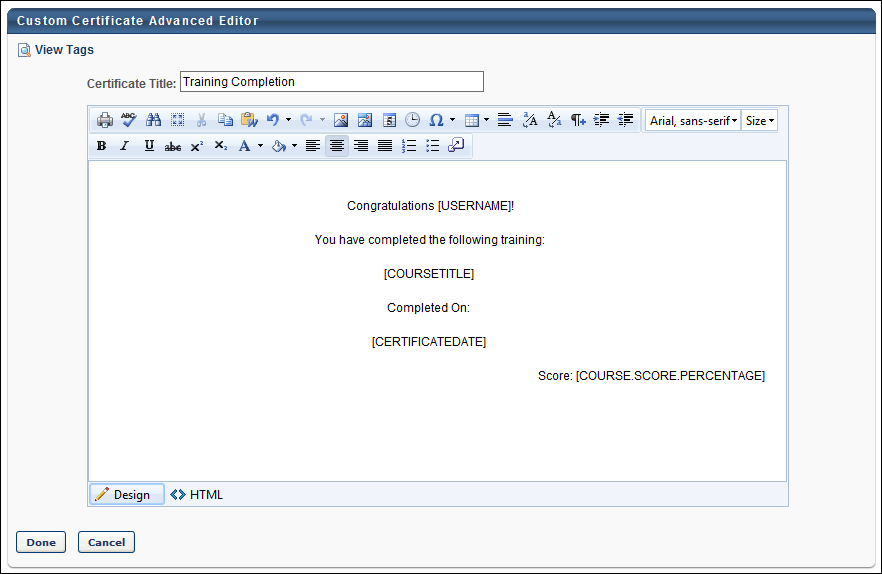
In the Certificate Title field, enter a title for the certificate. This title should describe the purpose of the certificate. This is required and the character limit is 300.
Best Practice: When editing a certificate, it is a best practice to change the certificate name each time. This is because when a certificate from a parent OU is modified, the certificate from the parent OU remains available along with the modified version of the certificate. If these two certificates are named the same, it is difficult to distinguish them.
Editing Modes
In the editor, there are two editing modes: Design and HTML. When in Design mode, you can use the standard editing tools to format your text, similar to your word processor application. When in HTML mode, the standard editing tools are disabled and you are able to view and modify the HTML code that is used to design the certificate. To switch between modes, click the appropriate tab in the lower-left corner of the editor. The system only accepts certain customizable HTML elements in the WYSIWYG Editor. Elements that are not acceptable display as text. See Safe Listed Customizable Elements.
Images
When adding an image to a custom certificate, the image must be uploaded to the Image Manager in order to appear properly in the certificate. However, there are currently no constraints available, so any image that is loaded can be viewed by any user with permission to manage custom certificates. To open the Image Manager, click the Image Manager icon ![]() . This opens the Image Manager. Click the Upload button to select the image to upload. The maximum file size is 1,024KB, and the accepted file types are .gif, .xbm, .xpm, .png, .ief, .jpg, .jpe, .jpeg, .tiff, .tif, .rgb, .g3f, .wxd, .pict, .ppm, .pgm, .pbm, .pnm, .bmp, .ras, .pcd, .cgm, .mil, .cal, .fif, .dsf, .cmx, .wi, .dwg, .dxf, .svf.
. This opens the Image Manager. Click the Upload button to select the image to upload. The maximum file size is 1,024KB, and the accepted file types are .gif, .xbm, .xpm, .png, .ief, .jpg, .jpe, .jpeg, .tiff, .tif, .rgb, .g3f, .wxd, .pict, .ppm, .pgm, .pbm, .pnm, .bmp, .ras, .pcd, .cgm, .mil, .cal, .fif, .dsf, .cmx, .wi, .dwg, .dxf, .svf.
Note: When previewing the certificate, .tif and .tiff images are not supported.
Tags
To view the available tags for the certificate, click the View Tags link in the upper-left corner. This includes all available standard tags and custom field tags that may exist in your portal. To use one of the tags, you can copy and paste the tag into the editor or use the 'Import Filed' tool in the WYSIWYG editor (see below).
Both Training and User Record Custom Fields are available as certificate tags if they are Date Fields, Numerical Fields, Short Text Boxes, or Scrolling Text Boxes. Custom Training field tags begin with "[CUSTOM_LO_". Custom User Record tags begin with "[CUSTOM_USER_". Custom field tags must be referenced in all capital letters, and the field name must be placed within square brackets ("[ ]").
The Standard certificate tags are as follows:
- [USERNAME] - User's Full Name
- [USERFIRSTNAME] - User First Name
- [USERLASTNAME] - User Last Name
- [COURSETITLE] - Course Title
- [COURSEPROVIDER] - Course Provider
- [COURSE.SCORE.PERCENTAGE] - Course score as a percentage
- [COURSE.SCORE.RATIO] - Course score as a ratio
- [COURSEDESCRIPTION] - Course Description
- [CERTIFICATEDATE] - Course Completion Date
- [CERTIFICATELONGDATE] - Course Completion Long Date
- [OBJECTTYPE] - Course Type
- [LOGO] - Logo
- [ILT.OBJECTIVES] - Event/Session Objectives
- [OBJDURATION] - Course Duration
- [OBJCREDITS] - Course Credits
- [MANAGER] - Manager Name
- [SESSIONCITY] - Session City
- [SESSIONSTATE] - Session State
- [SESSIONSTARTDATE] - Session Start Date
- [SESSIONSTARTLONGDATE] - Session Start Long Date
- [SESSIONENDDATE] - Session End Date
- [USERPHOTO.SMALL] - User's profile photo in 48 x 48 pixel size
- [USERPHOTO.MEDIUM] - User's profile photo in 100 x 100 pixel size
- [USERPHOTO.LARGE] - User's profile photo in 200 x 200 pixel size
- [USERPHOTO.XLARGE] - User's profile photo in 400 x 400 pixel size
Import Field
All certificate fields are available. All training custom fields are available if they are Date Fields, Numerical Fields, Short Text Boxes, or Scrolling Text Boxes.
As previously stated, in Design mode, the standard editing tools are available to format the text. The final option in the bottom right corner of the editing toolbar is the Import Field option ![]() . Click this option to view and import the available custom fields.
. Click this option to view and import the available custom fields.
Considerations
Standard Tag Behavior
If a learning object is associated with a Training Certificate before the LO is completed:
- The training certificate will always display the values of the standard tags as they were at the time of completion.
- If the learner’s display language changes, standard tags on the Training Certificate will display based on the language that was set at the time of completion.
If a learning object is associated with a Training Certificate after the LO is completed:
- The certificate will fetch the current values for the standard tags every time the certificate is generated.
- If the learner’s display language changes, standard tags on the Training Certificate will display based on the current language.
Custom Field Tag Behavior
If a learning object is associated with a Training Certificate before the LO is completed, the following rules apply:
- If a Training Custom Field was populated or blank in the Course Catalog when the LO was completed, that value is passed to the Training Details of the LO on the user’s transcript. After completion, edits made to the Training Custom Fields in the Course Catalog are not passed to the user’s Training Details or the Training Certificate tags.
- If a Training Custom Field is configured to be editable on the user’s transcript, editing the value on the User’s transcript will change the value in the Training Details but will not change the Training Certificate tags.
- If the Training Certificate contains User Record Custom Fields, edits to those fields on the User Record will not change the value in the Training Certificate Tags.
- If the user’s display language changes after completion, custom date fields will display in the format specific to the user’s language in the Training Details but not on the Training Certificate. Custom text fields will display in the language set at the time of completion both in the Training Details and the Training Certificate.
If a learning object is associated with a Training Certificate after completion, the following rules apply:
- If a Training Custom Field was populated in the Course Catalog when the LO was completed, that value is passed to the Training Details of the LO on the user’s transcript. Edits made to the Training Custom Fields in the Course Catalog after completion are not passed to the user’s Training Details or the Training Certificate tags.
- If a Training Custom Field was blank in the Course Catalog when the LO was completed, edits made to the Training Custom Field in the Course Catalog after completion are visible in the Training Details and the Training Certificate tags.
- If a Training Custom Field is configured to be editable on the user’s transcript, editing the User’s transcript will change the value in the Training Details and the Training Certificate tags.
- If the Training Certificate contains User Record Custom Fields, edits to those fields on the User Record will change the value in the Training Certificate Tags.
- If the user’s display language changes after completion, custom date fields will display in the format specific to the user’s new language in the Training Details and on the Training Certificate. Custom text fields will display in the language set at the time of completion both in the Training Details and the Training Certificate.
Note:
Training completions loaded via Edge, Express Class, or the Training Update Tool behave the same as if the learning object was associated with a Training Certificate after completion.
If an Event is associated with a Training Certificate, a child session's training certificate behaves the same as if the learning object was associated with a Training Certificate after completion.