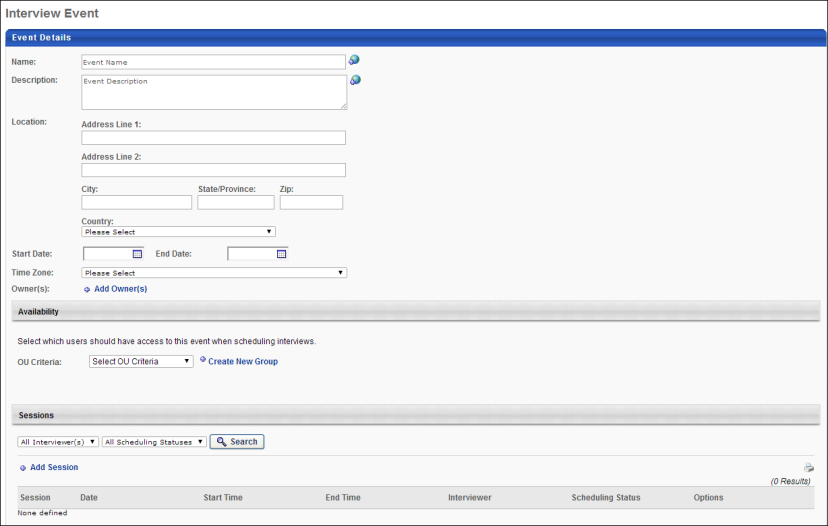
The Event Details section enables administrators to define general information about the event, such as the name, description, and start/end dates.
Note: Once you create an event, the event along with all of its sessions can be deleted from the main Interview Events and Sessions page.
To create an interview event, go to . Then, click the Create New Event link on the Interview Events & Sessions page.
| PERMISSION NAME | PERMISSION DESCRIPTION | CATEGORY |
Name
Enter a name for the event. This is a required field.
Description
Enter a description of the event. This is not a required field.
Location
Enter the address for the event. The location fields are not required fields. If a location is provided, then a map of the location displays for the applicant when viewing the interview invite.
This field allows location information to be included when inviting applicants to self schedule for an interview event. This is not a required field. If the Location field is not completed, then the address and map functionality are not included for applicants when viewing the interview invite, and the location will display "Not Specified" on the Applicant Profile page and interview scheduling pages.
Complete the following information in the Location field:
- Address Line 1 - Enter the street address, up to 110 characters.
- Address Line 2 - Enter additional address information, up to 55 characters.
- City - Enter the city, up to 35 characters.
- State/Province - If the United States or Canada is selected in the Country field, then the State/Province field displays a drop-down from which to select the state or province. For all other countries, a blank textbox displays in which to enter the value, up to 30 characters.
- Zip - Enter the zip code, up to 20 characters.
- Country - Select the country from the drop-down. This field is required if the other address fields are completed.
Start Date
Enter the date on which the event starts. Or, use the calendar feature to select a date from the calendar. The start date must be the current date or a future date. This is a required field.
Editing Note: When editing events that have a start date in the past, the start date must be changed to the current date or a future date in order to save changes to the event.
End Date
Enter the date on which the event ends. Or, use the calendar feature to select a date from the calendar. The end date must be the current date or a future date. This is a required field.
Time Zone
Select a time zone from the drop-down. This is a required field.
Owner
Event owners are able to view and manage the event for which they are an owner. Event owners are dynamically assigned permission to access the event. Click the Add Owner link to select one or more users from the pop-up. Click to add the owners to the event. There is no limit to the number of owners that can be added. This is a required field.
When creating events from the My Events tab, the current administrator's name is included as an owner by default. The default owner cannot be modified or deleted. Events that are created from the All Events tab are not assigned a default owner.
The Include Subordinates box is checked by default to include users in the subordinate organizational units (OU). Uncheck the box to not include subordinate OUs.
Owners can be deleted by clicking the Trash Can icon ![]() to the left of the owner.
to the left of the owner.
Save/Cancel
Once the required settings in each section are completed for the interview event, click to save the event.
Click to cancel creating, copying, or editing the event.