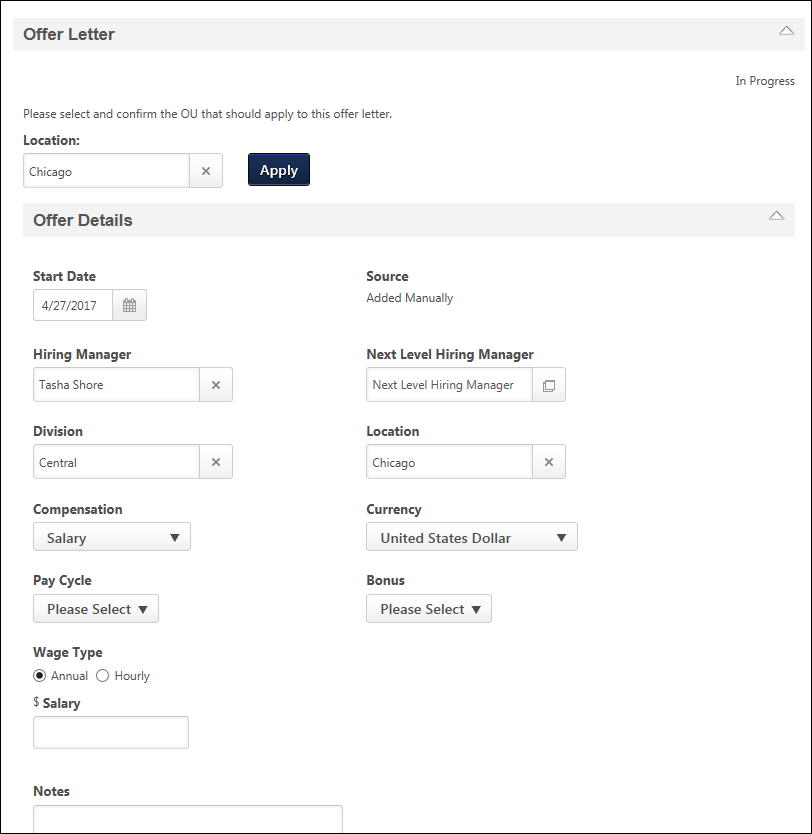
When there are no existing offer letters for the candidate, the Offer Letter status displays the Offer Details panel, which is expanded by default. The offer details are populated with the values from the job requisition. From here, the user can create the first version of the offer letter, which triggers the offer letter workflow.
Note About Date Format: All dates on the offer letter appear in alphanumeric format. The date will still be in the localized format of the person who is viewing the offer letter, but the value is alphanumeric.
Note: The Start Date, Wage Type, Pay Cycle, Bonus, and Notes are not pre-populated. Also, the Offer Management table does not display until at least one offer letter version is created.
| PERMISSION NAME | PERMISSION DESCRIPTION | CATEGORY |
| Offer: Manage Offers |
Grants ability to manage all functionality available in the Offer Letter Management table of an applicant's profile, as well as view offer letters on the Documents tab of the Applicant Profile page. This permission must be used in conjunction with the permission. This permission cannot be constrained. Note: Users must also be assigned the permission in order to edit offer letters that are generated from a template. Note: Users must also be assigned the permission to change the template that is used when generating offer letters.
Note: Users must also be assigned the permission to access offer letters that are defined as sensitive. |
Recruiting |
Location Option
To select the Location OU that corresponds to the Offer Letter Preferences settings that you would like to use for the offer letter:
- Click the Select icon
 in the Location field. This opens the Select Location pop-up.
 - Select a Location OU from the pop-up.
- Click in the Offer Letter status type panel. This updates the Offer Details with the values that have been configured in Offer Letter Preferences for the selected OU.
Note: The Location field does not display if the offer details are read-only.
Offer Details
To create an offer letter, complete the information in the Offer Details section.
Note: The default fields that display in the Offer Details section are dependent upon the settings configured by the administrator in Offer Letter Preferences. Only default fields that are defined as active in Offer Letter Preferences display in the Offer Details panel.
- Start Date - Enter the date on which the position starts. This is not a required field and is not pre-populated. Note: All dates on the offer letter appear in alphanumeric format. The date will still be in the localized format of the person who is viewing the offer letter, but the value is alphanumeric.
- Source - This field is pre-populated with the application source pulled from the candidate's application. The source is how the applicant applied for the position (e.g., a career site).
- Hiring Manager - This field is pre-populated with the user defined as the hiring manager on the requisition. Click the Select icon in the Hiring Manager field to select a different user or to define a hiring manager if one was not defined on the requisition. This is not a required field.
- Next Level Hiring Manager - This field is pre-populated with the user defined as the direct manager of the hiring manager. Click the Select icon in the Next Level Hiring Manager field to select a different user. This is not a required field. Note: If the user in the Hiring Manager field is changed, whether on the Applicant Profile page or the requisition, the user in the Next Level Hiring Manager field automatically changes. If you manually select a different user in the Next Level Hiring Manager field, then the manual selection changes to the automatic selection whenever the hiring manager is changed.
- Division - This field is pre-populated with the division defined on the requisition. Click the Select icon in the Division field to select a different division. This is not a required field.
- Location - This field is pre-populated with the location defined on the requisition. Click the Select icon in the Location field to select a different location. This is not a required field.
- Compensation - This field is pre-populated with the compensation type defined on the requisition. Click the drop-down in the Compensation field to select a different compensation type. This is not a required field.
- Currency - This field is pre-populated with the currency defined on the requisition. Click the drop-down in the Currency field to select a different currency. This is not a required field.
- Wage Type - Select the Annual or Hourly option to define the wage type. This is a required field.
- Annual - Selecting this option opens a numeric Salary text box to the right of the Wage Type field. Enter the salary amount in the text box. The field accepts decimal points that follow the requirements of the currency defined in the Currency field. This is not a required field.
- Hourly - Selecting this option opens a numeric Hourly Rate text box to the right of the Wage Type field. Enter the hourly rate in the text box. The field accepts decimal points that follow the requirements of the currency defined in the Currency field. In addition, a numeric Labor Hours text box appears to the right of the Hourly Rate text box. Enter the number of hours for the position in the text box. The field accepts decimal points. These are not required fields.
- Pay Cycle - Click the Pay Cycle drop-down to select a pay cycle. This is not a required field. Note: The options in the Pay Cycle drop-down are defined by the administrator in Offer Letter Preferences.
- Bonus - Click the Bonus drop-down to select a bonus. This is not a required field. Note: The options in the Bonus drop-down are defined by the administrator in Offer Letter Preferences.
- Notes - Enter notes about the offer letter. The maximum character limit is 500.
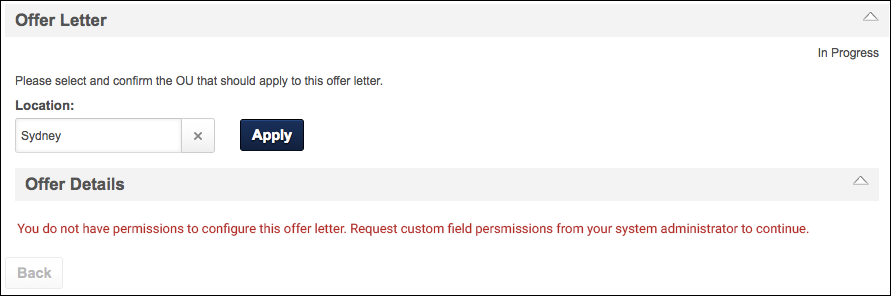
Custom Fields
If offer letter custom fields are active and available, then the fields display at the bottom of the Offer Details section.
If a custom field is marked as required and you do not meet the availability criteria for the field, then a message displays to indicate that you will need to contact your system administrator to have the availability field changed so that you meet the criteria. You will not be able to submit the offer letter if you do not meet the availability for a required custom field.
Save and Generate
Once all fields are completed, click . This saves the values entered in the Offer Details section and opens the Create Offer pop-up.
Create Offer Pop-Up
The Create Offer pop-up displays the offer letter text, along with the values defined in the Offer Details section. For users with permission to edit the offer letter content, the offer letter appears in Design mode. For users without this permission, the offer letter content is read-only.
The following information appears in the pop-up:
- Offer Title - Enter a title for the offer letter in the Offer Title field. The maximum character limit is 100. This is a required field. Special characters cannot be included in the Offer Title field. If the offer letter template title contains special characters, the characters cannot be included in the Offer Title field.
- Version - The Version field is a read-only field that displays the version number of the offer letter.
- Template - The Template field displays the name of the template defined at the requisition level, which is considered the default template. If no template is defined at the requisition level, then you can select a template from the drop-down. This is not a required field. Note: The templates available to select are the templates that have been configured for the Location OU that was selected in the Location field on the Offer Letter status type panel on the Applicant Profile > Statuses tab.
- Edit Template - The Edit Template icon
 appears to the left of the template name in the Template field and only appears for users with the permission to select a different template. Click the Edit Template icon to enable the Replace Template options.
 - View Tags - Click the View Tags link to display the tags that are available for use in an offer letter template. Note: If offer letter custom fields are active and available, then the associated tags display in the View Tags pop-up. All tags for offer letter custom fields begin with OFFER.CUSTOM. The Description column for such fields is blank. When previewing the offer letter, the custom field tags are replaced with the value defined by the recruiter in the Offer Details panel when configuring the offer letter details.
- View PDF - Click the PDF icon
 to preview the letter in Adobe Acrobat®.
If a new template is selected, click . This overwrites the existing offer letter content with the content from the template. Important Note: The existing offer letter content is overwritten with no warning. If you do not want to keep the content from the new template, then click . This closes the Create Offer pop-up and returns you to the Offer Details section. If you entered a title in the Offer Title field, the title is not saved upon clicking .
Click to create the offer letter. This adds the offer letter to the Offer Letter table on the Applicant Profile page. The version number of the offer letter is 1.
Edit Offer Letter Template
For users that have the permission to edit the offer letter content, all content on the offer letter can be edited. The offer letter appears in the Create Offer pop-up in Design mode, which provides formatting options. If tags are used in the template, then the tags appear in the offer letter as tags when in Design mode.
To view a preview of the offer letter, click the button. If tags are used in the template, then the tags in the preview are replaced with the values defined in the Offer Details section.
Once all changes are made, click to create the offer letter. This adds the offer letter to the Offer Letter table on the Applicant Profile page. The version number of the offer letter is 1.