Administrators must create a new custom applicant status to be used for the First Advantage (FADV) background check integration. One custom status will be used for both background checks and drug screenings.
Create Custom Status
To create a custom applicant status:
- Navigate to the Manage Applicant Statuses page.
- Click Create Custom Status. This opens the Create Custom Status pop-up.
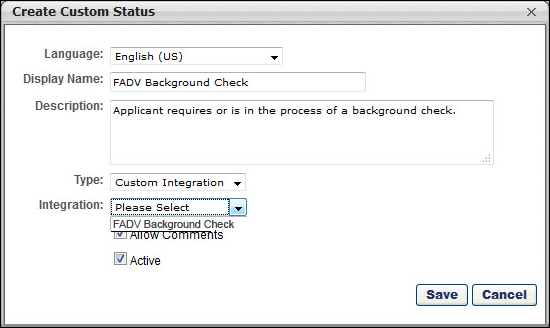
- Complete the following fields in the pop-up:
- Language - If multiple languages are enabled, from the drop-down list select the language in which you are entering the status name and description. To localize the status name and description into other available languages, select the appropriate language from the drop-down list and enter the localized name and description in the appropriate fields.
- Display Name - Enter the status name, which appears throughout the system. The character limit for this field is 50. When the Display Name of an active status is modified after the status is in use or has been used in a job requisition:
- The new display name appears on the Default Status List page.
- The new display name appears in the Status list on the job requisition template.
- Any new job requisitions created after the display name is changed apply the new display name.
- Job requisitions created before the status display name is changed continue to honor the name that existed at the time the requisition was created.
- Description - Enter the status description. This should describe the purpose of the status and what is implied when an applicant is in that status. The character limit for this field is 500.
- Type - Select Custom Integration from the drop-down. Note: This field only displays when creating a custom status at the top level OU. When creating a custom status for a child OU, the Type field displays the type selected for the parent OU but is not editable.
- Integration - Select FADV Background check from the drop-down.
- Allow Comments - If this option is selected, when an applicant profile has this status, comments can be applied and are tagged with this status. If the Allow Comments option is deselected for an active status, the change is applied to any templates implementing the status; new job requisitions created from the template apply the new behavior, but existing job requisitions are unaffected.
- Active - This field is checked by default. Ensure the field is checked before saving the status so that the status is active for the portal.
- Click in the pop-up. This returns you to the Manage Applicant Statuses page.
- Click at the bottom of the Manage Applicant Statuses page to save the custom status to the Division OU. If the custom status is not saved on the Manage Applicant Statuses page, the status will be lost once you leave the page.
The custom applicant status will need to be added to the Status List on the requisition template so that it will be included on the job requisition.
Configure Status as Sensitive
The administrator must configure the FADV custom applicant status as sensitive to restrict access to the status. The status can be designated as sensitive in the following areas of the system:
- Default Status List - If the status is part of the default status list, then check the box in the Sensitive column of the default status list.
- Requisition Template - The status can be designated as sensitive on the General step when configuring job requisition templates. To designate the status as sensitive, check the box in the Sensitive column of the status list in the Status List section.
Note: Only users with permission to view sensitive statuses can view the status in the applicant status workflow.