ILT Scheduling Wizard
Citrix (e.g., GoToMeeting) Events: Creating multiple sessions for a Citrix event creates multiple sessions within Citrix. When modifying session information such as session name, conference call information, etc., changes made within GoToMeeting may not appropriately synchronize with the Cornerstone system. It is a best practice to not make any changes within GoToMeeting to any fields that exist within sessions in the Cornerstone system. This will prevent synchronization issues.
Design Note: An updated interface is available for this page, which can be enabled by administrators in Feature Activation Preferences. With the new design, the functionality of the page is unchanged.
To access the Scheduling Wizard, go to and click the Sessions icon for an ILT event. Click the Create New Session link. Alternatively, you can click the Copy or Edit icon for an existing session, which also opens the Scheduling Wizard.
| PERMISSION NAME | PERMISSION DESCRIPTION | CATEGORY |
| Events Calendar |
Grants access to view Events Calendar page. This permission also makes the Event Calendar button on the Learning Search page visible. This is an end user permission. |
Learning |
| ILT - Batch Create Sessions | Allows the admin to create more than one ILT session at the same time using a session schedule wizard. This is an administrator permission. | Learning - Administration |
| ILT Schedule Part Occurrence | Allows the admin to create more than one ILT session schedule part at the same time using a part occurrence schedule wizard. This is an administrator permission. | Learning - Administration |
| Sessions - Cancel | Grants ability to cancel instructor led training sessions. This permission works in conjunction with Events - View and Sessions - View permissions. This is an administrator permission. | Learning - Administration |
| Sessions - Edit | Grants ability to edit/update existing instructor led training sessions. This permission works in conjunction with Events - View and Sessions - View permissions. Administrators can only edit sessions for which they have the availability to view and edit. When adding users to a session in which the session roster is full, this permission grants the ability to increase the session's available seats. This permission can be constrained by OU, User's OU, Instructor, User as Instructor, Facility, Facilities Owned by User, ILT Provider, User's ILT Provider, User, and User Self and Subordinates. This is an administrator permission. | Learning - Administration |
Create or Edit Session
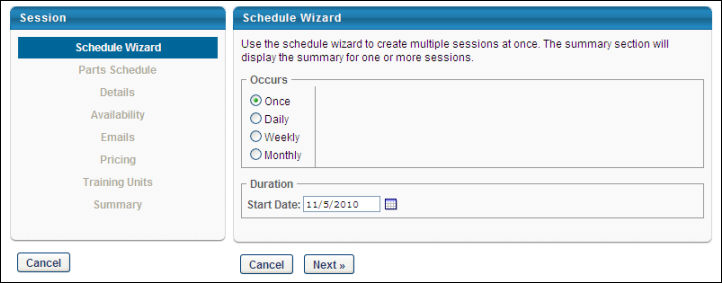
Schedule Wizard
Once you are creating or editing a session, the Scheduling Wizard opens and allows you to configure the following options:
- Occurs - select one of the options:
- Once - Choose this option to schedule a one-time occurring session.
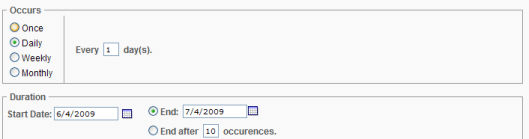
- Daily - Choose this option to schedule daily session. If this option is selected, configure parameters for the daily session:
- Every Day - Enter number in the Every Day field.
- Start Date - Enter a start date.
- End - Enter a specific end date OR move to the next option.
- End After - Enter a number in this field to define how many occurrences the session should end after.
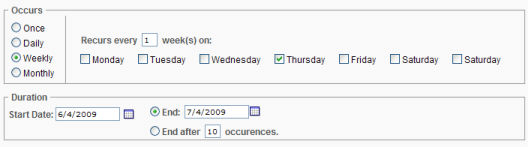
- Weekly - Choose this option to schedule a weekly session.
- Enter a number in the Recurs every week(s) on field.
- Select the day of the week.
- End - Enter a specific end date OR move to the next option.
- End After - Enter a number in this field to define how many occurrences the session should end after.
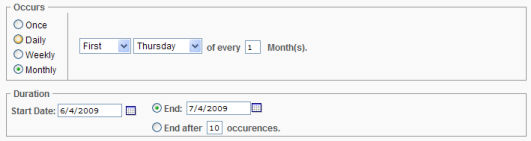
- Monthly - Choose this option to schedule monthly session.
- Select First, Second, Third, Forth or Last option from the drop-down menu.
- Select a day from the drop-down menu.
- Enter a number in the Of Every Month(s) field
- Enter a Start Date.
- End - Enter a specific end date OR move to the next option.
- End After - Enter a number in this field to define how many occurrences the session should end after.
- Click the button.
Parts Schedule
On the Parts Schedule page, configure the session parts. For example, you might create a one-part session that only takes two hours to complete, or you might create a three-part session which requires learners to attend four hours of morning training on Monday, Wednesday, and Friday.
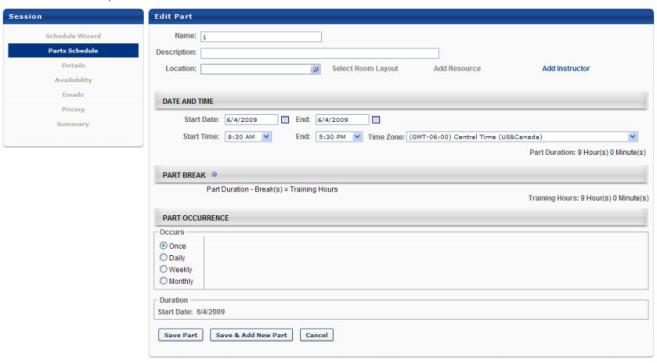
- Name - Enter the name of the first session part, up to 50 characters. This field displays on Training Session Details page from transcript, Training Session Details page from event calendar and Session LO Details page.
- Description - Enter a description of the part session which displays on the user's Session Details page accessed from the Transcript, up to 4000 characters.
- Select Location - if you copied or are modifying a session, click the delete icon to first remove the existing Location and then click the Select Location icon.
- Click the Select Location link.
- Search for a location by name, ID or Owner.
- Add the location by clicking the Add icon next to the location name.
- Check the Confirmation Required option only to require sessions location to be approved by the Facility Owner before the session is Approved. Session status is Tentative and not searchable until Facility Owner confirms. Note: Notes entered for the Facility Owner are viewed when the Facility Owner responds to the request.
- Click . If confirmation is required, location will have checkmark next to it.
- Select Room Layout - Click this field to display available room layouts, if applicable.
- Select room layout by clicking on room layout name.
- Add Resource - Click this option to display available resources, if applicable.
- Click on the applicable resource. Resources are tied to the facility.
- Enter the resource quantity needed in the Quantity field.
- Select whether the quantity is Per Part or Per Student.
- Check the Confirmation Required option to require resource to be approved by the Resource Owner before the session is Approved. Session status is tentative and not searchable until the Resource Owner confirms.
- Click . The resource will be listed on the Session Schedule page with the quantity in parentheses.
- Add Instructor - Click this field o display available instructors for the vendor/provider for this session (Provider/Vendor is set at the event level).
- Search for an instructor by name.
- Select an instructor by clicking on an instructor name.
- Select Primary or Secondary role from the Role drop-down list.
- Select the Confirmation Required option to require request to be approved by the Instructor before the session is Approved. The session status is Tentative and not searchable until the instructor confirms.
- Click .
- Add additional instructors by repeating the above steps.
- If confirmation is required, the instructor will have checkmark next to their name.
- Start Date - Enter a start date with the format MM/DD/YYYY, or click on the calendar icon
 to search for a date.
 - End - Select an end date time from the drop-down list. The start date and end date should be the same unless the sessions go past midnight. Multi-day sessions should be scheduled using Part Break functionality.
- Start Time - Select a start time from the drop-down menu.
- End - Select an end time from the drop-down menu.
- Time Zone - Select a time zone from drop-down menu. By default, the time zone associated with the selected location displays.
- Part Break - Enter a name for the part, up to 50 characters, and a break duration (in minutes).
- To delete a part break, click the Remove link.
- Part Occurrence - Use the scheduling wizard to define a schedule rule, resulting in more than one part being created and copied over a defined date range. Part Occurrence is the scheduling wizard tool. If more than on session is being created, the parts are copied for the batch-created sessions, with cascading dates.
- The default occurrence value is set to Once.
- If the session part should occur more than once, select Daily, Weekly or Monthly. The table will refresh based on which option is selected.
- The duration displays a read-only start date, defined in the Part and Time section.
- Select an End Date or enter a number of occurrences for the session to end after (required field).
- Click or the button to continue. This step validates and checks for errors. If there are errors, you will need to make changes before saving again. Error messages display above the navigation table. The status lights populate with the colors red, green, or yellow, to indicate if each part does or does not have a conflict. You may hover over the status light to see the specific conflict description. Red status lights will prevent from saving the schedule until the error is corrected. Yellow status lights indicate there is a potential conflict, but you will not be prevented from saving the schedule.
Creating More Than One Session
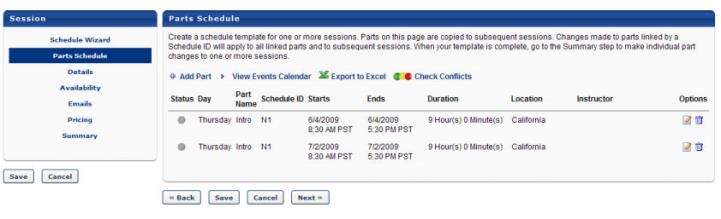
If you are creating more than one session at a time and are using Part Occurrence that the Part Schedule page will act as a template. If more than one session is being created the edit and delete options automatically will edit the series of parts linked by a schedule ID. To use the additional edit and delete options, navigate to the Summary page where the original and subsequent sessions are listed. From here you can edit individual sessions, and those session's parts.
Additional parts can be added or you can edit existing parts. For parts that were created by schedule rule, a Schedule ID is displayed in the column Schedule ID. This system generated number implies that the parts are linked to one another. Until the Session is saved the Schedule ID is N<#>. After the session or sessions are saved the Schedule ID will lose the "n" and be a unique numerical value. Due to the ability to create multiple parts using the schedule wizard, parts can be linked together, and therefore can be batch edited. With the exception of the options Start/End Dates, Start/End Time, and the scheduling wizard (Schedule date rule), all configurable options can be batch edited with three selections:
- Edit
- Edit only this part occurrence
- Edit this part occurrence and the following parts
- Edit the series of parts (all parts sharing the same schedule ID)
- Delete
- Delete only this part occurrence
- Delete this part occurrence and the following parts
- Delete the series of parts (all parts sharing the same schedule ID)
- Add Part - If session duration is more than one day, or separate sessions within the same day are required, add the session parts by clicking the Add Part link. Add multiple parts if session covers multiple days or time periods, or if parts of the session are held at different locations. Repeat the steps for each added part.
- Click the Add Part link.
- Enter Date and Time details.
- Click the button.
- To edit part, click Edit icon or to delete a part, click Delete icon.
- View Events Calendar - Click this option to display the Events Calendar.
- Export to Excel - Click this option to export to excel.
- Check Conflicts - Click this option to check if multiple sessions are being conducted at the same date, time and location. If a prior session has been scheduled at the same time as the prior location, a message will appear and detail the session number that conflicts. This message can be bypassed by clicking the or button.
- Click to save the session or Next to set session details. The session will inherit the availability and the session setting details from the event unless changed.
Details
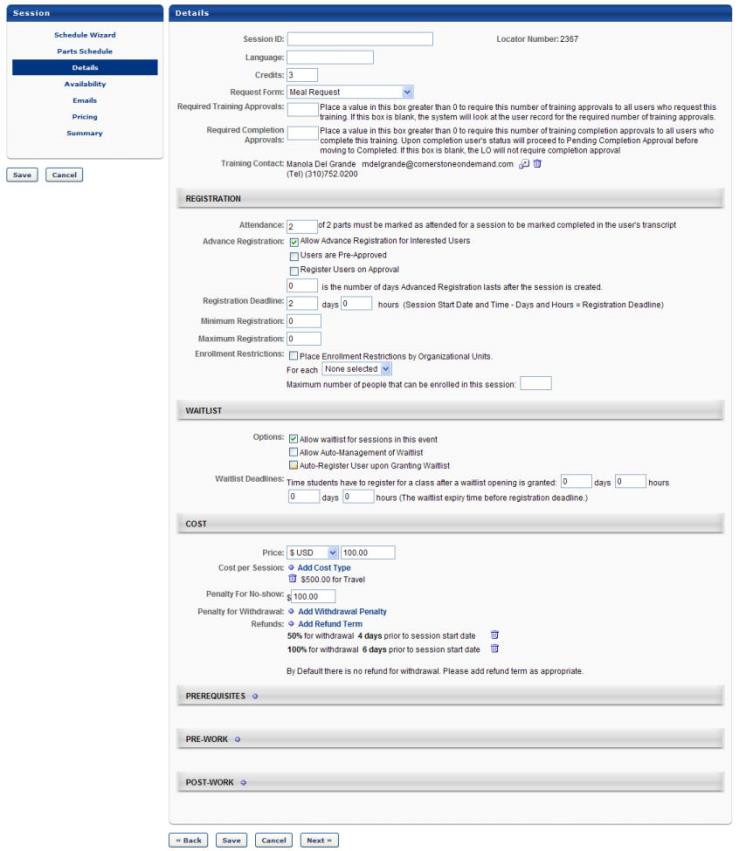
Populate the following fields in the Details section:
- Session ID - Enter a number that will be used to identify the session.
- Locator number - A system-generated number will be automatically populated here, and is used to uniquely identify the session when users search for training.
- Language - Select a language from the drop-down menu, if applicable.
- Request Form - Select a request form from the drop-down menu, if applicable. The user will be able to complete this form at the time they request the session.
- Required Training Approvals - Enter the number of initial approvals this session requires prior to registration. Leaving this blank causes the system to default to the number of Required Training Approvals set in the user's User Record. Setting Required Training Approvals at the LO level overrides the required training approvals in the User Record.
- Required Completion Approvals - Enter the number of completion approvals this training requires in order to be marked complete. If left blank, the training will follow the normal workflow for training completion. If a value is entered (number greater than 0) the training will require Completion Approval for ALL users who complete the training using the normal approval work-flow process.
- Training Contact - Select a training contact for the training.
- Credits per Session - Enter the number of credits received when a user completes the training.
- Attendance - This is the number of parts to be marked attended for a session to be marked complete in user's transcript. Enter a number to indicate how many parts of this session must be attended to show completion for this session.
- Advanced Registration - Select an advanced registration option:
- Allow Advanced Registration for Interested Users - Check this option to create an early registration period only available to users on the interest tracking list.
- Number of days Advanced lasts after session is created - Enter the number of days users will be allowed register in advance. Advanced registration will begin as soon as the session is created.
- Users are Pre-Approved - Check this option to exempt users included in the Advanced Registration process from requiring approval for this session.
- Register Users on Approval - Check this option to automatically register users included in the Advanced Registration, thereby bypassing the register link on the transcript.
- Registration Deadline - Enter the number of days/hours before the session start date, at which point registration ends.
- Minimum Registration - Enter the minimum number of users who must register for the session.
- Maximum Registration - Enter the maximum number of users who can register for the session. Note: When creating a session for a Citrix event, the maximum registration is 25.
- Enrollment Restrictions - Configure enrollment restrictions:
- Place Enrollment Restrictions by Organizational Units - Check this option to limit number of users from each OU (of the selected type) that can register for the event's sessions.
- Select an OU type from drop-down.
- Enter maximum registration value for each OU.
- Waitlists - configure waitlist options:
- Allow waitlists for sessions in this event - Check this option to allow waitlists for the session.
- Users will be added to the waitlist when they register for a session with no seats available.
- Each session has a separate waitlist.
- Allow Auto-Management of Waitlist - Check this option to automatically grant openings to waitlisted users.
- Grant waitlist opening to one user at a time based on priority - Select this option to automatically grant waitlist openings based on the waitlist order.
- Grant opening to all waitlisted users at once for first come first served registration - Select this option to allow all waitlisted users an opportunity to register.
- Auto-Register user upon Granting Waitlist - check to automatically register users thereby allowing them to bypass the transcript for registration. This should be used only if you are granting waitlist openings one at a time.
- Waitlist Deadlines - Configure waitlist deadline options:
- Students have - Enter the number of days and hours a user has to register for the session when waitlist opening is granted. If auto-register is on, this deadline does not apply.
- Waitlist expires - Enter the number of days and hours before the registration deadline that the waitlist expires. When the waitlist expires, all waitlisted users will have the status Waitlist Expired and will receive an email.
- Price Per Session - Enter a price for the session. Each user (or their cost center) will be billed this price upon registration.
- Cost Per Session:
- Click the Add Cost Type link.
- Select a Cost Type from drop-down menu.
- Enter the amount the item costs per session.
- Click the Save icon.
- Repeat the above steps to add other costs to the session.
- Penalty for No-Show - Enter a number to charge users who do not attend any part of a session for which they are registered (without prior withdrawal).
- Penalty for Withdrawal - Configure penalty for withdrawal options:
- Click the Add Withdrawal Penalty link.
- Enter a percent or dollar amount for the penalty for withdrawals from the event's sessions.
- Enter the number of days before the session start date that a penalty to be incurred.
- Click the Save icon.
- Repeat the above steps to add another type of withdrawal penalty.
- Refunds - Configure refund options:
- Click the Add Refund Term link.
- Enter a percent or dollar amount for the refund for withdrawals from the event's sessions. Refunds cannot be greater than the session price.
- Enter the number of days prior to session start date that the refund takes place.
- Click the Save icon.
- Repeat the above steps to add another refund type.
- Prerequisites - Configure prerequisite options:
- Click the Add icon
 .
. - Search for training by keyword by entering a full or partial title or description in the search box.
- Click the button.
- Click the Add icon to add training as a prerequisite.
- Add free form training, if applicable, by entering a title in the Free Form Training search box.
- Click .
- Click .
- Repeat the above steps to add more free form training.
- Select User must complete prerequisite before registering for this session if all prerequisites must be completed before registration is allowed.
- When selected, users who have not completed their prerequisites but attempt to register for this event's session will receive an Exception Requested status until the request is approved. The user cannot register until the exception is granted.
- Select User must register for prerequisites before registering for this session, and must complete prerequisites before the session start dates session if the user must register for the prerequisites before being allowed to register for the event .
- When selected, users who have not completed their prerequisites will have the status of Pending Prerequisite once they register. The user will be automatically withdrawn on the session start date if the prerequisites are not complete.
- Pre-Work:
- Click the Add icon
 .
. - Search for training by keyword.
- Click the button.
- Click the Add icon to add training.
- Add free form training, if applicable, by entering a title in the Free-Form Training text box.
- Click .
- Click .
- Repeat the above steps to add more free form training.
- Check Req. for each training item that is required for the completion of the class.
- If a student does not complete this training, their status will be Incomplete when the session is marked complete.
- Enter number for the training sequence in the Seq. text box for each training item to set a required sequence for the training.
- If there is a required sequence, users will not be able to request training until the training which is before it in the sequence is completed first.
- If no numbers are entered, students may take all the pre-work training in any order or all at once.
- Enter number for display position in the Display Position text box for each training item
- The training items will be displayed in this sequence on the Training Details page
- Post-Work - Configure post-work options:
- Click the Add icon
 .
. - Search for training by keyword by entering full or partial title or description in the search box.
- Click the button.
- Click the Add icon to add training.
- Add free form training, if applicable, by entering a title in the Free Form Training text box.
- Click .
- Click .
- Repeat steps to add more free form training
- Check the Req. checkbox for each training item that is required for the completion of the class.
- If a student does not complete this training, their status will be Incomplete when the session is marked complete
- Enter number for the training sequence in the Seq. text box for each training item to set a required sequence for the training
- If there is a required sequence, users will not be able to request training until the training which is before it in the sequence is completed first.
- If no numbers are entered, students may take all the post-work training at once.
- Enter number for display position in the Display Position text box for each training item. The training items will be displayed in this sequence on the Training Details page
- Click to save the session or Next to set availability. The session will inherit the availability and the session setting details from the event unless changed.

Availability
- Click Availability to specify which users or OUs to whom this session is available.
- Do not allow users to Request this session by Exception Request - Select this option to allow only users who have session available to them to request this session (No exceptions allowed)
- Click the Select Criteria drop-down menu and complete the following steps:
- Click to select a specific OU.
- Click Add to add availability to the OU.
- Click .
- Include Subordinates - Select this box to include the subordinates of the OU selected.
- Pre-Approved - Select this box to bypass the approval process. Upon request, the session will be in an Approved Status.
- Register Upon Approval - Select this box to bypass the Register step for the end user.
- Training Request Form - Select a training request form from the drop-down menu if applicable.
- Create New Group - Select this option to create new group if an existing group does not meet the availability needs.
- Click to save the session or click to configure custom emails for the session.
Emails
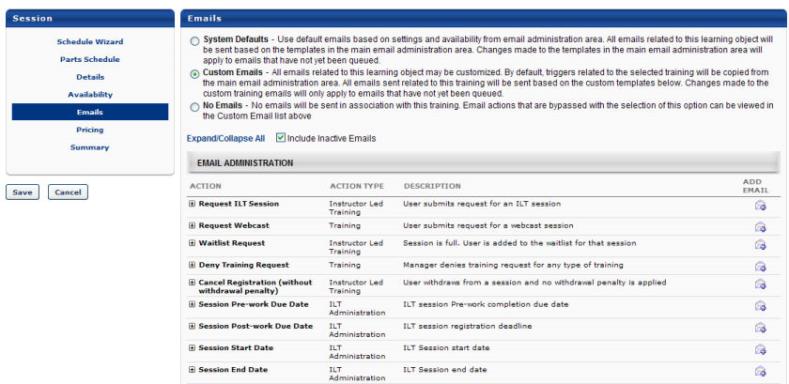
Configure email options for the event:
- System Defaults - By default, all existing and new learning objects will have the System Defaults option selected. If selected:
- All emails related to this learning object (LO) will be sent based on the active email templates in the main email administration area.
- Changes made to the templates in the main email administration area will apply to emails that have not yet been queued.
- Custom Emails - Select the Custom Emails option to customize emails for this LO. By default, triggers related to the selected training will be copied from the main email administration area. All emails related to this training will be sent based on the custom templates configured.
- To see inactive emails, select Include Inactive Emails option.
- If an email trigger is not available in the Custom Emails area, it will still be sent (if configured to do so) from the main Email Administration area.
- Changes made to the custom training emails will only apply to emails that have not yet been queued.
- Both active and inactive templates will be copied down. Only the active email templates will send in relation to this training request.
- The Custom Emails area will not display until this option is selected. These emails may then be edited, added or deleted as desired.
- Future training-related emails will send appropriately based on the settings and templates created within the Custom Emails section.
- No Emails - If this option is selected, no emails will be sent in association with this training. Email actions that are bypassed with the selection of this option can be viewed in the Custom Emails list displayed when the Custom Emails option is selected. This list of emails includes the emails that will not be sent when No Emails is the option selected. Note: There are two types of emails: those triggered by a user's action, and those triggered by an object. It is for this reason that the No Email option does not always mean No Emails will be received by the user.
- Click to save the session or the button to set pricing for the session if applicable.
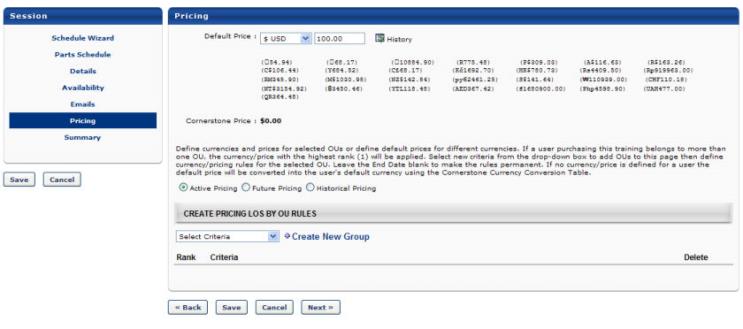
Pricing
- Click the Pricing link to edit the event pricing. See - Course Catalog - Pricing for more information.
- Click to save your configurations or click to continue to Session Summary.
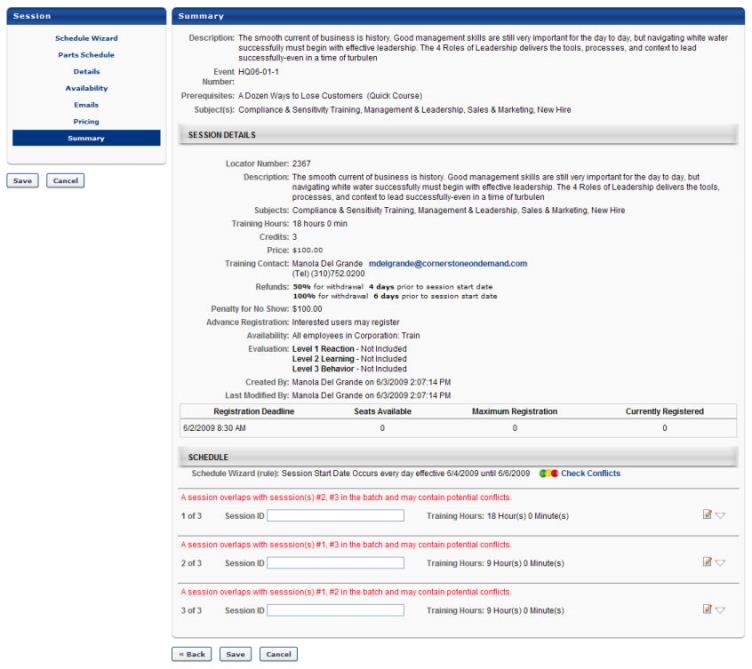
Summary
On the summary page, you can edit an individual session's parts. When more than one session is created, each will have copied parts from the Part Schedule template. When selecting to edit a session, open the associated session list page that looks the same as the Part schedule step. This is where you can make unique changes for one session and not impact other sessions created in the same batch. DO NOT return to the Part Schedule step to make edits as it will overwrite or re-copy any unique changes made on the Summary page.
- Edit
 - Click this option to make individual changes to a session and its parts. You can make changes to individual parts for the sessions that will be created. If those parts have a schedule ID, they will provide the multiple editing and deletion options. The parts with in the sessions will be grouped with independent schedule IDs.
 - Click to complete the creation of the one or more sessions.
Helpful Hints - Processing Time
- Best Practice - It is advised to not create a large batch of sessions which each have many parts. Processing time increases relative to the number of parts created and copied for each session in the batch.
- Example: 100 Sessions, each has 1 part, 100 parts total, conflict check may take up to 15 seconds.
- Example: 20 Sessions in a batch, each having 30 parts, total part = 600, conflict check may take up to 80 seconds.
- Conflict Processing time - The Check Conflict processing time varies across portals, as it is impacted by the total number of sessions and parts that may be stored in the portal's ILT module. Each past session and its parts are checked against other parts already created and stored. A call is made to the database for each item that is checked, such as location, instructor, overlapping dates, and resources. The results displayed above were documented from a portal with a moderate amount of stored data.