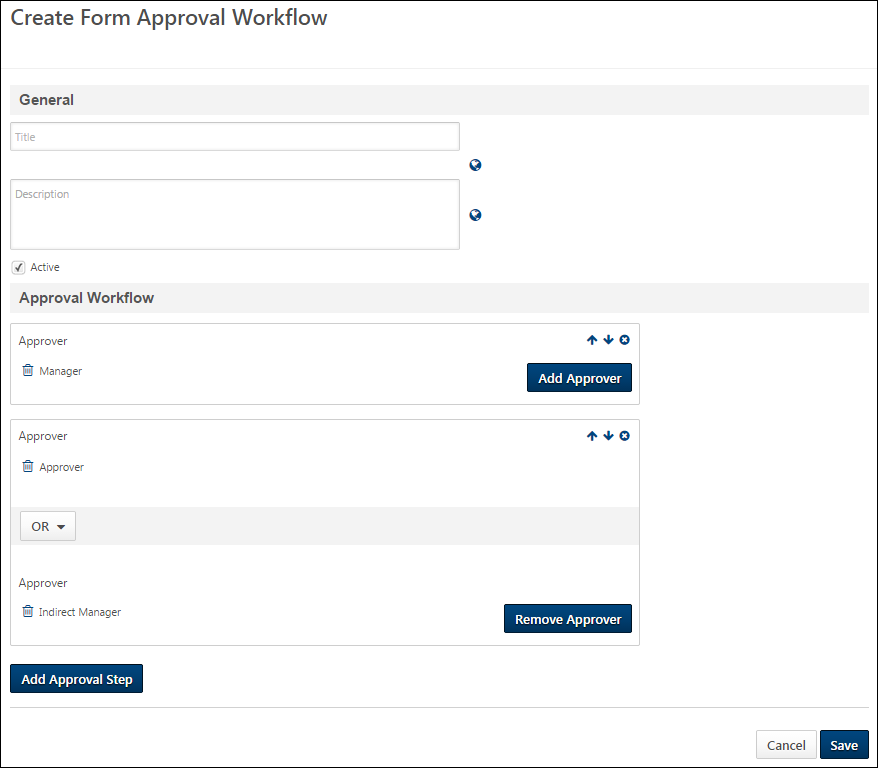
From the Create Form Approval Workflow page, you can build a form approval workflow. This workflow can be used for any form created in Manage Forms, and determines the approval steps required in order for the form to be approved. The approval workflow begins after the form has been submitted by the user and is used to ensure that the user's responses or the requests in the form are considered acceptable to submit.
To access the Create Form Approval Workflow page, go to . Then, select the button.
| PERMISSION NAME | PERMISSION DESCRIPTION | CATEGORY |
Title
Enter a title in the Title field, up to 100 characters. This is a required field. If multiple languages are enabled for your portal, select the Translate icon to translate the field into other available languages.
Description
Enter a description in the Description field, up to 500 characters. This is not a required field. If multiple languages are enabled for your portal, select the Translate icon to translate the field into other available languages.
Active
Check or uncheck the Active box. When checked, the workflow can be selected as the approval workflow on a form. When unchecked, the workflow is considered inactive and cannot be used on a form.
Editing Note: Inactivating a workflow does not impact forms to which the workflow has already been added. However, the workflow will no longer be available to add to forms until the workflow is activated.
Add Approval Step
The approval steps make up the workflow of the approval process. Approval workflows must have at least one step and can have up to five steps. Up to two approvers can be added to each step.
To add an approval step:
- Click the button. This opens the options for adding an approval step and adding approvers to the step.
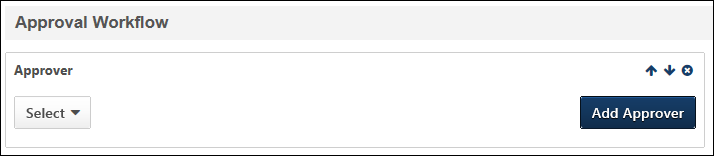
- Click the Select drop-down to choose the approver. You can select from individual users, employee relationships, and organizational units (OUs). At least one approver must be selected. All steps must have at least one approver.
- Users - Click the Users option. Then, click the Select a user icon
 . This opens the Select a user pop-up from which you can search for and select the approver.
 - Employee Relationships - Click the Employee Relationships option. Then, click the Select an employee relation icon . This opens the Select Employee Relationship pop-up from which you can select the relationship from the list. The relationships that display are the standard and custom employee relationships. The user who is defined for the employee relationship is the user who will be the approver. Note: For onboarding users who were external applicants, the employee relationships is the relationship once the user reaches their start date.
- Organizational Units - Click the Select OU Criteria dropdown and select an OU type. Click the search icon which appears beneath the dropdown. This opens the Select window. Search for and select the specific OU or group you wish to add as an approver to the approval workflow step. For example, if you selected Group from the drop-down, you might search for and select the HR group from the Select Group window. Only one group or OU can be selected at a time. Note: The OU or group you wish to use in an approval step must already be created prior to creating the approval workflow.
- Users - Click the Users option. Then, click the Select a user icon
- Click the button to add additional approvers to the step. When a step has more than one approver, decide if only one approver or all approvers must approve the form before the approval workflow can move to the next step.
- Select AND to require that all approvers in the step must approve the form before the approval workflow can move to the next step.
- Select OR to indicate that any of the approvers in the step can approve the form before the approval workflow can move to the next step.
To add approval steps, click the button and repeat the steps above.
Move Step Up/Down
Click the Move Up arrow to move the step up in the workflow.
Click the Move Down arrow to the move the step down in the workflow.
Remove Approver
For steps with multiple approvers, you can remove an approver by clicking the button.
Remove Step
Click the Remove icon ![]() to delete the step from the workflow.
to delete the step from the workflow.
Cancel/Save
Click to cancel creating/editing the workflow.
Click to save the workflow.
Edit Workflow
When editing an approval workflow that has not been used on a form, all fields are editable.
When editing an approval workflow that has been used on a form, only the Active field is editable.