User and OU Loads Deprecation: Ability to perform organizational unit and user data loads using Data Load Wizard was deprecated with and end-of-life in the May '22 Release for most customers. Edge Import replaces this functionality.
- For more information on organizational unit loads deprecation, See Load OU Data Overview.
- For more information on user loads deprecation, See User Data Load Overview.
- For information about Edge Import, See Edge Import Homepage.
| PERMISSION NAME | PERMISSION DESCRIPTION | CATEGORY |
| Data Load Wizard - Set User Password | Enables administrator to set a default password for new users when loading users. This is an administrator permission. | Data Load Wizard |
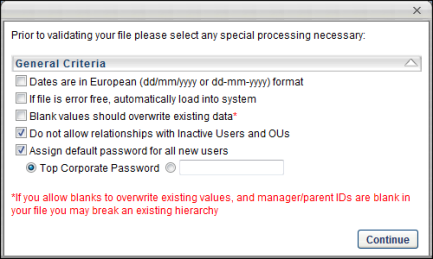
General Criteria
The following General Criteria options are available when loading data:
Dates are in International (dd/mm/yyyy or dd-mm-yyyy) format
Select this option if the dates within the file are in International format. This allows the system to properly read and interpret the date values when loading them into the system. Many date formats are supported in both American and International versions. Consult the Helpful Hints documents for a full list.
If file is error free, automatically load into system
Select this option to automatically load the data into the system if the data within the uploaded file is error free. The data within the file is still validated during the validation step. But, if there are no formatting or system compatibility errors, you will not have the option to perform a final review before the data is loaded.
Blank values should overwrite existing data
Select this option if you want a blank value in the load file to overwrite an existing value within the system. For example, a user record (John Smith) has an email address set in the system (jsmith@email.com), but the email value in the file is blank. If this option is selected, the blank value within the file overwrites the email value set in the system. If this option is not selected, the blank value within the file does not overwrite the email value in the system and John Smith's email address is not affected.
Note: If you select the option to allow blank values to overwrite existing values, and a manager or parent ID is blank within the file, this may cause a hierarchy within the system to break. Also, if the field is a required field, the value cannot be blank within the file.
Do not allow relationships with inactive Users and OUs
Select this option to prevent OUs and users from being associated with inactive OUs or users. This can be used to ensure organizations have a functioning hierarchy between OUs and users. If users and OUs are connected with inactive users or OUs, this may cause breakdowns in system communication such as approvals and reviews.
Assign default password for all new users
Select this option to assign a default password to all new users that are added to the system during the load. If a user is added to the system through an load, a password is not automatically assigned to the user unless this option is selected. Existing users are not affected by this. As a best practice, users should be required to reset their passwords upon initial login through a setting in Password Preferences. Note: This option is only available if you have permission to set user passwords in the Data Load Wizard. This option is selected by default, as it is generally advised for users to have passwords.
- Top Corporate Preference - Select this option to assign new users the default password that is specified in the Password Preferences in the system for the top level Division (Corporation).
- Enter a default temporary password - Select this option to specify a new temporary password for all new users. If this option is selected, you must also enter an appropriate password that will be assigned to all new users that are added during the load. When specifying a default password, be conscious of any password strength requirements that your system may have.
As part of the May '22 Release, customers who have a default password set for the portal cannot provide a custom password for new users created via the Data Load Wizard (DLW). When a default password is enabled for a portal, then this checkbox is selected and disabled, and radio buttons for Top Corporate Password or custom password no longer display for DLW User Loads. Users created via the DLW User Load will have their password set per the default password preferences.
After selecting the appropriate options, click to proceed to the Validate step. See Load OU Data - Step 6 - Validate.