The Custom Compensation Statement page enables administrators to create and edit the content for a statement section. Administrators can also set the conditions that determine the users to which the section displays.
When creating or editing a custom certificate, a Teleric HTML editor is used. For additional information about the editor, visit http://demos.telerik.com/aspnet-ajax/editor/examples/default/defaultcs.aspx.
To create a custom compensation statement, go to . Then, click the Create Custom Compensation Statement link.
| PERMISSION NAME | PERMISSION DESCRIPTION | CATEGORY |
| Compensation Custom Statements | Grants ability to create templates for compensation statements to add to compensation planning tasks. This permission cannot be constrained. This is an administrator permission. | Compensation - Administration |
In the editor, there are two editing modes: Design and HTML. When in Design mode, you can use the standard editing tools to format your text, similar to your word processor application. When in HTML mode, the standard editing tools are disabled and you are able to view and modify the HTML code that is used to design the certificate. To switch between modes, click the appropriate tab in the lower-left corner of the editor. The system only accepts certain customizable HTML elements in the WYSIWYG Editor. Elements that are not acceptable display as text. See Safe Listed Customizable Elements.
When adding an image to a custom statement, the image must be uploaded to the Image Manager in order to appear properly in the statement. However, there are currently no constraints available, so any image that is loaded can be viewed by any user with permission to manage custom compensation statements. To open the Image Manager, click the Image Manager icon ![]() . This opens the Image Manager. Click the Upload button to select the image to upload. The maximum file size is 1,024KB, and the accepted file types are .gif, .xbm, .xpm, .png, .ief, .jpg, .jpe, .jpeg, .tiff, .tif, .rgb, .g3f, .wxd, .pict, .ppm, .pgm, .pbm, .pnm, .bmp, .ras, .pcd, .cgm, .mil, .cal, .fif, .dsf, .cmx, .wi, .dwg, .dxf, .svf.
. This opens the Image Manager. Click the Upload button to select the image to upload. The maximum file size is 1,024KB, and the accepted file types are .gif, .xbm, .xpm, .png, .ief, .jpg, .jpe, .jpeg, .tiff, .tif, .rgb, .g3f, .wxd, .pict, .ppm, .pgm, .pbm, .pnm, .bmp, .ras, .pcd, .cgm, .mil, .cal, .fif, .dsf, .cmx, .wi, .dwg, .dxf, .svf.
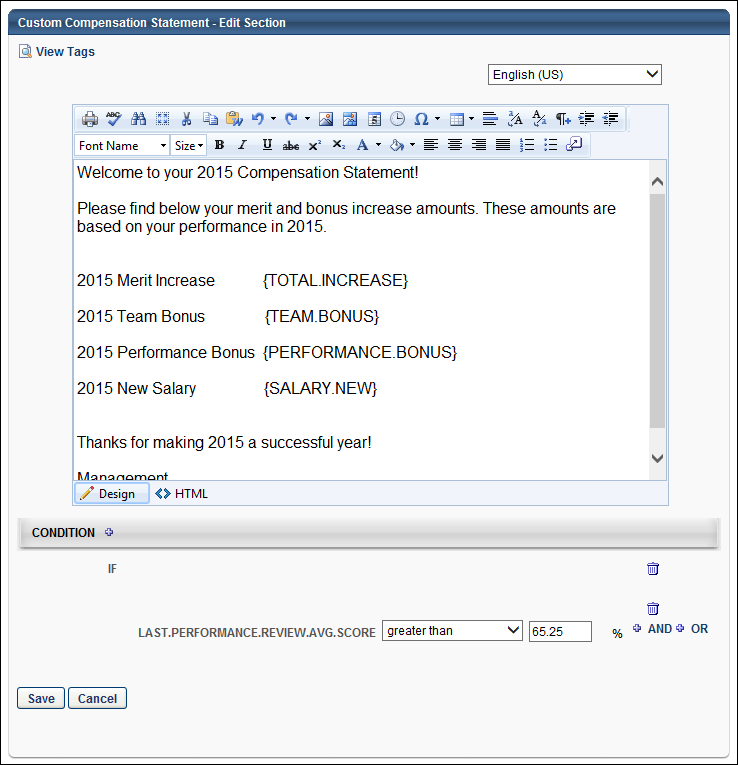
To view the available tags for the statement, click the View Tags link in the upper-left corner. This includes all available User, Compensation, Performance, and Competency standard tags and custom field tags that may exist in your portal. To use one of the tags, can copy and paste the tag into the editor. All custom fields must be referenced in all capital letters. The field name must be placed within curly brackets ("{ }").
As previously stated, in Design mode, the standard editing tools are available to format the text. The final option in the bottom right corner of the editing toolbar is the Import Field option ![]() . Click this option to view and import the available custom fields.
. Click this option to view and import the available custom fields.
Translation
If multiple languages are available for your portal, administrators can translate the custom compensation statement section into the other available languages. To translate the section, from the Language drop-down list in the upper-right corner of the page, select the appropriate language. Then, in the editor window, enter the translated section content. When a user views the statement in that language, they view the section content in the appropriate language.
![]()
Conditions
The conditions for a section determine which users are able to view the section. The custom compensation section is only displayed to the user if the user meets the section's conditions. For example, you can set the condition to: "IF SALARY.CURRENT Greater Than 100,000 AND 2011.PERFORMANCE.REVIEW Greater Than 4.0." This condition indicates that the section is only displayed to users that have a current salary of over $100,000 and their performance review score is over 4.0. You may choose to create a similar section that is displayed to users that do not match this criteria and has the appropriate information for those users.
If no condition is added, then the section is displayed to all users.
To add a condition, click the plus icon ![]() to the right of the Condition heading and select the appropriate metric to use to set the section condition. The administrator can use User, Compensation, Performance, and Competency metrics. Note: Only one IF condition can be added. If you click the plus icon and add a new condition, the previous condition is removed.
to the right of the Condition heading and select the appropriate metric to use to set the section condition. The administrator can use User, Compensation, Performance, and Competency metrics. Note: Only one IF condition can be added. If you click the plus icon and add a new condition, the previous condition is removed.
From the drop-down list, select the appropriate operator for the metric (e.g., Greater Than, Less Than, Equals, Is On, Is After, Contains). Then, in the field, enter the appropriate value for each metric. For example, if the employee must have scored higher than 60% on their performance review to be eligible for a compensation adjustment using this template, then select the appropriate performance review as the metric. Select Greater Than as the operator. In the field, enter 60.
You can also add additional conditions to the statement using AND or OR logic. Adding an AND condition indicates that both conditions must be met to satisfy the criteria. Adding an OR condition indicates that either of the conditions must be met to satisfy the criteria. For example, IF the employee's performance review score is greater than 3/5 OR the employee's competency assessment score is greater than 3/5, then they can view the section. In this example, OR logic is used, so either of the employee's performance review or competency assessment scores must be greater than 3/5 to view the section. If AND logic were used, both of the employee's scores must be greater than 3/5 to view the section. Multiple AND or OR criteria can be added, but they all must use the same logic (all AND criteria or all OR criteria).
When creating a condition using percentages, one to three decimals may be entered in the percentage field, depending on the decimal precision. The decimal precision for percentages in compensation is controlled by a backend setting.
Condition Rules
- Field values are locked for the statement when the task is submitted.
- General compensation, base component, bonus component, and equity component fields used in a condition that are not part of the planning task are treated as zero during the calculation with the exception of CURRENT component fields (e.g., Current Bonus, Current CustomBase).
- If a field is undefined for a user, the clause containing the undefined field is false. However, this does not automatically make the entire IF statement false if there are additional clauses.
- If multiple values exist for a field, the formula retrieves the most recent value within the task's compensation period dates.