Certification - Create - Step 2 - Framework
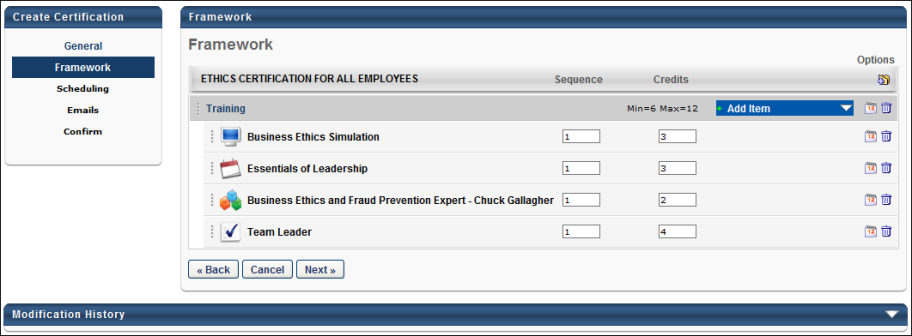
The contents and framework of the certification are defined on the Framework page. On the Framework page, you first add the necessary sections to the certification and then you add the training items to those sections. The sections and the training items can then be reordered as desired. Organizing the certification into sections enables you to establish a layout and sequence for the certification.
Note: After the certification is created and assigned to a user, the certification cannot be modified, including text changes. Please verify all aspects of the certification prior to saving.
To create a certification, go to . Then, click the Create a New Certification link or copy an existing certification by clicking the Copy icon in the Options column.
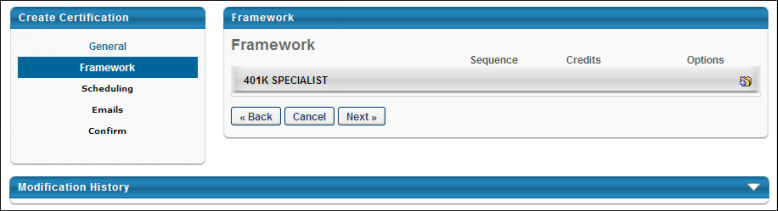
Adding a Section
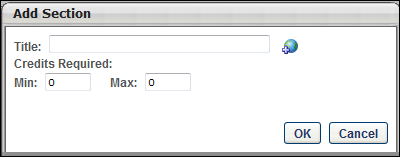
To begin creating the certification framework, you must first add a section by clicking the Add Section icon in the Add column to the right of the certification title. When you click this icon, a pop-up appears where you can enter the following information about the section:
- Title - The section title. For portals with multiple languages enabled, localize the field by using the Translate icon to enter localized text.
- Credits Required - Enter the minimum number of required credits and a maximum number of allowed credits for each section. See Certifications - Parent and Child Section Credits Workflow.
- Min - This is the minimum number of credits that must be completed in order to complete the section. If all items in the section are optional, this can be set to 0. For example, if the minimum is set to 4, users must complete enough training items to receive at least four credits to satisfy the section requirements. Once the minimum is received, the section is considered complete and the credits within the section can be counted towards any parent sections if applicable. Additional credits may be received up to the maximum for the section. This allows administrators to ensure users are completing enough training items within each section.
- Max - This is the maximum number of credits that can be granted within the section. For example, if the maximum is set to 10, users cannot receive more than 10 credits for the section. If they complete training items to accumulate 15 credits for the section, only 10 credits are received for the section. This allows administrators to ensure users are completing a balanced amount of training items within each section. Depending on the administrator settings, users may be able to carry over any overflow credits to subsequent renewal periods. See Certification - Create - Step 3 - Scheduling.
After entering the section information, click . The new section appears within the framework with the appropriate title and credit requirements.

Once a section is added to the certification, you may continue to add any additional sections, or you may begin modifying the section by adding training, modify the validity of the section, or modify the training requirements.
Adding Items to a Section
The following items can be added to a section from the Add Items drop-down:
- Training - Click the Add Training link. This opens the Search for Training pop-up, where you can search for training to add to the certification. The certification items that are available may be limited by the constraints placed on the administrator's permission to manage certifications. After selecting the required items, click . The selected items are added to the section.
- External Training - You can add external training to a section if the option to add external training is enabled. To add external training, select the Add External Training link. This opens the External Training pop-up, where you can enter the details of the training. After entering the training details, click . The external training item is added to the section.
-
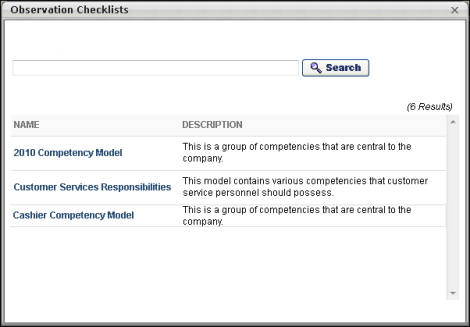
All existing active observation checklists that have a checklist type of Learning Object appear in the pop-up. You can filter the results by entering filter criteria in the Search field and then clicking . Select the checklist from the list. This closes the pop-up and adds the checklist to the section.
Note: Training cannot be added outside of a section. All training items must be added within a section. In addition, an expiration date cannot be configured for checklists inside a certification.
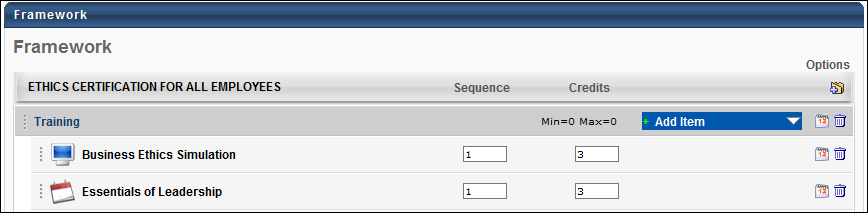
In the Sequence field, enter the sequence number for the item. The sequence number determines the order in which items can be completed. A sequence number of 1 indicates the item must be completed first in the section, and subsequent numbers must be completed in sequential order. If two items have the same sequence number, the two items with the same sequence number can be completed in any order.
In the Credits field next to the training item, enter the number of credits the item is worth towards the certification.
Define Validity for Section or Training Item
The validity period for a training item is the time period during which the training item can be completed and used towards completion of the certification. After the validity period has passed, the training item is expired and no longer counts towards the certification requirement. By default, the item can be counted towards multiple certification periods as long as the item is valid. When defining the validity period, you may choose to set no validity period, in which case the item is always valid during the time the certification is available. You may also set the validity period to a period that is relative to the start or end of the certification period. By default, no validity period is defined for all items.
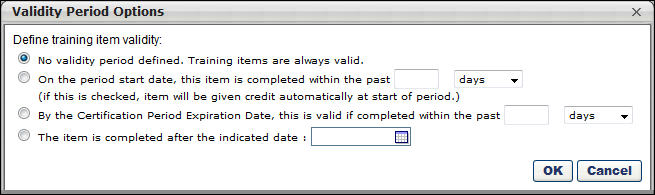
To set the validity period for a section or individual item, click the Calendar icon ![]() . The following validity period options are available:
. The following validity period options are available:
- No validity period defined - This is the default option. The training item is always valid towards the certification. This option is appropriate if the skills and knowledge in the item is not outdated over any renewal periods and do not need to be refreshed. Note: For the item to be used to satisfy requirements for renewal periods, you must also select the Allow training items acquired from previous periods to satisfy requirement if training item is valid option when configuring the training period.
- On the period start date, this item is completed within the past XX days, months, years - When the certification period begins, the system checks if this item is complete. The item must have been completed within the specified amount of time prior to the certification period start date or during the certification period. For example, if this option is selected and set to 2 years, the user must have satisfied the requirement within the previous two years prior to the start of the certification period or during the certification period.
- By the Certification Period end date, this item is valid if completed within the past XX days, months, years - According to the specified time period for this option, prior to the end of the certification period the system checks if this item is complete. If this item is completed outside of the specified period, the user does not receive credit for completing the item. For example, if this option is selected and set to 10 days, the user must satisfy the requirement within 10 days of the end of the certification period. If they completed the item 14 days prior to the end of the period, they receive no credit and they must complete the item again within 10 days of the end of the period.
- The item is completed after the indicated date - If the item was completed after the specified date, the requirement is satisfied.
Note: For a training item to be used towards multiple periods, the option to allow users to use an item towards multiple periods must also be enabled. This option is available while scheduling renewal periods on the Scheduling page. See Certification - Create - Step 3 - Scheduling.
Note: If a user has completed a training item multiple times, each instance of the item can be used to satisfy multiple renewal periods if the item is valid. For example, a user has taken LO1 three times prior to enrolling in the certification, and LO1 is required in the initial certification period and the two subsequent renewal periods. The user receives credit for LO1 for the initial period and the first two renewal periods as long as the item remains valid for those periods.
Edit Section Details
After a section is created, you can edit the section Title and Minimum and Maximum Requirements for the section. To edit the section details, click the section title. This opens a pop-up where the details are editable. For portals with multiple languages enabled, localization of the field is editable by using the Translate icon to edit localized text. After submitting the changes, the section details are updated on the page.
Reordering Sections or Training Items
After adding more than one item to a section or more than one section to a certification, the items can be reordered by dragging and dropping them in to the desired order. Items and sections can also be moved from one section to another via dragging and dropping.
To drag and drop a section or item, click the vertical dotted line to the left of the section title or item icon and drag it into the proper location.
Note: Moving items within a section can be used to rearrange the appearance of the certification, but the sequence is not affected. Moving items to a different section may affect the credit requirements, so be sure to check the accuracy and logic of the item credits and the section credit requirements after moving items. The Users are required to complete the minimum credits for all child sections in order for credits to be counted towards the parent section setting from the General page may also impact how credits are calculated for re-ordered sections.
Removing Sections or Training Items
To remove a section or training item, click the Delete icon next to the appropriate item. Clicking the Delete icon next to a training item removes the training item from the section. Clicking the Delete icon next to a section removes the entire section, including all of the items within it.
Next
After completing all required items in the Framework step, click to proceed to the Scheduling step. Note: You must complete all required items before proceeding to the next step. See Certification - Create - Step 3 - Scheduling.
Modification History
Click the arrow next to the Modification History heading to expand the section and view the modification history for the certification.