The Attachments section is only available for instructor led training (ILT) sessions and it is only available if the user or administrator has permission to view or manage attachments in the transcript. Attachments are displayed in the order in which they were uploaded, with the oldest attachments displayed first.
Click the attachment name to open the attachment.
| PERMISSION NAME | PERMISSION DESCRIPTION | CATEGORY |
| Attachments in Transcript - View | Grants ability to view attachments that have been uploaded for LOs on a user's transcript. This permission can be constrained by OU, User's OU, User Self and Subordinates, User, User's self, User's ILT Provider, ILT Provider, and Instructor. | Learning |
Attachment - Add
The maximum number of attachments that can be added for a single session per attendee is five.
To add an attachment to the Transcript Details page for an ILT session, follow these steps:
- In the Attachments section, click the Add Attachment link. This opens the Upload File pop-up.
- Click the button.
- Browse for and select the appropriate file on your computer. The following file types are accepted: Word, Excel, PowerPoint, pdf, txt, rtf, gif, and jpg.
- Once a file is selected, it is displayed in the Upload File pop-up. Click the button, or click the button to select a different file.
- Once a file is uploaded, it appears in the Attachments section.

Attachment - Edit
If an attachment is added to the Attachments section of the Transcript Details page, the display name can be edited.
To edit the display name for an attachment, follow these steps:
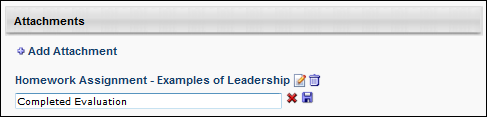
- Next to the appropriate attachment in the Attachments section, click the Edit icon
 . The display name becomes editable.
 - In the Display Name field, modify the display name, as necessary. The character limit for this field is 300.
- After editing the display name, click the Save icon
 to save the changes, or click the Cancel icon
  to discard the changes.
Attachment - Remove
To remove an attachment, next to the appropriate attachment in the Attachments section, click the Remove icon ![]() .
.