Talent Pool - View
Use the talent pool page to view the candidates in the talent pool and perform actions for the candidates, such as adding them to a job requisition. You can also view their status in the talent pool and create and manage nomination lists.
Users must have permission to manage talent pools in order to view the Manage Talent Pools page and have access to the features and functionality for talent pools. For portals with Recruiting and Succession, recruiters and hiring managers must have permission to manage talent pools in order to access and manage the Manage Talent Pools page.
| PERMISSION NAME | PERMISSION DESCRIPTION | CATEGORY |
| Talent Pools - Manage | Grants ability to create and manage Talent Pools. This permission also grants access the ability to add candidates to a job requisition. This permission can be constrained by OU and User's OU. This is an administrator permission. | Talent/Succession - Administration |
Add Candidate
The button allows you to add internal candidates to the talent pool. Note: External candidates can be added to a talent pool via Candidate Search Query or from the Manage Applicants page.
To add candidates:
- Click the button. This opens the Add Candidate pop-up.
- Search for candidates using the search option.
- Select candidates from the Available Users table.
- Click . This adds the candidates to the talent pool. The status of the candidates is New Candidate.
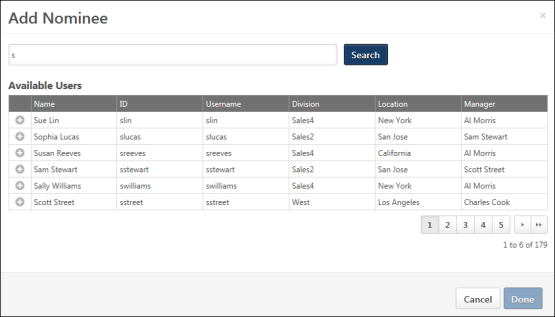
Add Nominee
The button allows you to add nominees to the nomination list. Nomination lists allow you to categorize candidates by a certain qualification or skill. When nominees are added to a nomination list but are not currently in the talent pool, they are only added to the nomination list and are not also added to the talent pool.
The button only displays if the talent pool is filtered by a nomination list. Filtering by a nomination list changes the name of the button to .
To add a nominee to the nomination list:
- Click the button. This opens the Add Nominee pop-up.
- Search for candidates using the search option.
- Select candidates from the Available Users table.
- Click . This adds the candidates to the nomination list. The status of the candidates changes to Nominated.
Options
The following options are available in the Options drop-down:
- Edit Name - Click Edit Name to change the name of the talent pool. This opens the Edit Name pop-up. Enter the changes into the text field, and then click . This saves the changes to the name.
Filters
The following filters are available:
- Nomination List Status - Select a nomination list status to filter the candidates by their status in the nomination list. The page is updated to show only the candidates who are in the selected nomination list status. The filter is disabled if a nomination list has not yet been created. When filtered by a nomination list, only the Assign Dev Plan, Create Group/Add to Group, and Remove options are available in the Actions column.
- Succession Metrics - Select a succession metric to filter the candidates by a specific metric. The metrics that display are the metrics that are available to the user.
- Metric Rating - Once the metric is selected, you can also filter by the metric rating. Select the rating from the drop-down to the right of the metric. The All option is selected by default. Only active metric ratings display in the filter. If a candidate does not have a rating but meets the metric criteria, then the candidate will display in the list.
Once the filters are defined, click . This updates the table to display the candidates that match the criteria.
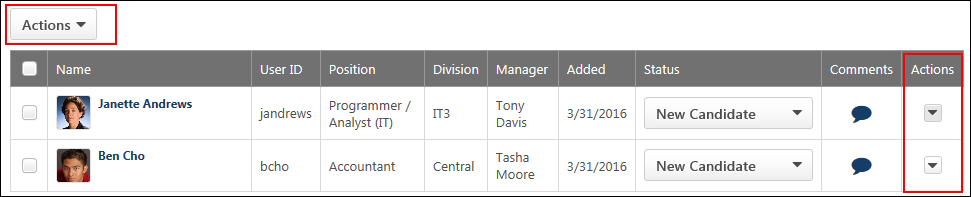
Actions
The drop-down allows you to apply actions to candidates, such as adding to groups and adding to a requisition. You can perform bulk actions by using the Actions drop-down above the candidates table. Or, you can perform actions on individual candidates from the drop-down in the Actions column in the table.
Note: The Assign Dev Plan action is only available for portals with Succession. The Add to Requisition action is only available for portals with Recruiting.
Note: The Create Group option displays if there a group has not yet been created for the talent pool. Once a group has been created, the Create Group option is replaced by the Add to Group option.
The Nominate action allows you to add candidates to an existing nomination list. Or, you can create a new nomination list to which to add the selected candidates.
To add candidates to a nomination list:
- Select one or more candidates.
- Click the Nominate option from the drop-down. This opens the Nominate Candidate pop-up.

- Create a new nomination list by entering a name for the list in the Create List field, up to 50 characters.
- Or, select the Add to existing list option to add the candidates to an existing list. Then, select the list from the drop-down.
- Click . This saves the new list and adds the candidates to the list. Or, this saves the candidates to the existing list.
Once a nomination list is created, the list cannot be deleted.
The Assign Dev Plan option allows you to assign a development plan to candidates in the talent pool to help candidates move to next level positions in the organization. This option is only available for portals that also have Succession.
To assign a development plan:
- Select one or more candidates.
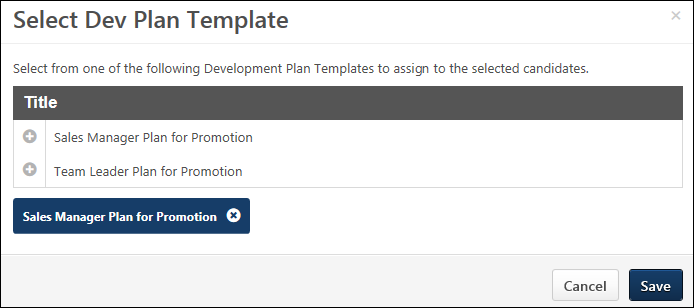
- Click the Assign Dev Plan option from the drop-down. This opens the Select Dev Plan Template pop-up.
- Click the plus icon to the left of the development plan to select the plan. Only one plan can be selected.
- Click . This adds the development for the candidates. The candidates' status in the talent pool changes to In Development.
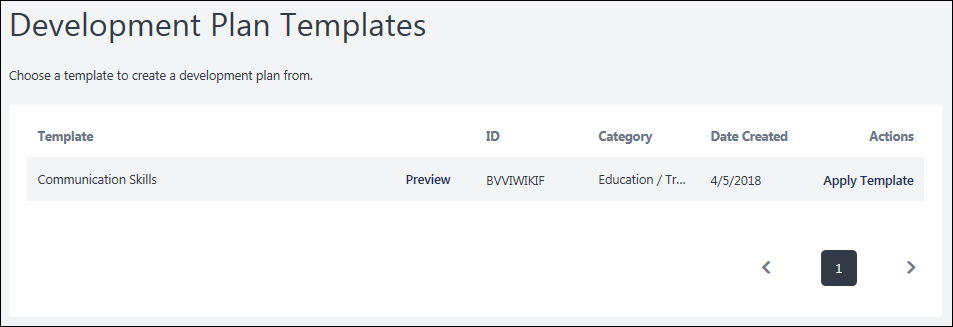
For portals using the redesigned development plans functionality, the workflow for assigning a dev plan is enhanced. A Preview option is available in the Development Plan Templates pop-up so that the manager can preview the development plan template prior to assigning it to ensure that the correct template is selected.
In addition, the system confirms that all of the selected users are within the manager's permission to create and assign a development plan, and all of the selected users are automatically added to the Assignment section of the development plan. If a manager does not have permission to create a development plan for a particular user, the Assign Development Plan option does not appear in the drop-down menu for that user.
You can add candidates to a Group organizational unit (OU) so that other actions within the system can be applied to the OU.
Create Group
The Create Group option displays if at least one group has not yet been created in Manage Talent Pools. Only one Group OU can be created at the talent pool level, and only one Group OU can be created per nomination list. For example, if a talent pool has two nomination lists, then up to three groups can be created. One group can be created for the talent pool and one can be created for each nomination list.
To create a group and add candidates to the group:
- Select one or more candidates.
- Click Create Group in the drop-down above the candidates table or the actions drop-down to the right of the candidate in the candidates table. This opens the Add to Group pop-up.
- Enter the group name in the Group Name field, up to 50 characters.
- Click . This creates the group and adds the selected candidates to the group.
Add to Group
The Add to Group option displays if at least one group has been created in Manage Talent Pools. To add candidates to an existing group:
- Select one or more candidates.
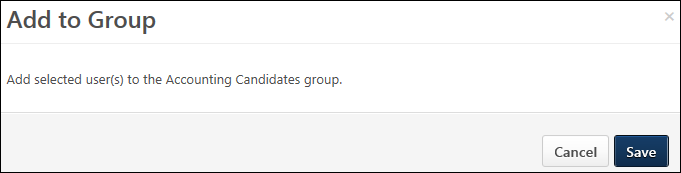
- Click Add to Group in the drop-down above the candidates table or the actions drop-down to the right of the candidate in the candidates table. This opens the Add to Group pop-up. When at least one group already exists for the talent pool, you cannot create another group. The pop-up displays the name of the group to which you can add the candidates.
- Click to add the candidates to the group.
Note: The Add to Group option is hidden if a Group OU that was previously created for the talent pool or nomination list is inactive.
The Add to Requisition option allows you to add candidates to a job requisition. This option is only available for portals that also have Recruiting.
To add candidates to a requisition:
- Select one or more candidates.
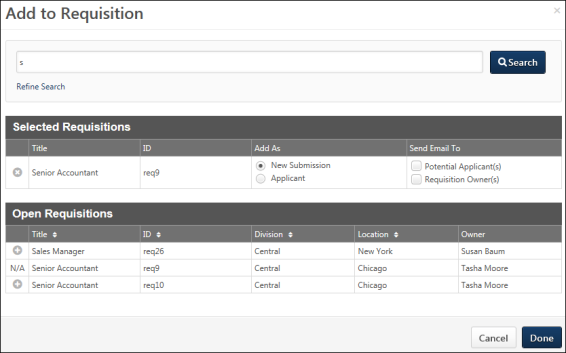
- Click Add to Requisition from the drop-down. This opens the Add to Requisition pop-up.
- Search for and select the job requisition to which to add the candidates.
- Once the job requisition is selected, configure the following options for adding the candidates:
- Add As - In the Add As column, select the New Submission option to add the submission directly into a New Submission status for the requisition. Select the Applicant option to add the submission directly to the Manage Candidates and Manage Applicants pages for the requisition. If the Applicant option is selected, the applicant's status will be the first status in the status workflow for the requisition, and the date in the Current Status column is the date on which the applicant was manually added to the requisition. Note: If the Skip New Submission Status option is enabled by the administrator in Requisition and Applicant Preferences, then the option to add an applicant as a new submission does not display for the Add to Requisition and Move to Requisition action items. The New Submission option in the Add to Requisition pop-up is hidden. The Applicant option is then selected by default.
- Send Email To - In the Send Email To column, check the box to send an email to the requisition owner and/or the potential applicant, notifying them that the applicant has been added to the requisition. Both boxes are unchecked by default. Note: If the new requisition requires applicants to complete certain steps prior to submitting their application, the email can be configured in Email Management to include a link for the applicant to apply directly to the requisition. Further, the application materials for the new job are pre-populated with the applicant's existing information.
The Delete action allows the talent pool creator or a candidate with whom the talent pool was shared to remove a candidate from the talent pool. To delete a candidate:
- Click Delete from the Actions drop-down. This opens the Remove User/Candidate pop-up.
- Click to remove the candidate. This removes the candidate from the talent pool.
- Click to close the pop-up without deleting the candidate.
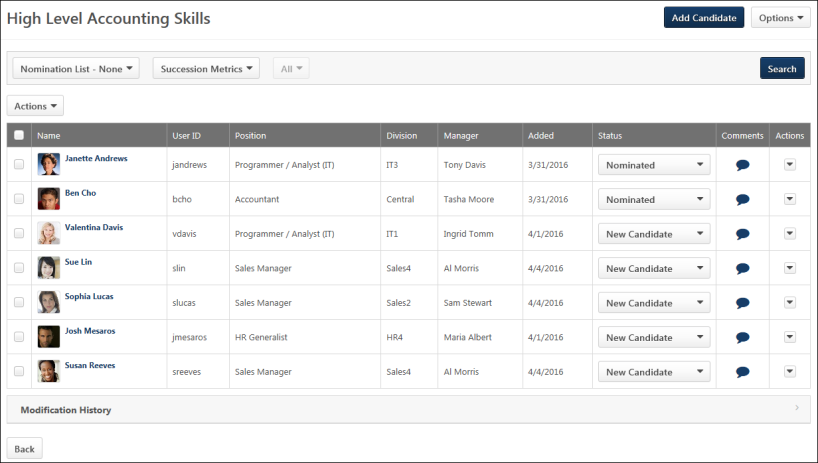
Candidates Table
The candidates table lists all users who are in the talent pool. You can perform actions on an individual user and also change the user's status in the talent pool. You can also access the user's Universal Profile > Bio page.
Select All Checkbox
Select the checkbox in the header row to perform bulk actions from the Actions drop-down on all of the selected candidates.
Select Individual User
Select the checkbox to the left of each candidate's name to perform actions from the Actions drop-down
Table
The following information displays in the table:
- Photo - The candidate's photo displays, if available.
- Name - This column displays the candidate's name as a link. For internal user, clicking the name opens their Universal Profile > Bio page or My Team page. For portals with Recruiting, clicking the name of an external candidate opens their Applicant Profile page.
- User ID - This column displays the candidate's user ID.
- Position - This column displays the candidate's current Position organizational unit (OU). If there is no value available, then "N/A" displays.
- Division - For internal candidates, this column displays their current Division OU. For external candidates, this column displays "External."
- Manager - This column displays the name of the candidate's manager. If there is no value available, then "N/A" displays.
- Added - This column displays the candidate's date on which the candidate was added to the talent pool.
- [Metric Filter] - The name of this column is the name of the metric selected in the metric filter. The column displays the rating for the metric. If a candidate has no rating for the metric, then the column displays "N/A."
- Status - This column displays the candidate's status in the talent pool. You can manually change the status by selecting a status from the drop-down, which helps you to better manage the candidate's lifecycle in the talent pool. The following statuses display:
- New Candidate - This status is assigned automatically when a candidate is added to the talent pool. indicates that the candidate has been added to the talent pool.
- In Development - This status is assigned automatically when a development plan is added for the candidate.
- Nominated - This status is assigned automatically when a candidate is added to a nomination list.
- Placed - This status is assigned manually and indicates that a candidate has been promoted or placed in a position.
Note: Changing a candidate's status when viewing the candidate in a nomination list does not change their status in the main talent pool.
- Comments - The Comments option allows you to add a comment about the candidate, as well as view the comments that others have added. Click the icon
 to open the Comments pop-up. Enter a comment in the text box. Only one comment can be added per user, up to 3000 characters. If comments have been added by other users, then the comments display below the text box. Any comments you enter can be viewed by the users with whom the talent pool is shared. You can edit your own comment by opening the Comments pop-up and changing the comment in the text box. To delete your comment, you can remove all text in the text box and click .
 - Actions - This column displays the actions that can be performed for the individual candidate. To perform an action, it is not necessary to check the box in the far left column of the table. The following actions are available from the drop-down:
- Nominate - See the Nominate section above for more information.Note: This option is not available when the table is filtered by a nomination list.
- Assign Dev Plan - See the Assign Dev Plan section above for more information.
- Create Group/Add to Group - See the Create Group/Add to Group section above for more information.
- Add to Requisition - See the Add to Requisition section above for more information.
- Remove - See the Delete section above for more information.
Modification History
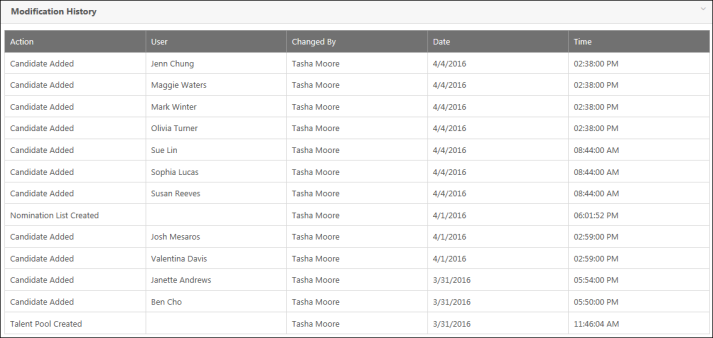
The Modification History section displays the changes made to the talent pool or the nomination list. The section is collapsed by default.
The changes that display are based on the user's availability. If a user is not able to view a specific candidate due to permission constraints, then the change associated with the candidate does not display in the modification history.
The following changes display in the Modification History section:
- Talent Pool Created
- Nomination List Created
- Candidate Added to Talent Pool
- Candidate Added to Nomination List
- Candidate Removed from Talent Pool
- Candidate Removed from Nomination List