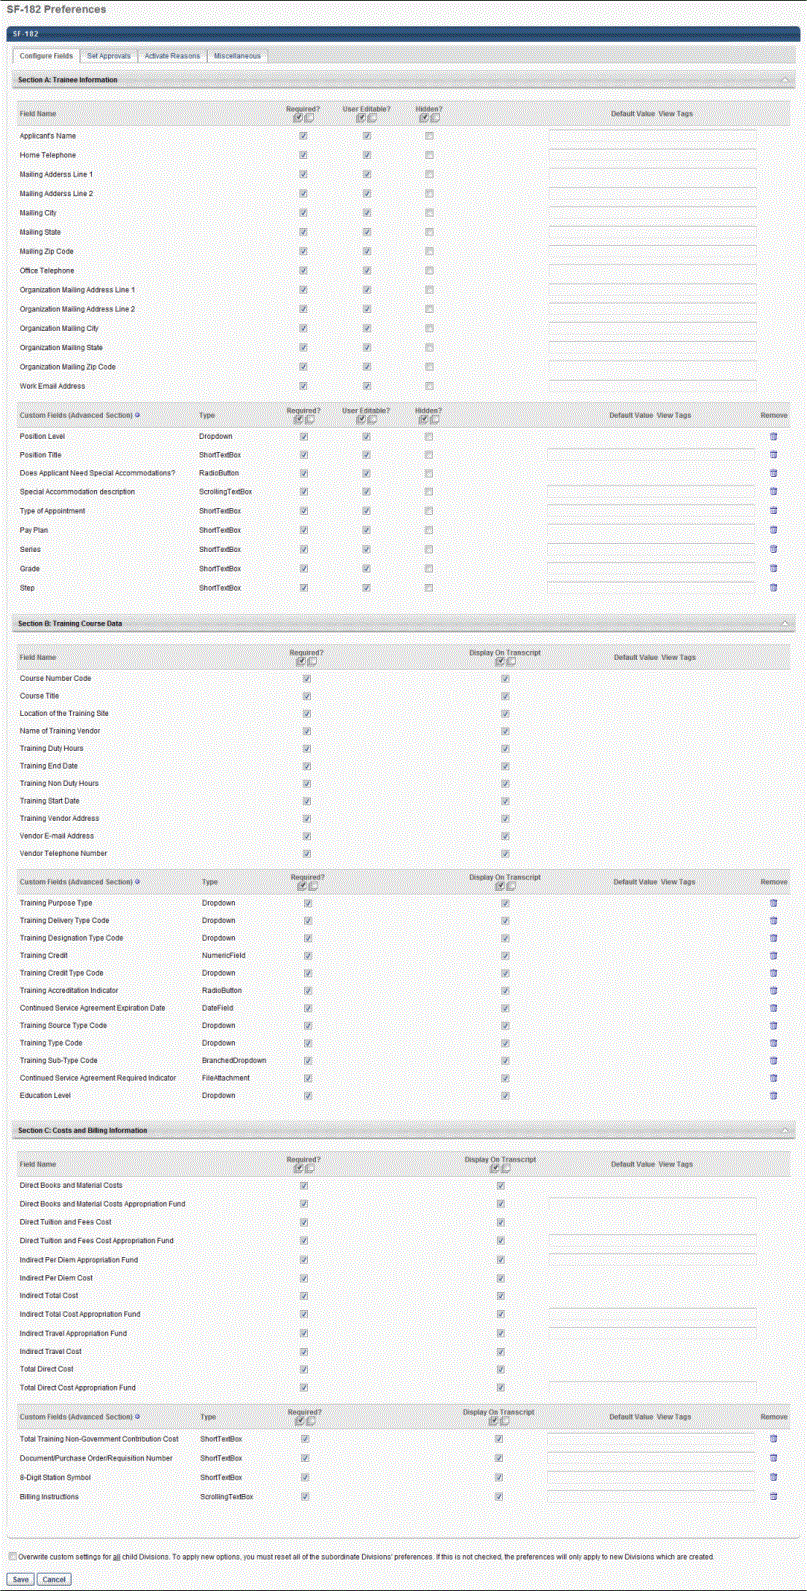
The Configure Fields tab enables administrators to define preferences for the sections on the SF-182 request form. The tab is separated into the following sections:
- Section A: Trainee Information
- Section B: Training Course Data
- Section C: Costs and Billing Information
Within each section, custom fields can also be configured. You can reorder the fields in the Custom Fields panels by clicking and dragging the field to the desired location. The fields can only be reordered within their respective Custom Fields panels.
Sections A, B, and C
The fields that appear in each section are configured by default and cannot be removed. However, some fields can be hidden so that they do not appear on the SF-182 request form. You can determine whether or not to set fields as required and allow users to edit the field. You can also define a default value for the field. Note: The default value for some custom fields can only be defined in the SF-182 area of Custom Field Administration.
- Field Name - This is the name of the SF-182 request form field.
- Required - This option enables you to set certain fields as required. Required fields must be completed on the SF-182 request form before the form can be submitted.
All fields are required by default. To deselect all fields as required, check the Deselect All option (the blank checkbox to the right of the Select All box).
Or, you can set individual fields as required or not required by checking or unchecking the Select box in the Required column for the desired fields.
- User Editable - This option enables you to allow users to edit the field's value on the form. Non-editable fields display on the form as read-only. This option is only available in Section A. Note: If a default value is not set for the field and you mark the field as not editable, users will not be able to enter a value in the field and the field will be blank on the request form.
All fields are editable by default. To deselect all fields as editable, check the Deselect All option (the blank checkbox to the right of the Select All box).
Or, you can set individual fields as editable or not editable by checking or unchecking the Select box in the User Editable column for the desired fields.
- Hidden - This option enables you to hide certain or all fields in the section. Hidden fields do not appear on the SF-182 request form. This option is only available in Section A.
All fields are visible by default. Check the Select All box in the header row to set all fields in the section as hidden. Check the Deselect All option (the blank checkbox to the right of the Select All box) to deselect all fields as hidden.
Or, set individual fields as hidden or visible by checking or unchecking the Select box in the Hidden column for the desired fields.
The settings in the Hidden column affect the settings in the Required and User Editable columns. The settings are affected as follows:
- If a field is hidden, then the settings in the Required and User Editable columns are deselected and no longer selectable. The Hidden option must be deselected to make the Required and User Editable options selectable.
- If all fields are hidden, then all fields in the Required and User Editable column are deselected and disabled. You must deselect all the fields one by one or click the Deselect All option in the Hidden column to enable the Required and User Editable options.
Note: While hidden fields do not appear while completing an SF-182 request form, they do appear on the printable version of the form. If a default value is set for the field, the value appears on the printable version even if the field is set to Hidden in SF-182 Preferences.
- Display on Transcript - This option enables you to define which fields appear on the Training Details page of the user's transcript. This option is only available in Sections B and C.
All fields are visible on the Training Details page by default. To deselect all fields as visible, check the Deselect All option (the blank checkbox to the right of the Select All box).
Or, set the visibility of individual fields by checking or unchecking the Select box next to the desired fields.
- Default Value View Tags - This option enables you to define the default value that appears for the field on the SF-182 request form. The default value is entered in the form of a tag. All fields are blank by default. When users create a request, the fields are pre-populated with the default values. Note: Fields that are configured to be hidden can still have a default value set.
The default values in Section A apply to administrators and managers when creating an SF-182 request on behalf of a user. For sections B and C, the default values are applied based on the administrator's divisional preferences. The values in Step 3 or Section A are applied based on the user's divisional preferences.
To enter a tag:
- Click the View Tags link in the column name. This opens the List of Email Tags pop-up.
- Copy the tag from the Tag Name column. The tag must be copied exactly, with no spaces before or after the tag name.
- Paste the tag into the Default Value field. Note: You can also type the tag name directly into the field.
On the request form, if a value is not available to replace the tag, then the field is blank.
Custom Fields (Advanced Section)
The custom fields that appear on the Configure Fields tab are system-defined and available by default. Additional custom fields can be added to a section if they are configured in Custom Field Administration and active for the specific section to which you would like it added.
Note: When a custom field is added and saved in SF-182 Preferences for any division for which the field is configured, the field can no longer be deleted in Custom Field Administration.
To add custom fields:
- Click the Add icon
 in the Custom Fields panel header. This opens the Select Custom Field pop-up.
 - Select the Add icon to the left of the field name. This closes the pop-up and adds the field to the list.
Note: If you select a custom field that has already been added to the section, an error message appears indicating that the field is already in the section.
- Custom Field Name - The name of the custom field.
- Type - The type of custom field. For example, the field type may be a drop-down, numeric field, or radio button.
- Required - This option enables you to set certain or all custom fields as required to be completed. Required fields must be completed on the SF-182 request form before the form can be submitted.
All fields are required by default. To deselect all fields as required, check the Deselect All option (the blank checkbox to the right of the Select All box).
Or, you can set individual fields as required or not required by checking or unchecking the Select box in the Required column for the desired fields.
- User Editable - This option enables you to allow users to edit the field's default value, provided a default value is available and configured in the Default Value View Tags column. Non-editable fields display on the form as read-only. This option is only available in Section A.
All fields are editable by default. To deselect all fields as editable, check the Deselect All option (the blank checkbox to the right of the Select All box).
Or, you can set individual fields as editable or not editable by checking or unchecking the Select box in the User Editable column for the desired fields.
- Hidden - This option enables you to hide certain or all custom fields. Hidden fields do not appear on the SF-182 request form. This option is only available in Section A.
All fields are visible by default. Check the Select All box in the header row to set all fields in the section as hidden. Check the Deselect All option (the blank checkbox to the right of the Select All box) to deselect all fields as hidden.
Or, set individual fields as hidden or visible by checking or unchecking the Select box in the Hidden column for the desired fields.
The settings in the Hidden column affect the settings in the Required and User Editable columns. The settings are affected as follows:
- If a field is hidden, then the settings in the Required and User Editable columns are deselected and no longer selectable. The Hidden option must be deselected to make the Required and User Editable options selectable.
- If all fields are hidden, then all fields in the Required and User Editable column are deselected and disabled. You must deselect all the fields individually or click the Deselect All option in the Hidden column to enable the Required and User Editable options.
Note: While hidden fields do not appear while completing an SF-182 request form, they do appear on the printable version of the form. If a default value is set for the field, the value appears on the printable version even if the field is set to Hidden in SF-182 Preferences.
- Display on Transcript - This option enables you to define which fields appear on the Training Details page of the user's transcript. This option is only available in Sections B and C.
All fields are visible on the Training Details page by default. To deselect all fields as visible, check the Deselect All option (the blank checkbox to the right of the Select All box).
Or, set the visibility of individual fields by checking or unchecking the Select box next to the desired fields.
- Default Value View Tags - This option enables you to define the default value that appears for the field on the SF-182 request form. The default value is entered in the form of a tag. All fields are blank by default. When users create a request, the fields are pre-populated with the default values. Note: Fields that are configured to behidden can still have a default value set.
The default values in Section A apply to administrators and managers when creating an SF-182 request on behalf of a user. For sections B and C, the default values are applied based on the administrator's divisional preferences. The values in Step 3 or Section A are applied based on the user's divisional preferences.
All fields in the column are blank by default. The value you enter is a user record custom field tag.
To enter a tag:
- Click the View Tags link. This opens the List of Email Tags pop-up.
- Copy the tag from the Tag Name column. The tag must be copied exactly, with no spaces before or after the tag name.
- Paste the tag into the Default Value field. Note: You can also type the tag name directly into the field.
On the request form, if a value is not available to replace the tag, then the field is blank.
Note: For some custom fields, a default value cannot be set in SF-182 Preferences. In this case, you can set the default value in Custom Field Administration.
- Remove - Click the Trash Can icon to remove the field from the form.
Overwrite Settings
Select this option to overwrite custom settings for child division OUs. If you overwrite custom settings for child division OUs, the selected settings are applied to both new and existing child OUs. Any previously customized child OUs are updated with the selected settings.
- If there are no customizations to the child OU, then the parent OU customizations are applied to all child OUs.
- Overwrite custom settings checkbox setting
- If this option is selected, all child OU customizations are deleted from the database, which means the parent OU customizations will be applied to new and existing child OUs.
- If this option is unselected, all existing child OU customizations will remain unchanged, and any new child OUs will inherit the parent OU customizations by default.
- If a child OU has been customized to display any widgets, then regardless of the parent OU customizations, the child OU customizations are applied.
- If a child OU has been customized to hide all widgets, then parent OU customizations will take precedence and will be applied.
Save
Once all preferences are set, click . Preference settings are not saved unless you click . This returns you to the Preferences page.
Or, to set preferences for another SF-182 Preferences tab before saving, click the tab name and configure the preferences. Then, click .