Administrators can add and edit SF-182 custom fields on the Define Field page.
Note: For default SF-182 custom fields, only the Name, Email Tag, SF-182 Section, and Active fields can be edited. The field type cannot be modified.
Note: There is no Availability option for default or new custom fields.
To create a custom field, go to . Then select the appropriate tab from the left-side panel. On the SF-182 Custom Fields page, click the Add Field icon ![]() .
.
| PERMISSION NAME | PERMISSION DESCRIPTION | CATEGORY |
| SF-182 Custom Fields - Manage | Grants ability to manage SF-182 Fields (Governmental clients). This is an administrator permission. | Limited Use/Obsolete |
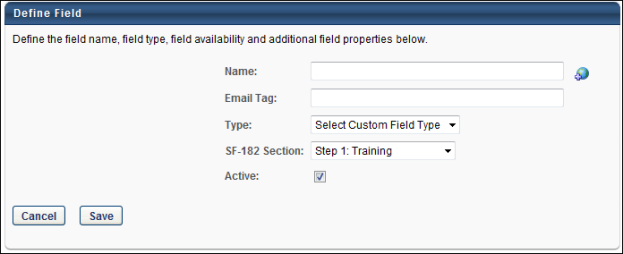
Add SF-182 Custom Field
To add a new custom field:
- Enter a name, up to 100 characters.
- Enter the email tag that will be associated with the field. The tag will also be used to retrieve the value of this field in email communications.
As a best practice, create the tag in all capital letters. All email tags for custom fields are prefaced with the word CUSTOM. For example, a custom field named Response Required could have an email tag named RESPONSE.REQUIRED. The system converts the name to CUSTOM.RESPONSE.REQUIRED.
- Select a field type from the Type drop-down.
- Select the step in the SF-182 Section drop-down to which the field will be associated on the request form. The value selected also determines the section in which the field appears on the Configure Fields tab of SF-182 Preferences.
- Leave the Active box checked to activate the field. Uncheck the box to inactivate the field.
- Click .
The field is added to the Fields table on the SF-182 Custom Fields page. If the field is inactive, then it can only be viewed on the SF-182 Custom Fields page by selecting the Include Inactive option and clicking .
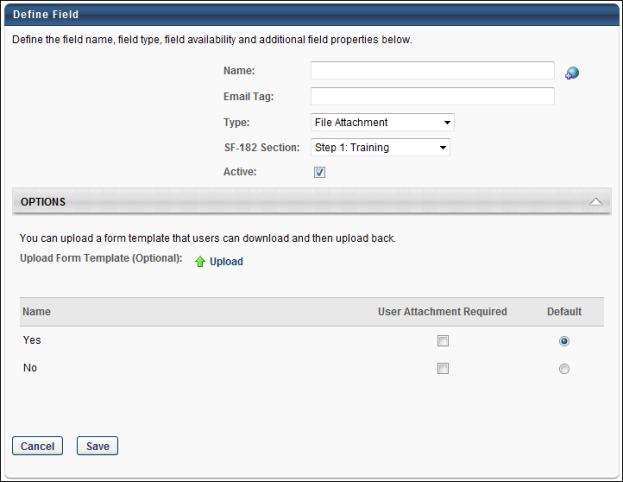
Add File Attachment Field Type Custom Field
Administrators can use the File Attachment field type to define a specific type of custom field for attachments. When a File Attachment custom field is configured and available on the SF-182 request form, users can attach a file to the field.
To create a File Attachment custom field type:
- Complete steps 1 and 2 in the Add SF-182 Custom Field section above.
- Select "File Attachment" in the Type field. An Options panel appears with additional options that can be configured for the field.
- Complete steps 4 and 5 in the Add SF-182 Custom Field section above.
- Complete the following options in the Options panel:
Upload Form Template
This field is optional and enables you to upload a template of the file for the user. The user can download the template on the SF-182 request form.
To upload a template, click the Upload link. This opens the Upload File pop-up. Click to search for and select the document. Click . The attachment appears below the Upload Form Template option. Only one attachment is accepted. The maximum file size is 10MB. The acceptable file types are .pdf, .doc, .docx, .gif, .jpg, and .jpeg.
You can remove an attachment by clicking the Trash Can icon to the left of the attachment name.
User Attachment Required
This option enables you to require users to upload an attachment to the field. If Yes is checked, users must attach a field and cannot proceed from the corresponding page of the request form until the field is completed. If No is checked, the field appears on the request form but is not required and no attachment can be added.
In the Default column, click the radio button to set the default value of the field as Yes or No. The radio button for Yes is selected by default.
Edit SF-182 Custom Field
Editing an SF-182 custom field is similar to the process of adding an SF-182 custom field. See the Add SF-182 Custom Field section on this page for details.