Create PowerPoint Template - Inserting Tags
Each PowerPoint template must contain tags to populate data from an SMP task. Each tag corresponds to a specific data element or field within the system. The user can add tags to the template that exist in SMP PowerPoint Tag Management.
Enter a Tag
To enter a tag on the Profile template, insert a text box on the slide and then enter the tag within the text box. This process may vary depending on the version of PowerPoint.
-
The tag name must be entered in the following format: <%TAG.NAME%>
-
If the tag name is not in the appropriate format, the report treats it as standard text.
A separate text box is needed for each tag on the template. For formatting purposes, even though the tag name may be long, the data that populate the tag may be smaller. Since a tag corresponds to a specific field, it may be preferable to enter the field title along with the tag name in order to identify the data.
For metric grid fields, the label of the cell that the employee is in appears as the value for the tag. If no cell label is available, then the value for the tag is the cell number in the grid.
Tag Properties or Attributes
Certain tags can have additional properties that allow for more flexible population of data.
Tag Attributes - Display Rating Score vs Text Rating
For Rating Scale, Formula Metrics, and Metric Grids, a tag attribute is available to display the rating score rather than the text rating for the metric.
- Only available for Profile templates.
- Displays the score of the rating (i.e., 1) for the metric instead.
- Only applies to tags that are associated with Rating Scale metrics, Formula Metrics, and metric grids.
- Insert the tag into the template as follows:
<%=TAG.NAME:ScoreValue%>
Example: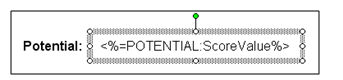
- For Rating Scale and Formula metrics, the score value is based off of the points on the rating scale.
- For metric grid fields, the cell number of the employee's grid populates in the tag when this tag attribute is applied.
Tag Attributes - Display Color of Rating
For Rating Scale, Formula metrics, and metric grids, a tag attribute is available to display the color of the rating from the metric instead of the text rating.
- Only available for Profile templates.
- Enter in a text box in the template.
- Only applies to tags that are associated with Rating Scale metrics, Formula Metrics, and metric grids.
- Insert in the following format: <%=TAG.NAME:FillColor%>
Example: 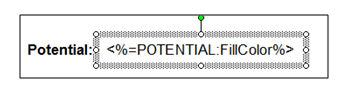
- For Rating Scale and Formula Metric fields, the color associated with the employee's rating will fill the area of the text box.
- If the rating for the employee is not color coded, then the text box will not fill with any color.
- For metric grids, the color will display based on the color coding for the cell that the employee is in.
- If the cell is not color coded, then no color will populate.
Tag Attributes - Fill Color for Drop-down or Radio Button Field
A FillColorIF tag attribute is available for drop-down and radio button fields.
- Only available for Profile templates.
- Only be available for drop-down and radio button fields.
- Allow for a color to be defined for each option within a drop-down field or radio button field.
- The tag will has the following format: <%=TAG.NAME:FillColorIF([Option1], [Color1], &ldots; , [OptionN], [ColorN])%>
- For each option in the drop-down/radio button, a unique color can be defined. The hex value of the color can be entered for each option.
- For each employee, based on the option selected for the drop-down/radio button field on the SMP task, then the associated color will fill the area of the text box.
Example:
- The [Option] is one of the selectable options in the drop-down/radio button field.
- The [Color] is the color's hex value code associated with the option.
- If the value of the drop-down/radio button field is the option entered in the tag, then the associated color will appear on the template.
- In order to use this tag attribute, at least one [Option] and [Color] values must be defined on the template.
- The value for [Option] must be in quotes.
- The [Color] value must be in the proper hex value format, with a pound sign and 6 alphanumeric characters. (#0000FF)
Tag Attributes - Display Successors Based on Rating
- Only available for Profile templates.
- Template can display the successors for an employee in a list based on each successor's metric rating from the succession step.
- An attribute will be available to add to the tag name that will list the successors for an employee based on their rating from the succession step.
- Only applies to rating scale metrics.
- This attribute should be applied to a rating scale metric that is used on the succession step to rate successors.
- To display all successors who were added under an employee, regardless of rating, insert the attribute in the tag as follows: <%=TAG.NAME:sList%>
- Adding this attribute will list the names of all successors for the employee.
- The tag name is the name of the metric the successors were rated against on the succession step.

- To only display successors with a specific rating on the succession step, i.e. only successors who were rated on the Readiness metric and have a rating of Ready Now, add the score of the rating to the tag name.
- Add the attribute to the tag as follows: <%=TAG.NAME:sList([ScoreValue])%>
- For example, to only display successors who have a Ready Now rating for an employee (Ready Now has a corresponding score of 2 for instance), the tag would be inserted in the template in the following manner: <%=READINESS:sList(2)%>
- Adding the score to the tag as an attribute will only display successors with that specific rating on the succession step.
Example:
- The score value will be based off of the points on the rating scale.
Tag to Display Data from Resume/Feedback Step
- To display data from a Resume/Feedback step within the SMP task for an employee, a special tag attribute will be needed.
- Only available for Profile templates.
- The Resume/Feedback step within an SMP task can contain multiple entries for a specific employee.
- The Resume/Feedback step can apply to a specific Resume section.
- The Resume/Feedback step in the SMP task must be associated with a Resume section in order to use this tag.
- The format of the tag is as follows: <%=[RESUME.SECTION]:FEEDBACK %>
- FEEDBACK must be entered along with the title of the Resume section used in the Resume/Feedback step for the SMP task in the format above.
- The tag will display all comment entries from the Resume/Feedback step for the employee.
- Each comment entry will be separated with a line break in the output.
When Resume OU tags are included, the following considerations apply to the report output:
- If more than one OU applies to a user, then each OU displays on a separate line in the order in which it appears on the user's Resume page.
- Resume Position OU sections that include tags with START.DATE and END.DATE tag data display the appropriate tag values in the report.
For Resume tags, the tag name can be inserted into a text box.
- Only available for Profile templates.
- This tag will display each entry from the Resume section and field that the tag is associated with.
- The format of the tag is as follows: <%=TAG.NAME%>
- For the field in the Resume section that the tag is associated with, each Resume entry in that section will populate the template with data from the associated field.
- For example, if the tag name is EDUCATION.DEGREE, then the template will display the degree information from the degree field from each education entry on the employee's Resume.
Example: 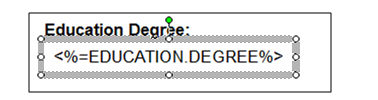
- Each entry will be separate by a line break on the output.
- In order for the Resume data to populate on the template, the Resume section must be included as fields for display in the SMP task.
- If this requirement is not met, then the data will not populate.
- Note: The SMP PowerPoint Template Report currently displays resume entries in the order in which they were originally entered on the resume. For example, if a user's job positions are entered in chronological order starting with the most recent position, the SMP PowerPoint Template Report displays the positions in that order. Similarly, if a user's job positions are entered in a random order, the report displays the positions in the same random manner. This logic does not match the manner in which resume entries are displayed in an SMP task.
- If multiple fields from a Resume section are to be displayed, then the template can display these tags on the template as separate columns in a freeform table.
- The table function in PowerPoint should not be used for this.
- The tags should still be entered in text boxes.
- The data of each tag will populate independently and sorted independently and not in association with other tags from the same Resume section.
Example: 
Tag to Display Employee's Profile Photo
To display the employee's profile photo, a photo tag can be inserted into the template. This is only available for Profile templates.
A picture must be inserted into the PowerPoint template as a placeholder for the employee profile picture. This picture can be any placeholder picture.
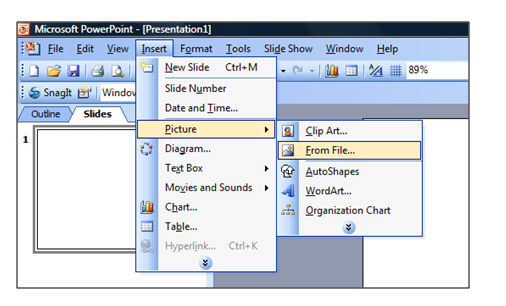
To insert a picture:
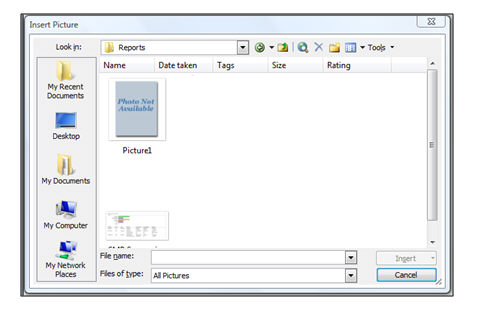
- Go to Insert > Picture > From File from the file menu in PowerPoint.
- Select a picture and click Insert.
- Place the picture in the desired location on the template. The picture can be resized to the desired dimensions. When the employee photo is placed in the placeholder on the output, the employee photo will be resized to the dimensions specified for the placeholder picture.
- Right click on the picture placeholder and select Format Picture.
- Click on the "Web" tab of the Format Picture dialog box.
- In the Alternative text field, enter the following tag name to indicate that this picture placeholder is designated for the employee profile photo.
- Click OK when the tag is entered.
<%=USER.PROFILE.PHOTO%>
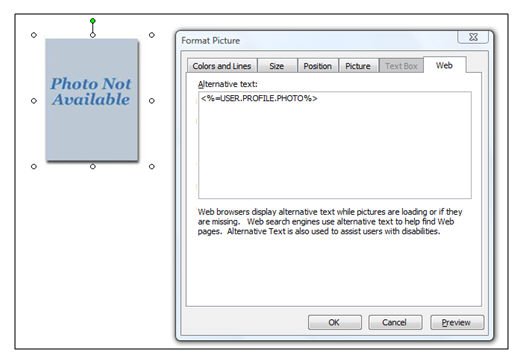
- This tag must be entered in order for the employee photo to populate in the placeholder.
- This tag can only be used for a picture placeholder.
- Only one placeholder for the profile photo can be included on the template.
Tag to Display a Metric Grid on the Template
A special tag structure is available for displaying a metric grid on the template.
- This tag structure should be used when displaying a metric grid on the Profile template or displaying a grid on the Grid template.
- By displaying the metric grid on the Profile template, the output will mark the cell that the employee falls in on the grid with an "X".
- Displaying the metric grid on a Grid template will display all employees in their respective grid position on the template.
- Each cell will list all the corresponding employees in alphabetical order by last name.
- To use this tag, the template should contain an actual grid for display.
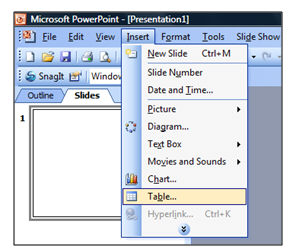
To create a grid in the template:
-
Click Insert > Table.
-
Determine the number of rows and columns for the table. The number of rows and columns for the table must match the number of rows and columns of the metric grid in the SMP task that will populate the table. A table must be used for this tag.
- In the top left cell of the table, the following tag must be entered: <%=TAG.NAME:GRID%>. Note: The word "GRID" must be entered after the colon. The tag must be entered directly in the cell, not into a text box.
Example

- When creating the table, table formatting and table styles provided by PowerPoint cannot not be used.
- By applying these styles, the desired output will not be achieved.
- The table can have specific formatting, such as horizontal and vertical alignment and borders.
Logical Tag for Conditional IF Statement
A logical tag attribute is available to allow the use of a conditional IF statement on the template.
- Only available for Profile templates.
- The logical tag will allow for a single tag to be used instead of the multiple tags
- This single tag will allow for the creation of conditional statements in order to populate tags within the template.
- The tag will have the following format: <%=TAG.NAME:ReplaceIF([Condition], [True], [False])%>
- The [Condition] will be the value that is in the field that corresponds to the tag.
- The ReplaceIF statement will check if the [Condition] is true for the associated field, then the value for [True] will be inserted for the tag, otherwise, the value for [False] will be inserted.
- In order to use this tag attribute, the [Condition] and [True] values must be defined on the template.
- [False] is an optional value.
- The value for [Condition] can be text that is entered in the field or a Boolean value (0 = False, 1 = True)
- The values for both [True] and [False] will be text.
Example 1: <%=TAG.NAME:ReplaceIF("", "No", "Yes")%>
- In this example, "" is the [Condition], "No" is the [True] value, and "Yes" is the [False] value.
- The "" value for [Condition] will indicate that the value for the field associated to the tag is blank for the employee.
- If the [Condition] is true (i.e. the field is blank), then "No" will be inserted for the tag on the template.
- If the [Condition] is false (i.e. the field is not blank), then "Yes" will be inserted for the tag on the template.
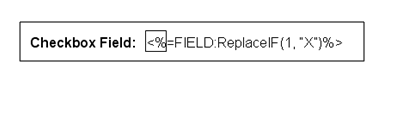
Example 2: <%=TAG.NAME:ReplaceIF(1, "X")%>
- In this example, 1 is the [Condition] and "X" is [True] value.
- The 1 for the [Condition] will be treated as a Boolean value, implying that if true, then insert the [True] value for the tag
- By using this Boolean operator, the system will check if there is a value, any value, in the field that is associated with the tag for the employee.
- If there is a value, the [Condition] will be true and the [True] value will be inserted for the tag.
- If the [Condition] is false, then no value will be inserted since there is no value defined for [False].
The client is responsible for ensuring that the text for [Condition] will be a valid value for the field associated to the tag.
- If it's not valid, then the [Condition] will always return as false. If a text value is used for [Condition], it must be enclosed in "".
- If a Boolean value is used for [Condition], then it must be a 0 or 1.
- The client can type in any text value for [True] and [False].
This tag can be used for all SMP fields, except metric grid and user custom fields.
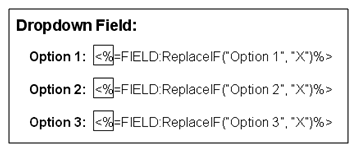
- For example, the client can use this tag to create a checklist like format for a drop-down field. An "X" will be placed in the appropriate box based on the option selected on the SMP task.
For checkbox fields, for example, a single box can be created on the template.
- A Boolean value should be used for checkbox fields.
- A 1 if the checkbox is checked, a 0 if the checkbox is unchecked.
- If the checkbox is checked for the employee in the task, the [Condition] will be true and an "X" will be placed in the box on the output.
The Profile template can contain more than one slide for an employee. If this is the case, then the group of slides will repeat for each employee in the PowerPoint output file when the report is processed.
Tag for Grid Template
The Grid template can only contain one slide. The only tag that can be used in a Grid template is the grid tag.
<%=TAG.NAME:GRID%>
The system will populate users in the grid table on the PowerPoint slide. All other tags highlighted above cannot be used in the Grid Template.
When creating templates in PowerPoint, the system will only support the features highlighted in this document.
- If other features of PowerPoint are included in the template such as: Charts, Spreadsheets, Documents, etc. then system cannot generate the PowerPoint output.
- Templates can only contain the features that are highlighted in this document.