When you click the Define Custom Fields for Training link, this opens the Custom Fields Administration for Training page.
Search for a Field
The following filters are available to search for an existing custom field:
- Name - Enter search terms in the filter. The field displays results for a partial or exact match to the search terms.
- Field Type - Select a field type from the drop-down.
- Include Inactive - Check the box to include inactive custom fields in the search.
Once all filters are defined, click . This refreshes the fields table with the filtered results.
Add Custom Field
To create a custom field, click the Add Field ![]() icon. This opens the Define field page. From here, you can select the type of field you want to create and define the options for the field if applicable. Information about how to create the specific types of custom fields (i.e., branched dropdown, checkbox, etc.) is available on the "Custom Field Type Options" page in Online Help. See Custom Field Admin - Custom Field Type Options.
icon. This opens the Define field page. From here, you can select the type of field you want to create and define the options for the field if applicable. Information about how to create the specific types of custom fields (i.e., branched dropdown, checkbox, etc.) is available on the "Custom Field Type Options" page in Online Help. See Custom Field Admin - Custom Field Type Options.
Fields Table
This table displays all existing custom fields for the field area. The table is sorted in alphabetical order by name. The Title and Created By columns are sortable. The following information displays in the table:
- Title - This column displays the title of the custom field.
- Type - This column displays the field type, such as radio button or short text box.
- Created By - This column displays the name of the administrator who created the field by last name, first name.
- Active - This column defines the active status of the field. To activate the field, check the box in the Active column. To inactivate the field, uncheck the box.
- Options - The following options are available in the Options column:
- Edit - Click the Edit icon
 to edit the field. The field type cannot be modified when editing the field. See Custom Field Admin - Custom Field Type Options.
 - Delete - Click the Trash Can icon
 to delete the field. This option is only available if the custom field has not been used. If a field has been used, then it cannot be deleted and the Trash Can icon does not display. There is no audit history available to view custom fields that were deleted. Please reach out to Global Customer Support if additional details are needed for a deleted custom field.
- Edit - Click the Edit icon
When active, the custom field is available to use by administrators who meet the field's availability requirements. Inactive custom fields are not available to use.
Note: Deleting a custom field permanently deletes the field from the system and any data associated with the field is lost. To remove a custom field from a learning object (LO), but keep the data, a best practice is to edit the custom field and remove visibility from all training types.
- Display event fields to end-users on the session details page - Select this option to have custom fields for events automatically display on the sessions for the corresponding event as well.
-
To create a Training custom field:
- Click Add Field icon
 .
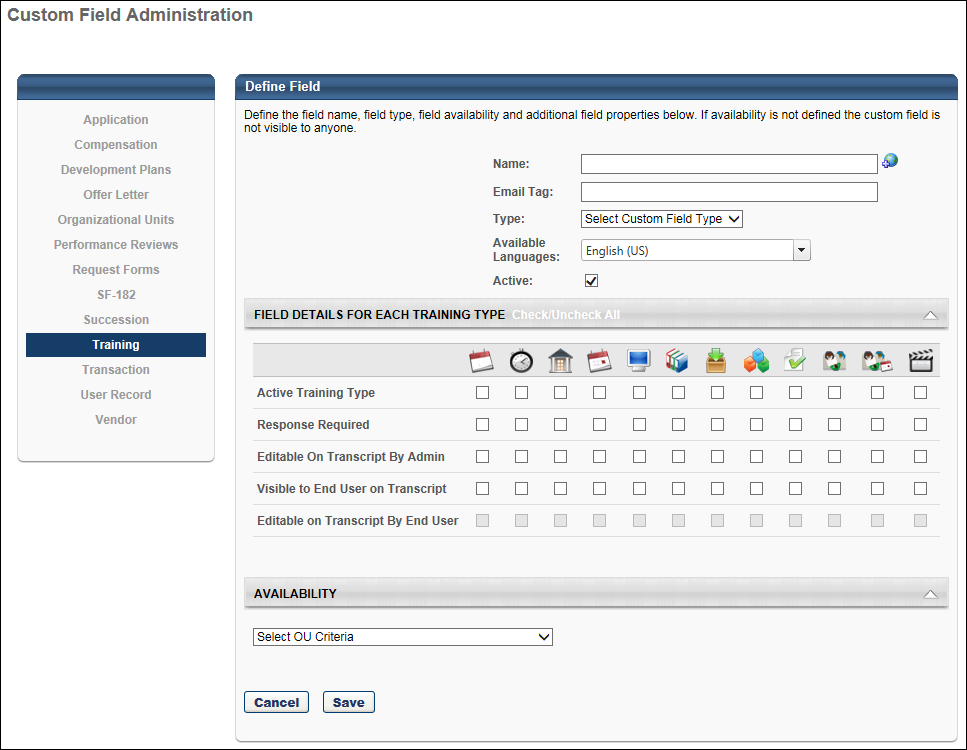
. - Name - Enter the name of custom field that will be visible to end user. If multiple languages are enabled, click the Translate icon to the right of the field to localize the values to the other available languages.
- Email Tag - Enter the name for the email tag to be associated with this field, and use it to retrieve the value of this field in email communications. The tag must be written in capital letters without spaces. Periods (.) can be used instead of spaces. For example, PROFIT.NET is an acceptable email tag.
- Custom tags are prefixed with the word CUSTOM. For example, for a custom field called Profit Net, the administrator can create the tag, PROFIT.NET, and the system will convert this to CUSTOM.PROFIT.NET.
- Type - From the drop-down list, select the type of field you are creating. The following options are available. See Custom Field Admin - Custom Field Type Options.
- Branched Dropdown
- Checkbox
- Conditional Numeric Field - See below for Conditional Numeric Field validation options.
- Date field
- Dropdown
- Hierarchy
- Multiple Checkbox
- Numeric Field
- Radio Button
- Scrolling Text Box
- Short Text Box
- Available Languages - From the drop-down list, select the languages in which the custom field is available. The available languages are mainly used for searching purposes and they are independent of the LO's default language. At least one language must be selected. At the top of the drop-down list, all selected languages are displayed. The drop-down list only displays the languages that are available to the user. Select the All Languages option to select all available languages. When a language is selected, the custom field is associated with that language.
- Fields Details for Each Training Type - Select the various options for the custom field for each LO type. Select the Check All option to select each option for all LOs. The following options are available:
- Active Training Type - Select the types of learning objects for which this custom field is visible.
- Response Required - Select whether administrators who are creating these learning objects must set a value in the custom field.
- Editable on Transcript by Admin - Select whether an administrator can change the value of this field for individual users by accessing their transcript. An example of when this might be used is for a credit field where you might change the credits a user received for this learning object.
- Visible to End User on Transcript - Select whether end users can see this field with the value the administrator selected when the administrator created the LO. This applies to the Learning Details and Training Details on Transcript. If this option is deselected, then only the administrator can see the field.
- Editable on Transcript by End User - Select this option to allow editing and changing of the value for the field. This can be useful when creating custom fields for external training, in which users are entering information about the training. Note: This field is only available if the Visible to End User option is selected for the training type. If a field is available for external training, it is a best practice to make the field visible and editable by end user to ensure the end user can use the field when adding their external training.
- Active - Select this option to make the field active.
- Availability - Define which users have the ability to view and access the custom field. See Setting Availability Overview. The administrator must set the availability of the field if the field is to appear for other administrators and end users in the application. If availability is not set, then the field will not appear in administrator and end user areas of the application.
- Click .
Lock History Rules
A user's transcript history and course completion certificate information is locked once the learning object's (LO) status is Complete. Updates to custom Training fields do not influence the transcript history or certificate when the user achieves the status of Complete, even if a custom field is removed.
Considerations and Exceptions
-
Transcript Custom Fields - If no value is set for a custom field within user's Transcript Details, the default value saved for the field in the Course Catalog is displayed. If no such value is set for the training, then the default value set in Custom Field Administration is displayed.
- Historical Certificates - When printing historical certificates, the certificate shows the custom field value at the time the user achieved a Complete status for the LO. If the custom field value changes, then the change displays on the certificate.
- Learning Assignment - Assign New Occurrence simulates recurrence. If a user is assigned a new occurrence of training, the Transcript Details page shows a new instance of the training. If the value of the custom field changes, then the Transcript Details page displays the new value. For certificates, the historical value of the custom field is preserved. Note: Because only one instance of the value is stored, the old value is removed. For reporting, the new value displays if a second instance exists.
- Transcript Details Page - If the value in a custom field is removed after the user achieves a status of Complete, the custom field still displays on the Transcript Details page and certificate but is a blank field.
- Inactivated Custom Field - If a custom field is inactivated, the field does not display on the user's Transcript Details page when the LO has a status of Complete. Only active items display on the page. Certificates display all items that are active at the time the user achieved a status of Complete.
- Reporting - Users can only report on currently existing and active custom fields.
- Ordering - Custom field options appear to users in the order in which the options were added and display on Custom Field Administration page. For example, if "Colorado" is added before the option "Alaska" in a dropdown custom field, the options will display in this order.
- Event and Session Custom Fields -
- If a custom field is only active for events (and not for sessions), reporting will only show a value for the custom field when reporting on an event training type. When reporting on session training type, the value for the custom field will be blank.
- Updating a session custom field at the session level will not sync with the user transcript. For example, if an administrator updates the custom field value from the user's transcript (e.g., CV1) and then later updates the same field to a different value (e.g., CV2) at the session level, the system will still display CV1 in the user transcript.