Browse for Training Preferences
The Browse for Training Preferences page allows administrators to configure the Browse for Training landing page, the sort options that are available on the Browse for Training page, the subjects that are available in the Browse by Subject widget, and an optional HTML banner that appears at the top of the Browse for Training page.
| PERMISSION NAME | PERMISSION DESCRIPTION | CATEGORY |
The Browse for Training Preferences page is divided into the following sections:
Enable Browse for Training Landing Page and Tile View
This option is unselected by default.
When this option is selected, the Browse for Training landing page is enabled for users. This page enables administrators to display more targeted and interesting content to users. Also, the Tile View option is available on the Browse for Training page, which enables users to view training as tiles or in a list.
- If this option is selected, any Browse for Training navigation links automatically directs users to the Browse for Training landing page. The regular Browse for Training page can be added as an additional navigation link, if needed.
- If this option is unselected and there are links to the Browse for Training landing page, then these links now direct users to the Browse for Training page.
When Tile View is enabled, an additional option is available, which enables administrators to determine the default view for the Browse for Training page, though users are able to change the view at any time. The Tile view option is selected by default.
Default Thumbnail Images Note: On the Browse for Training landing page and in Tile View, a thumbnail image is displayed for each LO that is displayed. Administrators can configure which image is associated with a LO on the Course Catalog - General page. If the training does not have a set image, then a randomly selected default image is displayed. Administrators can download all of the default images from within Online Help on the Course Catalog - General topic. The link to download these images is in the description for the Thumbnail Image field. See Course Catalog - General.

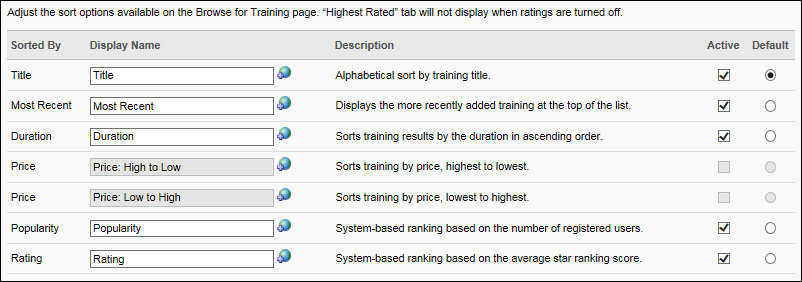
Sort Options
This section enables administrators to configure the sort options that are available on the Browse for Training page.
- Sorted by - This column displays the sort options that are available in the Sort by drop-down list on the Browse for Training page. Administrators are able to configure these sort options. However, they cannot add additional sort options.
- Display Name - This column enables administrators to configure the name for each sort option. The display name is what is displayed to users in the Sort by drop-down list on the Browse for Training Page. To customize the display name, in the Display Name field, enter the name that displays for the sort option. This field is required for all active sort options. If multiple languages are enabled for your portal, select the Translate icon to translate the field into other available languages.
- Description - This column provides a description for each sort option.
- Active - This column enables administrators to make a sort option active or inactive. When the Active option is checked, the sort option is active and appears in the Sort by drop-down list on the Browse for Training page. If all sort options are inactive, then the Sort by drop-down list does not appear on the Browse for Training page, and training items are sorted by title.
- Default - This option enables administrators to select a sort option as the default sort option on the Browse for Training page. Only one sort option can be set as the default sort option. Only active sort options can be selected as the default sort option.
Browse by Subject
This section enables administrators to configure the subjects that appear in the Browse by Subject widget on the Browse for Training page. Child subjects of a selected parent subject only display to users if there is training available to that user that is associated with that subject. The Browse for Training page initially displays the first 10 subjects. Note: Administrators can create additional subjects from the Course Catalog. See Subject Management.
To add a subject, click the Add Subject link. Then, select the appropriate subjects from the pop-up.
In the Subjects table, configure the order in which subjects appear in the Browse by Subject widget. In the Order field, enter the order in which the subjects should appear. For example, a subject with an order value of 1 appears first in the Browse by Subject widget.
To remove a subject from the Browse by Subject widget, click the Trash Can icon ![]() in the Remove column.
in the Remove column.

Configure Browse for Training Landing Page
This section enables administrators to configure the order in which the filter options appear in the Training filter on both the Browse for Training landing page and the Browse for Training main page. This section also enables administrators to configure what types of content appear on the Browse for Training landing page and the order in which they appear.
The following filters are available:
- Top Picks for User - When the Top Picks for [User] section is active in the portal and a user navigates to the Browse for Training landing page, a Top Picks for [User] section appears for the user with the user's name and training related to the user's previous training selections.
- My Subjects - This filter displays training that is associated with the user's favorite training subjects. Users can define their favorite training subjects on the Bio: About page. The most recently created or updated training is displayed first. This filter is only available if the Subjects section is enabled in Bio About Preferences.
- Featured - This filter displays all featured training that is available to the user. The most recently created or updated training is displayed first. A training item is designated as Featured by administrators via Course Catalog.
- Suggested - This filter displays all suggested training that is available to the user. The most recently created or updated training is displayed first. A training item is designated as Suggested by administrators via Course Catalog. Note: Marking a LO as Suggested is considered an update to the LO.
- Popular - This filter displays the most popular training items that are available to the user. The system determines popularity by the number of registered users within the previous 14 days.
- Newest - This filter displays the newest training items that are available to the user. The most recently created training is displayed first.
The filter options are organized in a table, and the following information displays for each filter:
- Order - Enter the order in which the sections should appear on the Browse for Training landing page. For example, a filter option with an order value of 1 appears first on the Browse for Training landing page.
- Filter By - This column displays the name of the filter.
- Description - This column displays a description of the filter.
- Visible on Landing Page - This option is selected by default. If this option is selected, the filter option also appears as a section on the Browse for Training landing page. For example, if the Featured filter option is visible on the landing page, then a Featured section displays training that are marked as featured for the user. All sections that are visible on the landing page appear in the defined order.
- Select Subjects Pop-up Title - Users are able to select their favorite training subjects on the Universal Profile - Bio page. Enter the title that should appear in the Select Subjects pop-up in which users select their favorite training subjects. The default value is "Select Subjects." The character limit for this field is 25. If multiple languages are enabled for your portal, select the Translate icon to translate the field into other available languages.

Browse for Training Banner
This section enables administrators to configure the HTML banner that is displayed at the top of the Browse for Training page. This banner is optional and can be used to market certain training items.

By default, no banner is configured. To configure an HTML banner for the Browse for Training page, click the Edit icon ![]() in the upper-right corner of the Preview panel. This opens the Browse for Training Banner pop-up, in which the user can enter the appropriate HTML code for the banner.
in the upper-right corner of the Preview panel. This opens the Browse for Training Banner pop-up, in which the user can enter the appropriate HTML code for the banner.
In the editor, there are two editing modes: Design and HTML. When in Design mode, you can use the standard editing tools to format your text, similar to your word processor application. When in HTML mode, the standard editing tools are disabled and you are able to view and modify the HTML code that is used to design the certificate. To switch between modes, click the appropriate tab in the lower-left corner of the editor. The system only accepts certain customizable HTML elements in the WYSIWYG Editor. Elements that are not acceptable display as text. See Safe Listed Customizable Elements.
Note: Because of the security risks associated with JavaScript, it is disabled in this editor by default. To embed JavaScript within this widget, contact Global Customer Support. Global Customer Support does not troubleshoot Java or HTML issues.
Click to save the changes and close the pop-up. A preview of the banner is displayed in the Preview panel.

Overwrite Settings
Select this option to overwrite custom settings for child division OUs. If you overwrite custom settings for child division OUs, the selected settings are applied to both new and existing child OUs. Any previously customized child OUs are updated with the selected settings.
- If there are no customizations to the child OU, then the parent OU customizations are applied to all child OUs.
- Overwrite custom settings checkbox setting
- If this option is selected, all child OU customizations are deleted from the database, which means the parent OU customizations will be applied to new and existing child OUs.
- If this option is unselected, all existing child OU customizations will remain unchanged, and any new child OUs will inherit the parent OU customizations by default.
- If a child OU has been customized to display any widgets, then regardless of the parent OU customizations, the child OU customizations are applied.
- If a child OU has been customized to hide all widgets, then parent OU customizations will take precedence and will be applied.
Cancel or Submit
After configuring the Browse for Training Preferences page, click to discard any unsaved changes, or click to finalize the selected settings.