The Define Approval Template page enables administrators to create and edit approval workflow templates.
To access the Approval Workflow Templates page, go to .
To access the Define Approval Template page, click the Create New Approval Template link from the Approval Workflow Templates page. Or, click the Edit Template or Copy Template icon from the Options column on the Approval Workflow Templates page.
| PERMISSION NAME | PERMISSION DESCRIPTION | CATEGORY |

Create New Template
Approval Template Name
When creating a new template, the first step is to enter a name in the Approval Template Name field, up to 100 characters. This is a required field. For portals with multiple languages enabled, click the Translate icon to localize the template name.
Approval Step Number
The Approval Step Number column displays the step number that is associated with the approver in the Approver(s) column. The step number is automatically populated when a new step is created. You can edit the step number by entering up to three positive whole numbers in the field.
Multiple steps can have the same step number. Steps with the same number occur simultaneously during the approval process. Approval from any approver in either step approves the step. The other approvers in the step can still enter their approval decision, but their decision does not impact the step. If all approvers in the step deny approval, then the step is denied. See the Considerations section below for more information about the approval process for steps.
Add Approval Step
When creating a new template, the second step is to add an approval step. At least one step must be added. Click the Plus icon to the right of the Approval Step Number column name to add an approval step. This adds a new step to the Define Approval Template table.
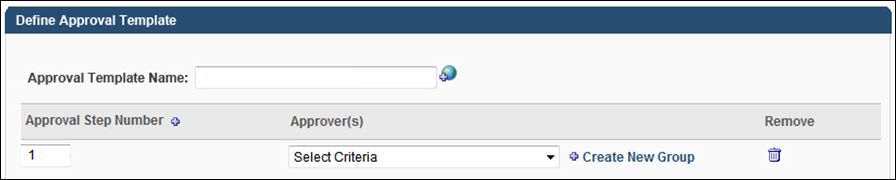
Approver(s)
When creating a new template, the third step is to define the approver criteria. Multiple approvers can be defined for each step.
To define criteria for the approval step, select an employee relationship, familiar job title, organizational unit (OU), or specific user from the Criteria drop-down. Once selected, the approver type appears in the Approver(s) column. Approval from any approver defined for the step approves the step. The other approvers in the step can still enter their approval decision, but their decision does not impact the step. The Approval History section on the Training Details page for the user displays the name of the approver that approved the user and also the OU or group from which the approval was granted.
Considerations
- If an approval is not obtained after going through all of the steps in an approval workflow template, the system automatically approves the training. Therefore, it is always a best practice to ensure that the number of steps in the approval process is greater than the largest number of approvals needed for a user or LO.
- If the final approver in the approval workflow defers approval, then the step is considered approved. The user's status changes to Approved.
- If the same approver is added to multiple steps, then approving any one of the steps counts as approval for all of the steps for which they are an approver. Example

- If one approver in the step denies the step, then the LO is denied and the workflow is complete.
- If all approvers in the step defer the step, then the step is deferred and moves to the next step in the workflow. Note: In this case, if the user is approved at a later step, then the Approval History section on the Training Details page for the user displays the OU or group that approved the user.
- If all approvers in the step are vacant for the user, then the approval moves to the next step in the workflow. If an approval is not obtained after going through all steps, the system automatically approves the training.
- If the Required Training Approvals field on the user record is set to zero, then no training approvals are ever required for the user, regardless of any training approvals that are set anywhere in the system.
Remove
Click the Trash Can icon to remove the criteria defined for the step.
Save or Cancel
Once all fields are completed, click the button. This saves the template and returns you to the Approval Workflow Templates page. Click to cancel creation of the template and return to the Approval Workflow Templates page.
Edit/Copy Template
The process for editing or copying a template is similar to creating a new template. See the Create New Template section above for more information.