The Create a Plan page is the first step in creating a headcount plan. From this page, you will define general information about the plan, such as the name and due date. You will also define the scope, position attributes, cost, and assign the plan.
To access the Create New Plan page, go to and click the button.
| PERMISSION NAME | PERMISSION DESCRIPTION | CATEGORY |
| Work Force Planning - Administrator | Grants access to the Headcount Planning page. Users with this permission can also create new headcount plans for any part of the organization, as well as create subplans that have been assigned to them. Administrators can only view plans that they have created or to which they were assigned as a Co-Planner or Primary Planner. This is an administrator permission. | Core Administration |
| Work Force Planning - Owner | Grants owner-level access to plans. Users with this permission can view their assigned plans and can create plans. This permission cannot be constrained. | Core Administration |
| Work Force Planning - Subplanner | Grants the ability to complete subplans that have been assigned to the user as a Primary Planner or a Co-Planner. Users with this permission cannot create new headcount plans or view all plans. Within the plans assigned to them, users can assign subplans to their direct reports. | Core Administration |
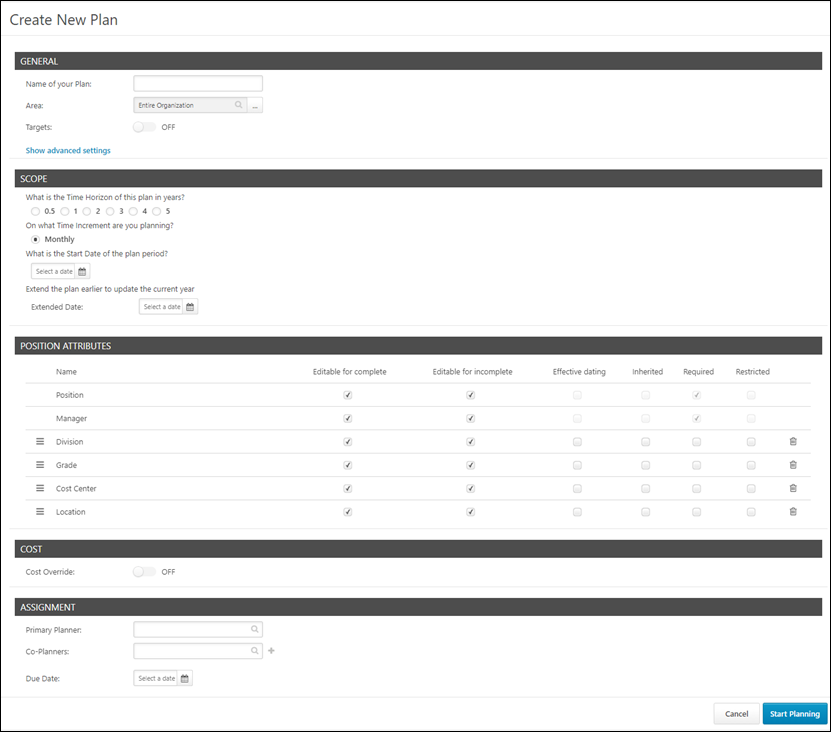
General
- Name of your Plan - Enter the plan name. There is no character limit.
- Area - Select the level and area of your organization that you'd like to plan for. The hierarchy displayed is the Reporting/Manager hierarchy.
- Targets - This option allows planners to access a Targets page from the plan and enter an annual cost budget for the plan. To enable the Targets option, toggle the slider to the right. When enabled, "On" displays to the right of the toggle. The Targets option is disabled by default.
Show Advanced Settings
The Instructions, Description, and BC Notifications To fields are visible in the Advanced Settings section but do not currently have functionality for the plan. The functionality may be available in a future release.
Scope
- What is the Time Horizon of this plan in years? - The time horizon is the total period of time for which the user intends to plan. Select one of the time horizon options. The options are in yearly increments, with 0.5 being six months.
- On what Time Increment are you planning? - This defines how the time horizon is broken up or segmented for planning purposes. Currently, the time increment is automatically defined as monthly.
- What is the Start Date of the plan period? - This field allows you to define the start date of the time horizon. Click the Select a Date field to enter a start date. The date can be a current, future, or past date. For example, you select three years in the Time Horizon field. Then, you set the start date of the time horizon for June 2017. This would mean that the headcount plan would run from June 2017 to May 2020. When choosing the date range, keep in mind the date ranges that are included in your Cost Model file so that accurate costs are applied to the positions in your plan.
- If you want to include a period of time before your official plan year, you can extend the plan earlier to update that period, i.e., the current year.
Position Attributes
In this section, you can manage changes to the Main Attributes and the Optional Attributes in the planning configuration.
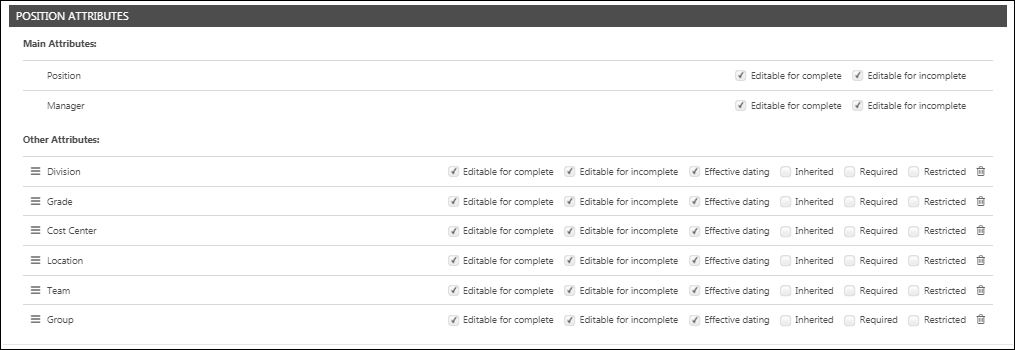
This section displays the fixed attributes of Position and Manager. These attributes cannot be removed and their order cannot be changed.
The following options are available in this section:
- Editable for complete - Check the box to enable the given position attribute to be editable once all required attributes have been populated.
- Editable for incomplete - Check the box to enable the given position attribute to be editable before all required attributes have been populated.
Optional attributes can be removed from a plan and their order can be changed.
The following options are available for each position attribute in this section:
- Editable for complete - This option is enabled by default. Check the box to enable the given position attribute to be editable once all required attributes have been populated.
- Editable for incomplete - This option is enabled by default. Check the box to enable the given position attribute to be editable before all required attributes have been populated.
- Effective dating - This option is disabled by default. When disabled, any changes to an attribute apply to the entire planning period. When enabled, any changes to an attribute apply to the selected time increment and all subsequent increments in the planning period.
- Inherited - This option is disabled by default. Inherited refers to inherited from the parent. When enabled, for new positions, this attribute will be populated to the same value as the parent (a.k.a., manager) position's attribute.
- Required - This option is disabled by default. This is an attribute that is required for a position to be Complete, except when an attribute is both Required and Restricted. In that case, when creating a new position, the planner could still save the position without the Required attribute.
- Restricted - This option is disabled by default. When enabled, the attribute can only be edited by the administrator or the owner of the plan. Whether enabled or disabled, the attribute is visible to all planners. This is often used for Costing information, which some organizations want to keep centrally controlled.
- Delete - Click the Delete icon
 to delete the attribute from the plan. Planners will not see (nor be able to edit) this position attribute in the given plan. The position attribute will also not appear when exporting plan. Note: To add an attribute back to the plan, click the plus icon next to the deleted attribute.
- Kim is the Vice President of Human Resources at a company with 3,000 employees.
- She is starting their annual headcount planning exercise and wants to limit which decisions can be made by planners during their planning. For example
- She can now configure the scope of the plan for each individual plan, rather than make those changes portal-wide through an adjustment to a data feed.
Cost
In this section, planners can enable a Cost Override setting, which will allow planners to manually edit the cost components of any position within Planning. New cost components cannot be added at this point; the components available will be the same components that are in the original cost file.
The Cost Override setting is disabled by default. When enabled, planners will be able to edit costs on the plan. This decentralizes the control of costing from a Human Resources/Administrator team to all planners for their respective areas.
For information about manually editing cost components, see the Create Plan - Planning Page - Position Costing topic in Online Help.
Assignment
The following fields display in the Assignment section:
- Primary Planner - Select the primary planner from the users in the drop-down, which include the plan creator, the user who occupies the top most position instance in the plan, and possibly position instances at that highest level, depending on configuration. There can only be one primary planner per plan. This field is required and by default is the plan creator.
- Co-Planners - You can select any user in the portal. Select the user from the drop-down, and then click the plus icon to add the user as a co-planner. There can be unlimited co-planners per plan. This field is not required and, by default, there are no co-planners assigned.
- Due Date - Click the Select a Date field to enter a due date. The due date is not recognized as a date that will trigger any actions, such as closing the plan. This field is not required.
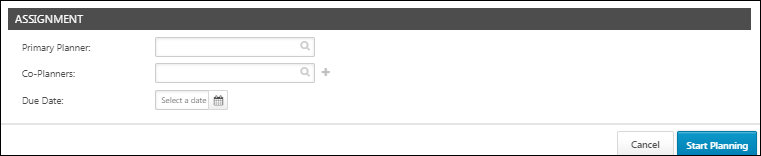
Start Planning/Cancel
Click to create your headcount plan. This saves the plan to the Active Plans section on the Headcount Planning homepage and opens the planning page.
Important Note: Only click the button once. If you click it more than once, you will create a new plan each time you click the button.
Click to cancel creating the plan.