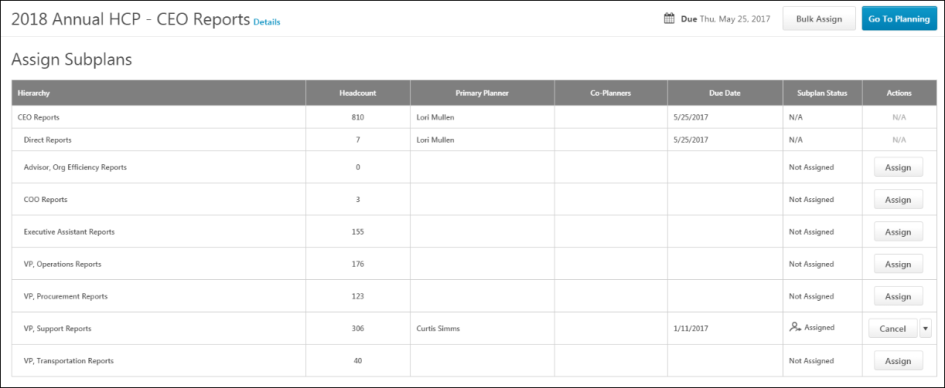
Assign Subplans
Use the Assign Subplans page, to assign and manage subplans for the headcount plan assigned to you. You can also view basic details about your overall headcount plan, such as the planners, due date, and plan period.
To access the Assign Subplans page select one of the following options:
- Click from the Create a Plan page.
- Click the button from the Planning page.
| PERMISSION NAME | PERMISSION DESCRIPTION | CATEGORY |
| Work Force Planning - Administrator | Grants access to the Headcount Planning page. Users with this permission can also create new headcount plans for any part of the organization, as well as create subplans that have been assigned to them. Administrators can only view plans that they have created or to which they were assigned as a Co-Planner or Primary Planner. This is an administrator permission. | Core Administration |
| Work Force Planning - Owner | Grants owner-level access to plans. Users with this permission can view their assigned plans and can create plans. This permission cannot be constrained. | Core Administration |
| Work Force Planning - Subplanner | Grants the ability to complete subplans that have been assigned to the user as a Primary Planner or a Co-Planner. Users with this permission cannot create new headcount plans or view all plans. Within the plans assigned to them, users can assign subplans to their direct reports. | Core Administration |
Plan Name
The plan name displays at the top of the page. The plan name displays as "[Name of Plan] - [Area of the organization that is assigned in the subplan]."
Details
Due Date
The due date of the overall plan displays in the upper-right corner of the page.
Bulk Assign
The option allows plan owners to assign subplans to multiple users at different levels throughout the organization. Click to open the Bulk Subplan Assignment page. See Assign Subplans - Bulk Assign.
Go To Planning
Click to open the overall headcount plan. See Headcount - Planning Page.
Subplan Status Export
Click to save the subplan to a .csv file.
Assign Subplans Table
The Assign Subplans table displays the subplans and child subplans that are associated to a main headcount plan. The following information displays in the table:
- Hierarchy - This column displays the top level of the plan, encompassing the entire planning responsibility of the user. This column also displays the next two levels down the hierarchy, which are the direct reports and the reports of those direct reports.
- Entire Organization - This row represents the top level of the plan. The status for this row is always N/A, and there are no actions available.
- Direct Reports - This row represents the direct reports of the position to which the main plan rolls up (in example above the position is "VP, Operations"). The status for this row is always N/A, and there are no actions available.
- Next Level Down Direct Reports - This represents the direct reports of the reports in the Direct Reports row. The Primary Planner, Co-Planner, and Due Date columns will be blank for this row until a subplan is assigned. The status for this row is Not Assigned until a subplan is assigned.
- Headcount - This column displays the baseline headcount value, which is the value at the beginning of the plan (the moment of the snapshot). This value is for informational purposes only and can help the planner decide whether an area (the area within the organization to which the plan applies) is large and might require a subplan.
- Primary Planner - This column displays the name of the primary planner.
- Co-Planner - This column displays the name of the co-planner, if a co-planner is assigned.
- Due Date - This column displays the due date of the overall plan or the subplan.
- Subplan Status - This column displays the status of the subplan. The following are the possible statuses:
- Not Assigned - This status indicates that the subplan has not been assigned. Once a subplan is assigned, it will not return to this status.
- Assigned - This status indicates that the subplan is assigned but has not been started by the subplanner.
- In Progress - This status indicates that the subplan has been received. A subplan can return to this status after it was previously submitted but rejected by the senior planner.
- Submitted - This status indicates that the subplan has been submitted but has not been approved/rejected by the senior planner.
- Approved - This status indicates that the subplan was submitted, approved, and consolidated into its parent plan. The senior planner can edit the subplan area in this status (the subplanner no longer can edit the area).
- N/A - This displays for rows that are not editable (i.e., the subplan cannot be assigned). This always displays in the row for the main headcount plan.
Actions
The following actions display in the Actions column:
Note: No actions are available for the main headcount plan.
Assign Subplan
Subplans that are in the Not Assigned status can be assigned. To assign a subplan:
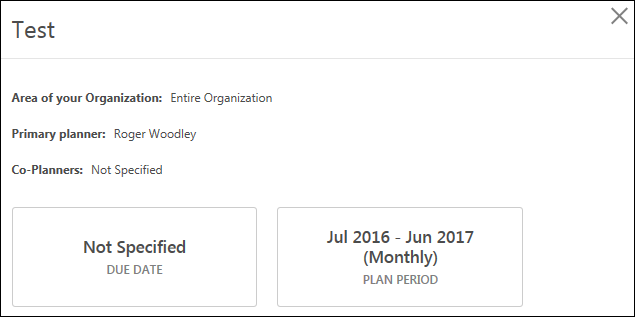
- Click from the Actions column. This opens the Assignment pop-up. The area within the organization to which the subplan applies displays in the Area field.
- Select a primary planner from the Primary Planner drop-down. The options that are available are the direct reports of the position to which the main report rolls up.
- Select a co-planner from the Co-Planner drop-down. You can select any user in the portal who was an active user at the time the headcount plan was created.
- Enter a due date in the Due Date of your Plan field.
- Click . This assigns the subplan to the primary planner and any co-planners that you have selected.
Once a subplan is assigned, the subplanner can manage the subplan in the same way that the planner manages the main headcount plan. The subplanner can access the plan from the main Headcount Planning page. For more information aboutthe Planning page of a headcount plan, see the Create Plan - Planning Page topic in Online Help.
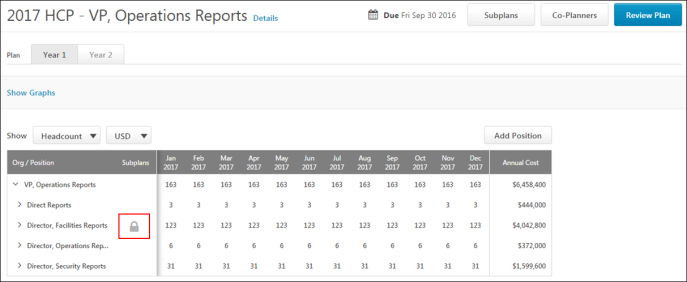
Locked Headcount Planning Section
Once the subplan is assigned, the section of the main headcount plan that has been assigned is not editable on the headcount planning page. A lock symbol displays for that section of the plan until the subplan is completed by the subplanner. The user can still view that section of the plan but the user cannot edit any section of that plan. The values in that section of the plan reflect the point at which the subplan was assigned, not any changes made by the subplanner while the subplan was in the In Progress status.
Edit Subplan
Click to edit the subplan assignment. This opens the Assignment pop-up.The Primary Planner, Co-Planner, and Due Date are editable fields.
Note: Planners can edit their entire plans, even while they have subordinate managers working on subplans, as though everyone is working off of the exact same plan. This allows the senior planner to be able to edit any area of the plan, regardless if there is a subplan assigned.
Re-Assign
Click to reassign the subplan. You can re-assign to the same primary planner that previously completed the subplan, or change to another primary planner.
Cancel
This action displays for subplans that are in an Assigned or In Progress status. Click to merge the subplan with the main headcount plan, discarding any changes made by the subplanner and returning the subplan to the version that was assigned. This action cannot be changed once the subplan is merged with the main headcount plan.
Note: Cancelling a subplan does not automatically cancel its child subplans. Edits and submissions of those child subplans will not be merged with the main headcount plan.
Review
Click to review the subplan. This opens the subplan page, which displays the planning table and the details of the subplan. This is similar to the Planning page for the main headcount plan.
From the subplan page for subplans that are in a Submitted status, you can click to accept the plan, or click to reject the plan, which will return the subplan to the primary planner and co-planners for further edits.
For more information about the Planning page of a headcount plan, see the Create Plan - Planning Page topic in Online Help.