Manage Applicants Deprecation: Cornerstone is deprecating Manage Applicants in Q1 2024. See Manage Applicants Overview.
The Edit Page Layout page allows recruiters to customize the visibility of the columns and features that display on the Manage Applicants page. Recruiters can define and save custom layouts that include the features and columns that fit the needs of the recruiter. This helps to reduce the amount of horizontal scrolling that is necessary when viewing the applicant information.
From this page, recruiters can do the following:
- Configure the Manage Applicants table column by column
- Customize the default template layout
- Create custom layout templates for individual requisitions
- Apply saved layout templates to each requisition
Note: The page layout configurations are per logged-in user. Therefore, if multiple users in the same organizational unit configure the layout differently, the page displays for each user based on their own individual configurations.
To access the Edit Page Layout feature, click the Edit Page Layout option ![]() in the upper-right corner of the Manage Applicants page.
in the upper-right corner of the Manage Applicants page.
| PERMISSION NAME | PERMISSION DESCRIPTION | CATEGORY |
| Requisition: Reviewer |
Enables reviewer to access requisitions and applicants for requisitions for which they are a reviewer. This permission cannot be constrained. Note: This is a dynamically assigned permission that is not available in Security Role Administration. Once a requisition is in a Closed or Cancelled status or if the user is removed as a reviewer, the permission is revoked for the associated requisition. This permission cannot be manually assigned. Note: If an applicant reviewer is removed as a reviewer via the Applicant Profile page, the Requisition: Reviewer permission is revoked for the associated requisition. However, if the reviewer was also added as a reviewer via the General tab when creating, editing, or copying the requisition, the reviewer still appears on the In Review panel as a duplicate reviewer and retains access to the requisition and applicants from the Requisition: Reviewer permission. See Applicant Profile Page Overview for more information about duplicate reviewer instances. |
Recruiting |
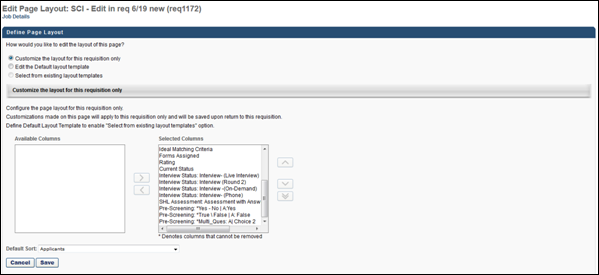
Define Page Layout
Recruiters can select one of the following page layouts to configure the Manage Applicants page:
- Customize the layout for this requisition only - This option enables recruiters to define the layout for the current requisition. When selected, this opens the Customize the layout for this requisition panel. The default layout template displays in the Selected Columns section. If a column in the default template is not available for the requisition, then "Not available for this requisition" displays in parentheses to the right of the column name.
- Applicants - Note: This column displays be default and cannot be removed, disabled, or reordered.
- Applicant Location
- Applicant (User) Flags
- Application Flags
- Type
- Source
- Ideal Matching Criteria
- Ratings
- Current Status
- Edit the Default layout template - This option enables recruiters to define the default layout for the Manage Applicants page for all requisitions. When selected, this opens the Edit the Default Layout Template panel. See the Edit Default Layout Template section below for more information.
- Select from existing layout templates - This option enables recruiters to select a saved custom template for the layout of the current requisition. When selected, this opens the Select a different layout template panel. The Selected Columns section refreshes to display only the columns that cannot be removed from the template.
By default, the following columns display in the Available Columns section the first time the layout is customized for the current requisition:
Select the template from the Select Layout Template field. The templates that are available to select are defined via the Save as New Layout Template option. There must be at least one custom template created in order to select a custom template. See the Save as New Layout Template section below for more information about creating custom templates. Once the template is selected, the Selected Columns section refreshes to display the custom layout for the template.
Changes can be made to the custom template layout by adding and removing columns from the Selected Columns section. Once the changes are saved, the new settings are applied to the requisitions to which the template applies.
Pre-Screening Survey Column
The Pre-Screening Survey column does not display in the Available Columns section for surveys that do not have scores.
SHL Assessment Column
For portals with an integration with SHL, if one or more SHL assessments are configured for the portal, then each assessment is available to add as a column on the Edit Page Layout page. The columns appear in the Available Columns list as "SHL Assessment: [Assessment Name]." Once moved to the Selected Columns list and saved, the columns display in the Applicants table on the Manage Applicants page.
If an assessment has not been added to a status of the type SHL Assessment, the assessment column can still be added to the Manage Applicants page.
Selection Components Columns
If the application workflow includes Skills Assessment or Skills Test components, then columns can be added to the Manage Applicants page to display the results and details of the components from the application. In addition, a column can be added that provides a link to the full details of the Selection components.
Note: A column is not available to add for the Realistic Job Preview component.
Job Fit Factors
For applications that include the Skills Assessment component of the Selection functionality, an individual column can be added for each job fit factor. The name of each column displays as "[Name of Position] Fit Factor." The columns can be added to the Manage Applicants page as individual columns to allow recruiters to view the job fit factors for applicants.
Each fit factor column displays the applicant's fit factor rating as a colored icon. The following ratings are available:
- Green
 - This icon indicates that the applicant scored as Highly Qualified for the fit factor.
 - Yellow
 - This icon indicates that the applicant scored as Average Qualified for the fit factor.
 - Red
 - This icon indicates that the applicant scored as Less Qualified for the fit factor.
As with current functionality, columns can be added by selecting the column name, and then clicking the right-facing arrow to move the column to the Selected Columns list. The column can be positioned in any order below the Applicants (Default Sort) column.
Selection Full Details
The Selection Full Details column displays a View Details link to view the details and results of all of the Selection components that are included in the application workflow for the job requisition.
Skills Tests
For applications that include the Skills Test component of the Selection functionality, columns can be added to display the test scores. For the May '15 release, the available columns are Typing Accuracy and Words Per Minute.
Add/Remove Columns
For all template layouts, the columns that display on the Manage Applicants page are defined in the Available Columns and Selected Columns sections. The Available Columns section lists the columns that are available but not currently selected to display in the Manage Applicants table. The Selected Columns section lists the columns that have been selected to display in the Manage Applicants table.
For portals with multiple languages enabled, the column names display in the language of the recruiter viewing the page. If the recruiter's language is not available, then the columns display in the default language.
To add or remove a column from the Selected Columns section, click the and arrow buttons that display between the sections. Columns with an asterisk cannot be removed.
Note: The Applicants column displays by default cannot be added or removed. This column and cannot be reordered.
Reorder Columns
The order in which the columns display in the Manage Applicants table can be defined by clicking the and arrow buttons to the right of the Selected Columns section.
Individual columns can also be moved to the bottom of the list by clicking the arrow button to the right of the Selected Columns section.
Note: The Applicants column displays by default and cannot be reordered.
Default Sort
The Default Sort option sets the default order in which applicants display on the Manage Applicants page. The drop-down lists the columns that display in the Selected Columns section that are sortable on the Manage Applicants page. Select a column from the drop-down to define the sort order.
The following defines the default sort order for the information in the sortable columns:
- Applicants - Sorted alphabetically. Note: The Applicants column displays by default, but a different column can be selected to define the default sort order.
- Type - Sorted by internal applicants, then external applicants.
- Ideal Matching Criteria - Sorted by highest to lowest criteria matches.
- Ratings - Sorted by highest to lowest rating.
- Current Status - Sorted by the highest number of steps in the application workflow to the fewest number of steps in the application workflow.
- [Name of On Demand Video Interview] - Sorted by the highest percentage of recommendations to advance.
- [Name of Interview Status] - Sorted by the highest percentage of recommendations to advance.
- [Name of Assessment Result/Score] - Sorted by highest to lowest result/score.
- [Name of Integration Results] - If the results display in text characters, then the sort order is alphabetical. If the results display in numeric characters, then the sort order is highest to lowest result.
- [Name of Integration Score] - Sorted by highest to lowest score.
Once the column is selected, the associated column in the Selected Columns section displays "(Default sort)" to the right of the column name.
If a column is selected in the drop-down but is not available for the requisition, then the Manage Applicants table is sorted by the Applicants column.
If a column is selected in the drop-down and saved for a template, and the saved template is applied to a requisition that does not have the column available, then the Manage Applicants table is sorted by the Applicants column.
Edit Default Layout Template
The default layout template can be modified by selecting the Edit the Default layout template option in the Define Page Layout panel. This opens the Edit the Default Layout Template panel. Changes can be made to the default layout by adding and removing columns from the Selected Columns section. Once the changes are saved, the new settings are applied to the requisitions to which the default template applies.
Note: When navigating to a job requisition that does not have a custom layout template defined, the default layout for the Manage Applicants page displays.
Save/Cancel
Click to save the settings. If the settings are not saved, then the changes are applied to the current requisition but are not applied to the template.
Click to return to the Manage Applicants page without saving the settings.
Create Custom Layout Template
Recruiters can create custom layout templates that can be applied to the current requisition. Clicking the button at the bottom of the page opens the New Layout Template pop-up. Enter a title for the template, up to 250 characters, and then click . This saves the layout defined in the Selected Columns section.
Changes can be made to the custom layout by adding and removing columns from the Selected Columns section. Once saved, the custom layout template is available to select in the Select Layout Template drop-down when the Select from existing layout templates option is selected in the Define Page Layout panel.
Note: The Applicants column cannot be removed, disabled, or reordered when configuring a custom layout.