Sterling Integration Implementation Steps
Setting up the integration includes enabling the integration in Edge and completing pre-steps for mapping resume fields, as well as creating reference forms that can be used to request references.
| PERMISSION NAME | PERMISSION DESCRIPTION | CATEGORY |
| Edge Integrations - Manage | Grants access to the Integrations service for Edge Integrate, where the administrator can configure, enable, and disable their third-party integrations used within the Cornerstone system. This permission cannot be constrained. This is an administrator permission. | Edge |
Integration Guide
Select this link to download the Sterling Integration Guide.
Pre-Steps
Note: In order to send resume and/or reference fields to Sterling, Succession Management and Form Management must be available in your portal, respectively. This resume mapping is an optional step.
Configure the following resume sections:
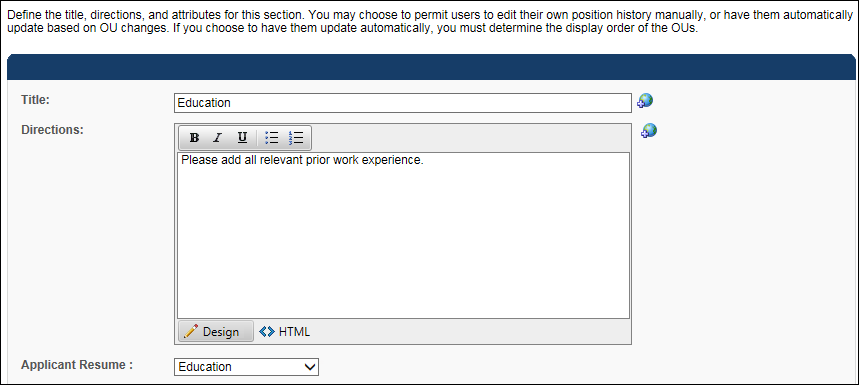
- Education
- Map a resume section to Applicant Resume "Education"
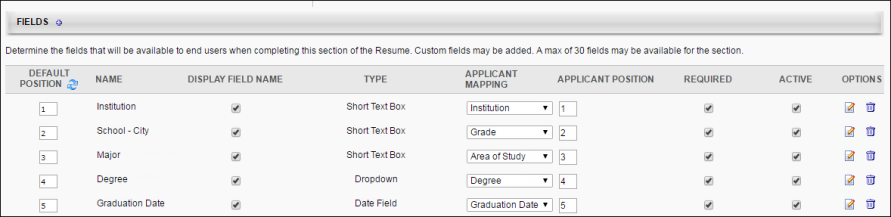
- Map Sterling's education verification fields as described in the table below:
Sterling Education Verification Field Label Cornerstone Resume Applicant Mapping Additional Notes School - Name Institution School - City Grade School - Major Area of Study School - Degree Earned Degree It is recommended that you set up the field as a drop-down, since Sterling only accepts the following values: GED, High School, Certificate, Associate's, Bachelor's, Master's, Doctorate, Other. School - Date of Graduation Graduation Date - Previous Position
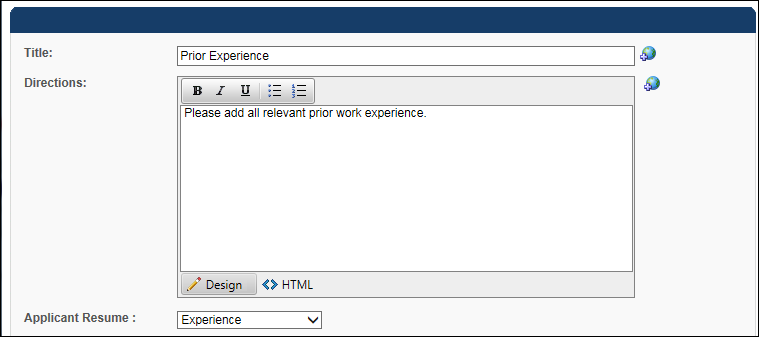
- Map a resume section to Applicant Resume "Experience"
- Map Sterling's employment verification fields as described in the table below:
Sterling Employment Verification Field Label Cornerstone Resume Applicant Mapping Employer - Company Name Organization Employer - Employment Start and End Date Date Range Employer - Employer Job Title Position

- Create questions and forms in Form Management ():
- Create a new category (optional)
- Create form questions on the Question Bank page. The API name entry must follow the naming convention described in the table below.
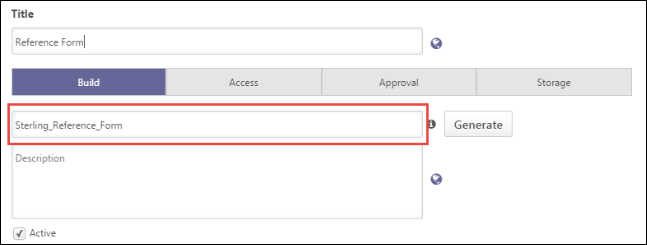
- Create a form on the Manage Forms page and include the questions created in step 2B. The form's API Name entry must be set to "Sterling_Reference_Form." The form can include up to three sets of reference fields.
Edge Integrate Steps
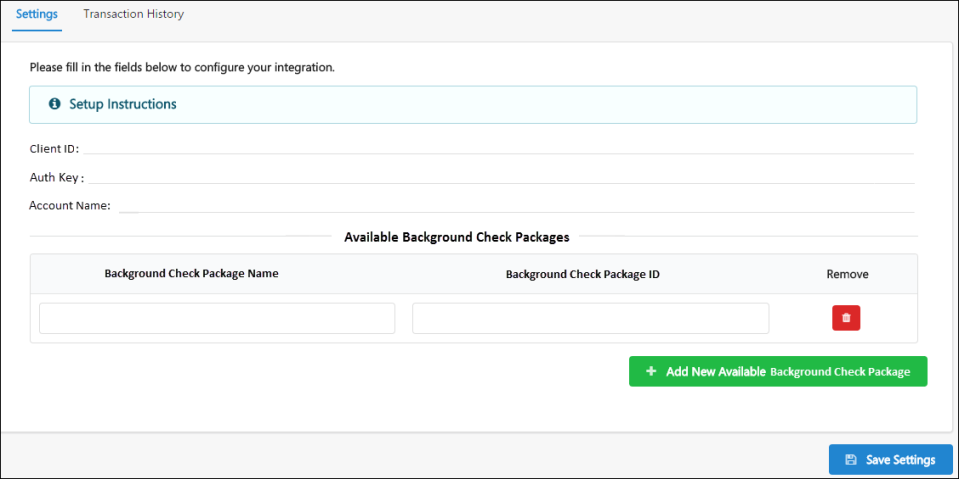
In order to include Sterling background checks/drug screenings in the application workflow, the integration must first be enabled via Edge Integrate.
On the Edge Integrate > Settings page, you will enter your client ID, auth key, and account name. An API user name, password, and integration ID must also be entered.
In the Available Background Check Packages section, enter the background check package name and ID.
You can also configure which field is mapped to Sterling’s Reference Code and Access Credential Type fields by making a selection in the drop-down.
- Reference Code - This is a Sterling field that can be mapped to either of the Cornerstone organizational unit (OU) below. This is the OU associated to the job requisition the candidate has applied to. The available OU options are Division, Location, Position, and Grade.
- Access Credential Type - This is a Sterling field that can be mapped to either the username or user ID of the user submitting the background check request in Cornerstone (i.e., user assigning the candidate to a Sterling background check). Sterling uses this value to validate that the submitter has an existing user record in their system. If the submitter's unique identifier does not exist in Sterling, then Sterling will create a record.
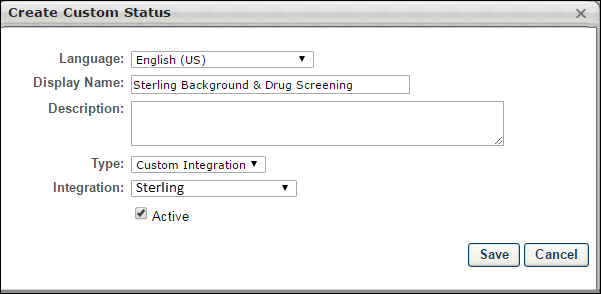
Create Custom Applicant Status for Sterling Background Check
This set up is required when assigning a background check to an applicant:
- Navigate to the Manage Applicant Status page:
- Navigation:
- Click the Create Custom Status link. This opens the Create Custom Status pop-up.
- Complete the following fields in the pop-up:
- Language - If multiple languages are enabled for the portal, select the language from the drop-down list for which you are entering the status name and description. To localize the status name and description into other available languages, select the appropriate language from the drop-down list and enter the localized name and description in the appropriate fields.
- Display Name - Enter the status name, which appears throughout the system. The character limit for this field is 50. When the display name of an active status is modified after the status is in use or has been used in a job requisition:
- The new display name appears on the Default Status List page.
- The new display name appears in the Status list on the job requisition template.
- Any new job requisitions created after the display name is changed apply the new display name.
- Job requisitions created before the status display name is changed continue to honor the name that existed at the time the requisition was created.
- Description - Enter the status description. This should describe the purpose of the status and what is implied when an applicant is in that status. The character limit for this field is 500. This is not a required field.
- Type - Select Custom Integration from the drop-down. Note: This field is displayed only when creating a custom status at the top level OU. When creating a custom status for a child OU, the Type field displays the type selected for the parent OU but is not editable.
- Integration - Select Sterling from the drop-down.
- Active - This field is checked by default. Ensure the field is checked before saving the status so that the status is active for the portal.
- Click to save the custom applicant status.
- Add custom applicant status to a job requisition.