Applicant Statuses - Create Custom AccurateAce Status
In order for the AccurateAce Background Check status to be available to select for applicants, it is necessary to create a custom integration status in Manage Applicant Statuses.
To create a custom applicant status, go to . Then click the Create Custom Status link.
To create a custom integration status for AccurateAce Background Check:
- Navigate to .
- Click the Create Custom Status link. This opens the Create Custom Status pop-up.
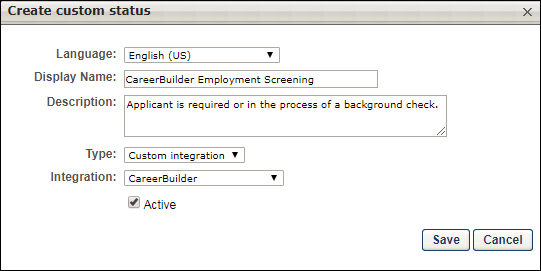
- Complete the following fields in the Create Custom Status pop-up:
- Language - If multiple languages are enabled, from the drop-down list select the language in which you are entering the status name and description. To localize the status name and description into other available languages, select the appropriate language from the drop-down list and enter the localized name and description in the appropriate fields.
- Display Name - Enter "AccurateAce Background Check" to identify the status as being specifically for AccurateAce Background Check.
- Description - Enter a description, up to 500 characters. As a best practice, provide a description that helps recruiters understand the purpose of this status.
- Type - Select "Custom Integration." The Custom Integration status type mans that the applicant is in an integration step of the status workflow.
- Integration - Select "AccurateAce" in this field, which will associate the custom status to AccurateAce Background Check.
- Active - This option is selected by default and means the status will be available to include in status workflows.
- Click to save the custom status. Your new custom integration status will be visible in the list of statuses on the Manage Applicant Statuses page.