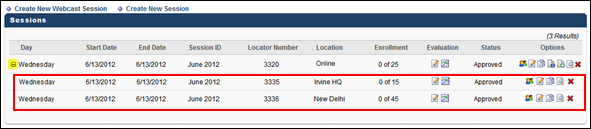
For portals that have the ability to configure multiple providers for a session, the following differences appear on the Sessions page:
- The Create New Session link is named Create New <Primary Vendor Name> Session. (Please note that the vILT provider must be configured as the Primary Provider to be marked as a Webcast ILT and display the monitor icon).
- If the Secondary Vendor field is completed on the Properties step when configuring the event, then a Create New <Secondary Vendor Name> Session link appears to the right of the Create New <Primary Vendor Name> Session link.
- The Options column includes icons to create virtual and onsite session options. These options only appear once the parent session is created.
- If session options are created for a parent session, then the options display below the parent session and are expanded by default.
Note: The icons in the Options column only appear for portals with the ability to configure multiple providers for a session.
Design Note: An updated interface is available for this page, which can be enabled by administrators in Feature Activation Preferences. With the new design, the functionality of the page is unchanged.
To access the Sessions page, go to ILT > Manage Events & Sessions. Then, select the View Sessions icon in the Options column for the desired event.
| PERMISSION NAME | PERMISSION DESCRIPTION | CATEGORY |
| Sessions - Edit | Grants ability to edit/update existing instructor led training sessions. This permission works in conjunction with Events - View and Sessions - View permissions. Administrators can only edit sessions for which they have the availability to view and edit. When adding users to a session in which the session roster is full, this permission grants the ability to increase the session's available seats. This permission can be constrained by OU, User's OU, Instructor, User as Instructor, Facility, Facilities Owned by User, ILT Provider, User's ILT Provider, User, and User Self and Subordinates. This is an administrator permission. | Learning - Administration |
Create New Primary and Secondary Vendor Sessions
Clicking either the Create New <Primary Vendor Name> Session or Create New <Secondary Vendor Name> Session link enables administrators to create a new virtual or onsite session, depending on the type of vendor selected when configuring the event. For example, if the primary vendor at the event level is a virtual provider, then clicking the Create New <Primary Vendor Name> Session link enables the administrator to create a new virtual session.
Create Virtual and Onsite Session Options
A session option is an additional option for attending the corresponding session. For example, if a virtual session option is added to an onsite session, then users will have the option to attend the virtual session or the onsite session.
If enabled, the following options are now available in the Options column once the parent session is created:
- <Vendor Name> Session Option
 - Click the icon to create virtual session options. This opens the Parts Schedule step of creating a session. Note: If the primary and secondary vendors are both virtual providers, then two instances of this icon appear in the Options column. The first instance is associated with the primary vendor, and the second instance is associated with the secondary vendor.
 - <Vendor Name> Session Option
 - Click the icon to create onsite session options. This opens the Parts Schedule step of creating a session. Note: If the primary and secondary vendors are both onsite providers, then two instances of this icon appear in the Options column. The first instance is associated with the primary vendor, and the second instance is associated with the secondary vendor.
View Session Options
If session options are added to a parent session, then the options display below the parent session and are expanded by default. Click the Expand/Collapse icon to the left of the Day column to collapse the session options.
Each session option has a separate locator number and roster. The enrollment options may vary, if configured by the administrator.
Session options can only be created for a parent session. Session options cannot be created for a session option.
To view all users associated with the session, including users associated with the session options, click the View Roster icon for the parent session. From the Parent Roster page, select the locator number filter options to view the desired roster.
To view all users associated with a specific session option, click the View Roster icon in the Options column for the session option.
Edit Session
Edits made to a parent session do not affect the associated session options and vice versa.
Copy Session
Clicking the Copy icon in the Options column for a parent session creates a new parent session. Clicking the Copy icon for a session option creates a new session option within the associated parent session.
Cancel Session
Canceling a parent session that has at least one session option also cancels the session option. Clicking the Cancel Session icon in the Options column opens a pop-up that indicates canceling the parent session also cancels any associated session options.
A session option can be deleted by clicking the Cancel Session icon in Options column.
For more information about the Sessions page, see ILT Session Overview.
For more information about creating session options, see Create Session Options - Parts Schedule.