The Properties step is the first step of the event creation process. On this step, you will provide basic information about the event.
Design Note: An updated interface is available for this page, which can be enabled by administrators in Feature Activation Preferences. With the new design, the functionality of the page is unchanged.
To create an event, go to . Then, click the Create New Event link.
OR, go to . Then, click the button and click the Event link.
| PERMISSION NAME | PERMISSION DESCRIPTION | CATEGORY |
| Events - Edit | Grants ability to edit/update existing instructor led training events. This permission works in conjunction with Events - View permission. This permission can be constrained by OU, User's OU, ILT Provider, and User's ILT Provider. This is an administrator permission. | Learning - Administration |
| Events - View | Grants view-only access to instructor led training events, enabling the user to view all details/options that were selected when the event was created. This permission can be constrained by OU, User's OU, User's ILT Provider, and ILT Provider. This is an administrator permission. | Learning - Administration |
| LO Attachments - View | Grants ability to view the learning object attachments that are set to be available to administrators. This permission can be constrained by User's ILT Provider, Provider, and ILT Provider. This is an administrator permission. | Learning - Administration |
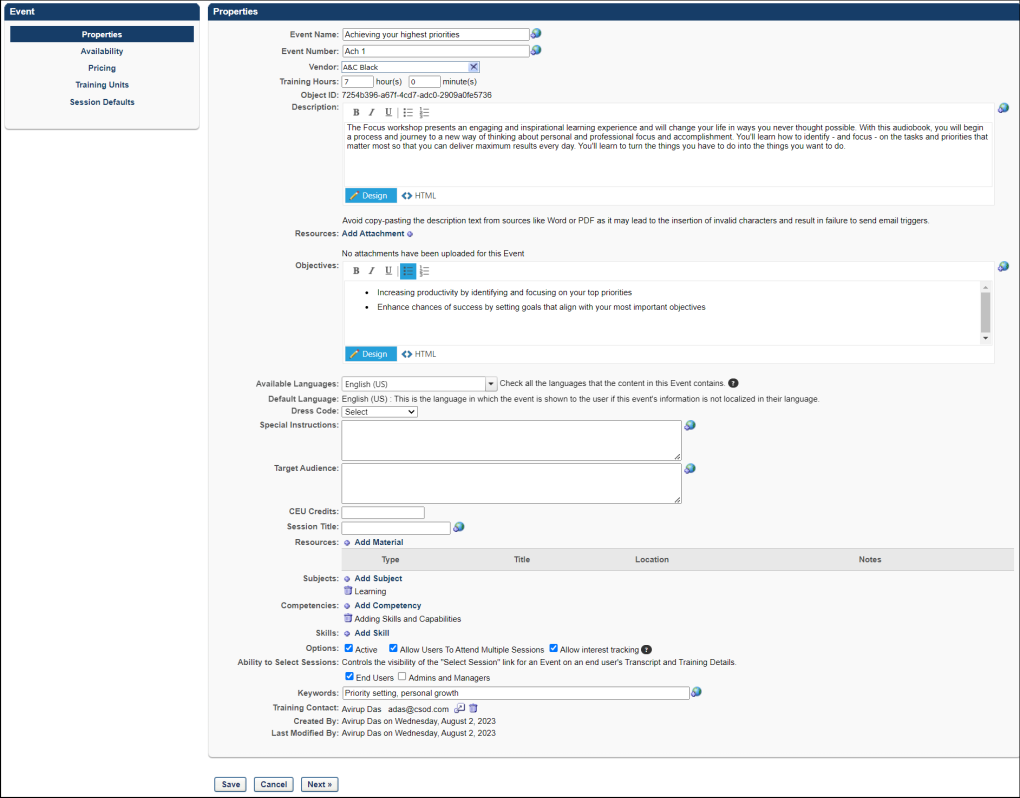
Properties
On the Properties step, configure the following fields and options:
- Event Name - Enter a name for the event that the user will see (required field). The character limit is 500.
- Event Number - Enter a number.
- Vendor - Choose a vendor from the pop-up menu (required field). The Vendor field cannot be edited once the event is created unless the Enable to change provider for events option is selected in ILT Preferences. Note: If this field is named Primary Vendor and a Secondary Vendor field appears below it, then your portal has enabled the ability to configure multiple providers for a session. See ILT Event - Create - Step 1 - Properties - Primary Vendor.
- If the preference Enable to select provider when creating sessions is unchecked, after the provider tied to an event is changed (e.g., from Provider A to Provider B), then administrators who have the ability to create a new session from scratch will only be able to create a new session tied to the current/latest event provider (Provider B). This is valid for both the Primary and Secondary vendor.
- If the preference Enable to select provider when creating sessions is checked, after the provider tied to an event is changed (e.g., from Provider A to Provider B), then administrators who have the ability to create a new session from scratch will be able to create a new session tied to the current/latest event provider (Provider B) or define a previous provider to whom the event was historically tied for the session before creating it (Provider A). This is valid for both Primary and Secondary vendor.
- The new vendor is the default provider on sessions created from scratch.
- The provider on existing sessions is NOT changed to the new provider.
- When a session is copied, the session inherits the provider and the instructor from the existing session.
- Training Hours - Enter training hours/minutes that will display on the Event Detail pop-up. If 0 hours and 0 minutes is the event value then no value will display on the Event Details pop-up.
- Description - Enter an event description. This is HTML friendly. The character limit for this field is 4000.
- Resources (Attachments) - This section enables administrators to view and manage attachments for the event. The visibility of each attachment can be determined by the administrator. For example, some attachments may be visible to only administrators, while other attachments may be visible to all users. In addition, attachments can be made visible to users only if they are registered for the corresponding event. This section is only available for users that have permission to view or manage LO attachments. See ILT Event - Create - Properties - Resources.
- Objectives - Enter objectives, if applicable. This field is HTML friendly. The text character limit for this field is 3000, while 500 characters are reserved for HTML tags.
- Language - Select language from drop-down if applicable.
- Enter information in the customizable event fields, if any. If you do not complete these fields, they do not display to users.
- Resources (Materials) - This section enables administrators to view and manage the materials for the event. Add by clicking on the Add Material link. Event materials are resources that are required for the event. These materials are not the same materials that are created in Course Catalog.
- Select Material Type from drop-down. The following material types are available: Audio Cassette, Book, Course Kit, Course Reader/Packet, CD-ROM, Dictionary/Thesaurus, Equipment, Hardware (Special), Journal, Magazine, Miscellaneous, Software, Tool/Accessory, Video Cassette.
- Enter a Material Title.
- Enter a Material Location.
- Enter Material Notes.
- Click to add the material. Add more resources by repeating steps above if applicable.
- Subjects - Click Add Subject link to associate the event with a Subject Area. These subject names can be used by users when searching for training. This field is required. When a subject is selected, the subject appears below the Add Subject link. If the selected subject is a child subject, then the entire hierarchy is displayed. In addition, the entire subject hierarchy is displayed in the following areas:
- Competencies - Click Add Competency link to associate a competency to this event.
- Skills - Click Add Skill link to associate a skill to this event.
- Options:
- Active - Check to make this event active.
- Allow Users to Attend Multiple Sessions - Check to allow users to register for more than one session of this event.
- Allow Interest Tracking - Check to allow users to indicate interest for this event. This is checked by default. If this is unchecked after a user has already indicated interest, the event will not be visible to for the user on the Interest & Waitlist page. If it is re-activated, then event will be visible on the user's Interest & Waitlist page and the welcome page widget.
- Allow users to select Sessions - This option is only available when using the old Transcript functionality. Allows users to choose a particular session when enrolling in an event. The box is checked by default. Unchecking the box hides the Select Session link for the user in the following instances and takes effect immediately upon saving the event:
- Ability to Select Sessions - This option is only available when using the Universal Profile - Transcript functionality. This option enables administrators to configure which roles can select an event session on behalf of a user via the option on the user's Universal Profile - Transcript or Training Details page. At least one option must be selected. Select the appropriate roles:
- End Users - By default, this option is checked for newly created events.
- Admins and Managers - By default, this option is unchecked for newly created events.
- Keywords - Enter words to associate with the event. When a user searches and enters any of the keywords specified here, the course title will appear in the search results.
- Training Contact - If ILT Preferences are configured to have the administrator that is creating the event be the training contact by default, then the administrator's name appears in the Training Contact field when creating an event. The administrator can select a different training contact by clicking on the Select icon. If the administrator is not selected to display in the Training Contact field by default, then the field is blank and a training contact can be selected by clicking the Select icon. Only one training contact can be selected. The training contact is displayed to the user with the contact's phone number, fax number, and email address. Note: This field only appears if the Display Training Contact for Events and Sessions box is checked in ILT Preferences.
- The event contact will default to the person scheduling the Event, but can be overridden. The session contact will default to the person scheduling the Session, but can also be overridden.
- When this field is activated, events that have been created in the past will not have anybody listed in the training contact field. Editing an event without a contact will not default the contact field with the person performing the editing.
- Click or to continue to proceed to the Availability section, where you define who can view the Event and how settings will default for associated sessions. If no Event Availability and/or Session Defaults are defined, the Event will not be available to any user, and sessions assume system defaults. Availability and session default settings can be overridden at session level.
If the Enable to change provider for events option is selected in ILT Preferences, then the vendor can be changed. To change the vendor in the Primary Vendor field, click the Select icon ![]() and choose a different vendor from the pop-up. A warning message will appear and indicate that:Changing the vendor could cause some administrators to lose their right to take action on the event and associated sessions.Changing the vendor empties the preferred instructor fields on the Session Defaults tab on the event. The warning message lets the administrator know that they may want to select new preferred instructors at the event level. The instructors that are available to select will be from the new provider.
and choose a different vendor from the pop-up. A warning message will appear and indicate that:Changing the vendor could cause some administrators to lose their right to take action on the event and associated sessions.Changing the vendor empties the preferred instructor fields on the Session Defaults tab on the event. The warning message lets the administrator know that they may want to select new preferred instructors at the event level. The instructors that are available to select will be from the new provider.
Note: If no preferred instructor is selected at the event level, then no instructor is populated by default when creating a new session from scratch.
Changing the vendor empties the preferred primary instructor on the Session Defaults page. Note: If you would like at least one instructor populated by default when a new session is created for the event, then it is necessary to add the instructor on the Session Defaults tab of the event. The instructors that are available to select are instructors that are tied to the new provider.
Once the event is saved:
In addition:
Note: At least one vendor is required for an event, so the Primary Vendor field cannot be blank. For portals with the ability to add multiple vendors, both the primary and secondary vendor can be changed if the Enable to change provider for events option is enabled in ILT Preferences. See ILT Event - Create - Step 1 - Properties - Primary Vendor.
Changes to the vendor are tracked in the Modification History section of the event.
Modification History
For portals with multiple languages enabled, if the translation of a title or description is modified, the Modification History panel displays the change. However, only changes to languages that were added when the learning object was initially created are tracked.
The initial creation and changes to the title and description display in the panel as follows:
- Title at Initial Creation - <Learning Object Type> created with <Language of Title> Title "<Title>" by <User Full Name> (<User ID>) on <Date/Time of Creation>.
- Description at Initial Creation - <Learning Object Type> created with <Language of Description> Description of "<Description>" by <User Full Name> (<User ID>) on <Date/Time of Creation>.
- Change to Title - Title in <Language of Title> was changed to "<New Title>" by <User Full Name> (<User ID>) on <Date/Time of Creation>.
- Change to Description - Description in <Language of Description> was changed to "<New Description>" by <User Full Name> (<User ID>) on <Date/Time of Creation>.
- Title/Description Translation Change - Title/Description in <Language> "<New Title/Description>" was added by <User Full Name> (<User ID>) on <Date/Time of Creation>.