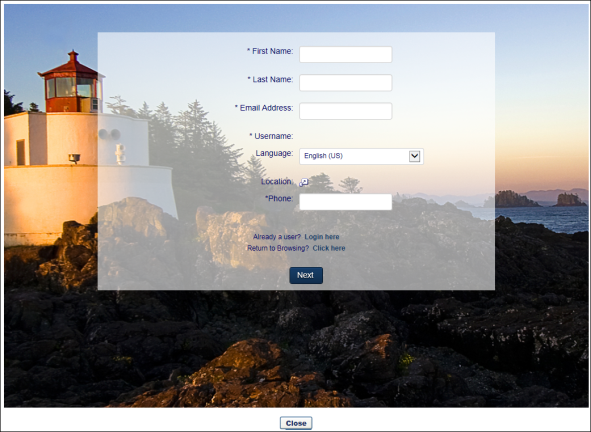
The Layout step of the self-registration group creation process allows you to configure the look of the self registration page. You can customize HTML above and below the self registration form fields. You can also add a background image and a transparent color block around the form fields, as well as define the font color of the form fields.
To create a self-registration group, go to . Then, click the Create New Self Registration Group link.
| PERMISSION NAME | PERMISSION DESCRIPTION | CATEGORY |
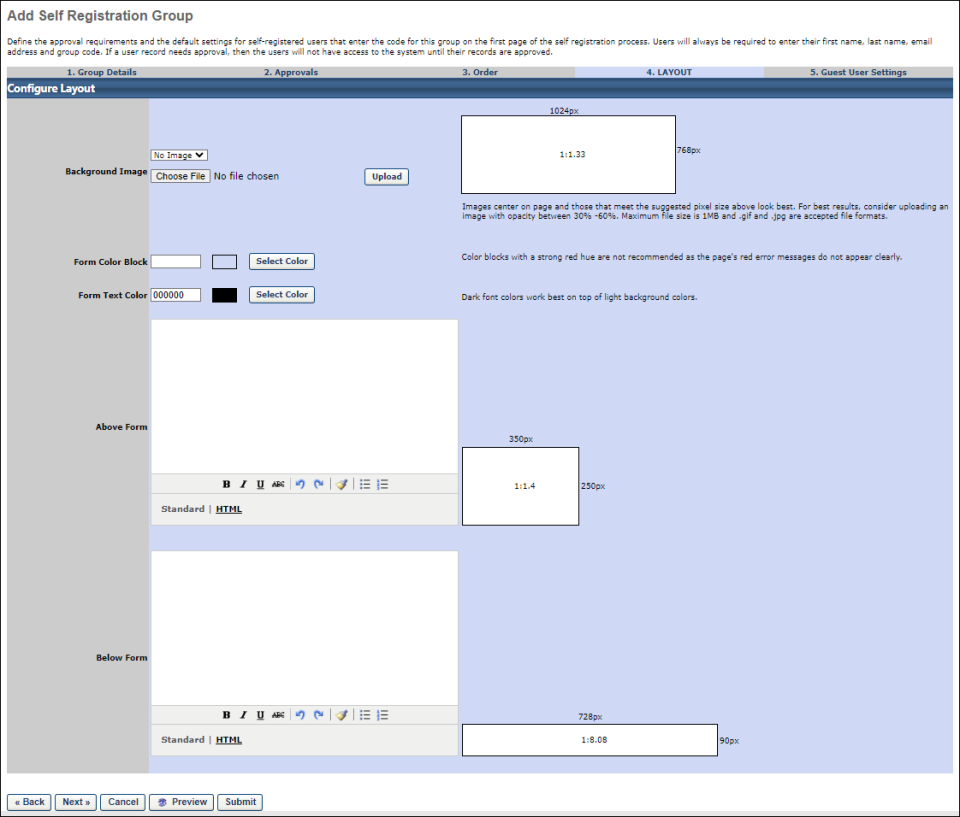
Background Image
This option enables administrators to upload an image that will fill the background of the self registration page. Administrators can select an existing image from the drop-down or click the button and upload a new image.
When uploading an image, the accepted file types are .gif and .png files up to 1MB.
Form Color Block
This option enables administrators to add a semi-transparent colored box centered around the self registration form fields. Administrators can enter the hex value for the color in the text box or click the button to select a predefined color.
If an image is not used for the page, then the colored form color block displays without transparency.
Note: If the color white (hex value = ffffff) is selected to display over a background image that includes color within the parameters of the form color block, then the transparency effect still displays over the colored areas.
Best Practice: As a best practice, it is recommended not to use color blocks with a strong red hue. Such hues can obscure the red error messages that display to users on the self registration page.
Form Text Color
This option enables administrators to define the font color for the self registration form fields. Administrators can enter the hex value for the color in the text box or click the button to select a predefined color.
Above Form
This option enables administrators to add valid HTML that will appear in a fixed rectangle above the self registration form fields. The size of the rectangle is 350px x 250px (or a 1:1.4 ratio).
When in Standard mode, the standard design features display. When in HTML mode, the standard design features do not display and the HTML code can be viewed and modified.
Below Form
This option enables administrators to add valid HTML that will appear in a fixed rectangle below the self registration form fields. The size of the rectangle is 90px x 728px (or a 1:8.08 ratio).
When in Standard mode, the standard design features display. When in HTML mode, the standard design features do not display and the HTML code can be viewed and modified.
Self-Registration Pages Created Prior to the May '15 Release
Prior to the May '15 release, HTML and design options were not automatically enabled. For self-registration pages created prior to the May '15 release, additional options are available that do not apply to newer pages:
- Configure with HTML - Select this option to enable the HTML options for the layout. Once selected the Color and Image sections are replaced with HTML options.
- Colors - Select the colors for the self-registration page.
- Corporate Colors - Select this option to use the settings from the Display Preferences on the top node of the Division organizational unit.
- Clear - Select this option to use a system generated uncolored style.
- Image - Select an image that will display either above the self registration form fields or to the left of the form fields. The following options are available in this section:
- Select Image - Select an image from the drop-down. Or, browse for a new image by clicking , and then upload the image to the page. Note: The PNG file format is not supported. Note: Uploaded images cannot have spaces in the file name.
- Above Page - Select this option to display the image above the self registration form fields.
- Beside Page - Select this option to display the image to the left of the self registration form fields.
Multi-Step Self Registration Pages
For self registration pages that have multiple steps, the settings defined on the Layout tab display across all steps of the self registration process.
Back/Next/Cancel/Preview/Submit
- Click to return to the previous step.
- Click to continue to the Guest User Settings page. See Registration Group - Create - Step 5 - Guest User Settings.
- Click to cancel creating or modifying the self registration group.
- Click to preview the self registration page. All settings defined on the Layout tab display in the preview.
- Click to save changes.