Registration Group - Create - Step 3 - Order
Items that are in the Hidden column do not appear in the self-registration process, while items in the Visible column do.
To create a self-registration group, go to . Then, click the Create New Self Registration Group link.
| PERMISSION NAME | PERMISSION DESCRIPTION | CATEGORY |
Add Custom Fields
Click the Add Custom Fields link to add an existing custom field to the registration process. To create a new custom field, See Custom Field Administration.
- Once a custom field is added, it appears in the Visible column and can be moved to a different location by dragging and dropping. Click the Expand icon to configure the field.
- Use default label (including translations) - When this field is selected, the name of the field displays as the name defined in Custom Field Administration in the default language for the custom field. If any translations have been defined for the field, then the translated value displays for users when completing the self-registration page, if a translated value is available for the user's browser language.
- Display Name - Set the name that is displayed to the users.
- Required - Select this option if the field must be completed.
- Users selects - Select this option to allow the user to complete the field.
- Automatically assign to - Select this option and enter a value to automatically set the value for the user to the specified value.
Add Page Break
Click the Add Page Break link to add a page break to the self-registration process. A page break is used to divide the fields into multiple pages. For example, if on PAGE 1 there is four fields and then a page break, when the user completes the four fields on PAGE 1, they are taken to the next page to complete the fields that appear after the page break.
- When a page break is added, it appears at the bottom of the Visible fields list. It can be moved to a different location by dragging and dropping.
Expand All
Click the Expand All link to expand all fields that can be customized. Alternatively, you can click the Expand icon ![]() to the right of a field name to customize the field. When all fields are expanded, you can click the Collapse All link to collapse all fields.
to the right of a field name to customize the field. When all fields are expanded, you can click the Collapse All link to collapse all fields.
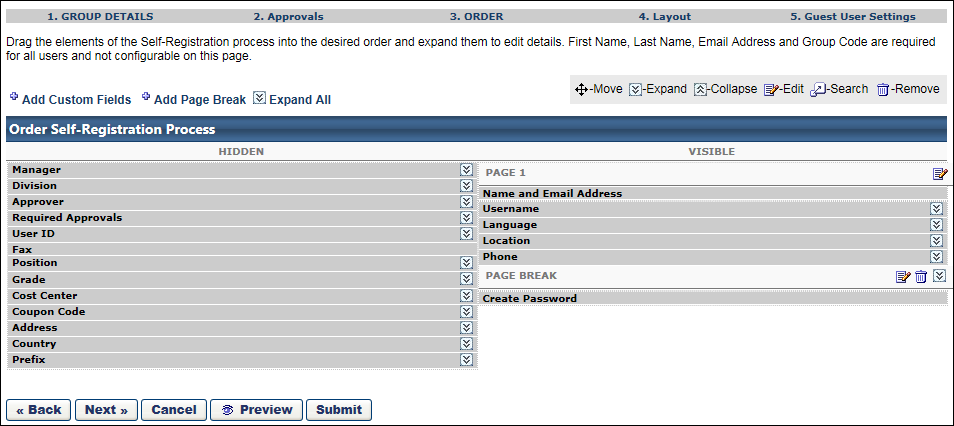
Order Self-Registration Process
The Order Self-Registration Process table represents the process that users follow when self-registering. The table has two columns: Hidden and Visible. By default, all non-required fields appear in the Hidden column, while all required fields appear in the Visible column.
- PAGE 1 - By default, PAGE 1 is always listed first with the Name and Email Address field. To edit the instructions that appear on the first page, click the Edit icon.
- Name and Email Address - The Name and Email Address field is always in the Visible column because they are always required and cannot be edited. This is done because self-registering users should always be presented with the Name and Email Address fields at the beginning of the self-registration process.
- PAGE BREAK - For each page break, you can edit the instructions that appear on the new page by clicking the Edit icon. You can also delete the page break.
- Create Password - The Create Password field appears as the last item in the Visible column. This row is required and cannot be moved. If approval is not required and a default password is set in the Password Preferences, the Create Password field appears during self-registration and they are required to create a password.
All fields can be dragged and dropped into a different order or column except for the Name and Email Address field.
To edit a field, click the Expand icon ![]() to the right of the field name. The following options are available for the default fields:
to the right of the field name. The following options are available for the default fields:
Address
This field allows users to enter their physical address. When included on the self-registration page, the following fields display for users to complete:
- Address Line 1
- Address Line 2
- City
- State
- Zip
In the configuration options for the field, you can make the field optional or required. You can also select to automatically set the address to the location in the Location field, which is the default selection for the configuration options.
Approver
- No Approver - click radio button if no Approver is to be assigned to all users in this group
- Allow User to Select Approver - click radio button to allow a user to select their Approver
- Require Manager to Select Manager - click radio button to require a user to select their Approver
- Automatically Assign to - click radio button to and then select Approver that will be assigned to all users in this group
Cost Center
- Automatically assign to - click radio button and select Cost Center that will be assigned to all users in this group
- User Selects from the Following List - click radio button to allow the user to select from a list of Cost Centers that is created by clicking on the Add Cost Center link to create a list for selection. Include Subordinates - check to include subordinates if applicable.
Country
This field allows users to select their country. The field displays as a drop-down from which users select their country.
In the configuration options for the field, you can make the field optional or required. You can also select to automatically set the country to the location in the Location field, which is the default selection for the configuration options.
Coupon Code
- The Coupon Code field display name can be customized and can be required. This field allows a self-registering user to enter an LMS coupon code during the registration process.
Division
- Automatically assign to - click radio button and select Division that will be assigned to all users in this group
- User Selects from the Following List - click radio button to allow the user to select from a list of Divisions that is created by clicking on the Add Division link to create a list for selection. Include Subordinates - check to include subordinates if applicable.
Grade
- None - click radio button if no grade is to be assigned to this group
- Automatically assign to - click radio button and select Grade that will be assigned to all users in this group
- User selects from the following list - click radio button to allow the user to select from a list of Grades that is created by clicking on the Add Grade link to create a list for selection
Language
- User selects - click radio button to allow the user to select the desired language if applicable
- Automatically assign to - click radio button and select the language from drop-down list to automatically assign to users in this group
Location
- Automatically assign to - click radio button and select Location that will be assigned to all users in this group
- User Selects from the Following List - click radio button to allow the user to select from a list of Locations that is created by clicking on the Add Location link to create a list for selection. Include Subordinates - check to include subordinates if applicable
Manager
- No Manager - click radio button if no Manager is to be assigned to all users in this group
- Allow user to select manager - click radio button to allow a user to select their Manager
- Require user to select manager - click radio button to require a user to select their Manager
- Automatically assign to - click radio button to and then select Manager that will be assigned to all users in this group
Phone/Fax
- Require valid phone number for registration - Select this option to require users to enter a valid phone number in order to register. This is an alphanumeric field, which allows users to enter a phone number, as well an extension, etc.
Position
- Automatically assign to - click radio button and select Position that will be assigned to all users in this group
- User Selects from the Following List - click radio button to allow the user to select from a list of Positions that is created by clicking on the Add Position link to create a list for selection. Include Subordinates - check to include subordinates if applicable.
Prefix
This field displays as a text box and allows users to enter a prefix, up to 20 characters. In the configuration options for the field, you can make the field required.
Required Approvers
- User selects - click radio button to allow the user to select the number of required approvals for learning object request approvals
- Automatically assign to - click radio button and enter number of required approvals to automatically assign this number of approvals to users in this group
User ID
- Allow User to enter ID - Select this option to allow users to enter a user ID.
- Require User to enter ID - Select this option to require users to enter a user ID.
- Hide this field from users (ID's are generated using system logic) - This option is only available for portals with Cornerstone HR enabled. When this option is selected, the system automatically generates a User ID for the user. If this option is selected, the User ID field must be in the Hidden column. User IDs are created based on the User ID Generation Rules. See User ID Generation Rules.
- Hide this field from Users (ID's are automatically generated) - Select this option to hide the User ID field and allow the system to automatically generate a user ID. The user ID is the value in the User ID on the user record. When this option is selected, the User ID field cannot be added to the Visible column, since the ID will be auto-generated. Note: If the Allow User to enter ID or Require User to enter ID option is selected, then the User ID field can be added to the Visible column.
- Field Name
- Format - Define the pre-text format and the numeric starting point for the automatically generated User ID. For example, enter C in the first box and 1000 in the second box to begin auto-generation of User ID's with the name C1000, C1001, C1002. The numeric starting point must begin with a non-zero number. This is because this is a numeric field and any zeros at the beginning of the starting point value are omitted. For example, if "01" is entered as the numeric starting point, the system will save the numeric starting point as "1." If it is necessary for the numbering system to begin with a zero, then this should be included as part of the pre-text.
Username
- Allow user to enter - click radio button to allow users to enter their own username
- Automatically set to user's email address - click radio button to have the system automatically set the username to the user's email address. Note: Multiple users may register with the same email address as long as the option on the Create Self Registration Group page is not selected to automatically make the username equivalent to the user's email address.
- Automatically set to User ID - click radio button to automatically set the username to the user ID
Next, Preview, or Submit
Click to continue to the Layout page. You can also click to view the page or to save changes. See Registration Group - Create - Step 4 - Layout.
Note: When previewing the page, if CAPTCHA is enabled for a portal, a CAPTCHA widget appears on the Self-Registration page preview. The availability of this functionality is controlled by a security setting which can be managed in the Security Health Check tool.