A data feed is a way for organizations to automatically load data such as user or transcript data from an external system into the Cornerstone system. For example, if an organization maintains their user data base in an external system, they can configure a data feed to regularly load any new or modified user records into their Cornerstone system.
Organizations can import one or more data files simultaneously based on a schedule.
To create a new data feed configuration, go to . Select the panel. Then, select the button.
This opens the New Configuration flyout, which guides you through a multi-step process to create a new configuration.
| PERMISSION NAME | PERMISSION DESCRIPTION | CATEGORY |
| Access Edge Import | Grants access to the Edge Import tool, which enables administrators to load data into their portal. This permission cannot be constrained. This is an administrator permission. | Edge Import |
| Delete Feeds | Grants ability to delete disabled Edge Import feeds. Users with this permission can delete disabled feeds created by anyone for all types of data feeds. This permission cannot be constrained. This is an administrator permission. | Edge Import |
| Enable/Disable Feeds | Grants ability to enable or disable a data feed in Edge Import. This permission cannot be constrained. This is an administrator permission. | Edge Import |
| Manual Run Feed | Enables administrator to manually initiate a data feed processing. This permission cannot be constrained. This is an administrator permission. | Edge Import |
| Set up Feed | Enables administrator to access the Feed Settings page where the administrator can create and update feeds and schedule feeds. This permission does not grant the ability to activate feeds or manually run feeds. This permission cannot be constrained. This is an administrator permission. | Edge Import |
Edge Import Migration Guides
- Core Loads Migration - Select this link to download the Edge Import Core Loads Migration Guide.
- Important: For customers using the following Data Load Wizard features that are not available in Edge Import, we do not recommend migration of Inbound Data Feed (IDF) for Users and OUs from Data Load Wizard to Edge Import at this time:
- Sensitive Personally Identifiable Information (SPII) fields - Date of Birth/SSN
- Customers using the above features will be informed when these features are available in Edge Import and will be given at least three months to deprecate.
- Important: For customers using the following Data Load Wizard features that are not available in Edge Import, we do not recommend migration of Inbound Data Feed (IDF) for Users and OUs from Data Load Wizard to Edge Import at this time:
Edge Import Guides
- Edge Import Starter Guide - Select this link to download the Edge Import Starter Guide.
- Capabilities - Select this link to download the Edge Import Skill and Capabilities Guide.
- Compensation - Select this link to download the Edge Import Compensation Guide.
- Employee and OU Loads and Feeds - Select this link to download the Edge Import Employees and OU Loads and Feeds Guide.
- Learning - Select this link to download the Edge Import - Learning Guide.
- Performance - Select this link to download the Edge Import Performance Guide.
- Recruiting - Select this link to download the Edge Import Recruiting Guide.
Data Feed Name
A default name is given to the feed, but this can be edited. To edit the feed name, click the Edit icon ![]() to the right of the feed name.
to the right of the feed name.
Enable/Disable Data Feed
Depending on the feed status, an enable/disable toggle may appear next to the feed name.
- If the feed is ready to be enabled, an Enable/Disable toggle appears to the right of the feed name. When this toggle is enabled, the data feed is enabled. This toggle is only available if the administrator has permission to enable or disable feeds.
- If the feed is not ready to be enabled, specific prompts appear to the right of the feed name to help administrators understand what is required to enable the feed. For example, if there are no active files for the feed, then "No active files" is displayed next to the feed name.
Overview Step
The Overview step enables administrators to configure the general settings of the data feed. The following settings and information are available:
- FTP Location - This displays the location where the system will collect the files for the data feed. This is the location where data files should be loaded by the administrator in order to be fed into the Cornerstone system via the data feed. A default file location is displayed.
- Change FTP Path - Select this link to change the FTP location. The folder location must exist before updating the FTP path. Multiple feeds can have the same FTP path. However, all feeds using the same path must have unique file names. Note: Only Cornerstone FTP account paths can be utilized. External FTP accounts cannot be used.
- Files - This section shows a summary of the files that are added and included in the data feed. At least one file must be added and included in the feed in order to enable the feed.
- - Select this button to add a file that will be included in the data feed.
- Schedule - This section shows a summary of the schedule that is set for the data feed. A schedule must be set for the feed in order to enable the feed.
- - Select this button to set the schedule for the data feed.
- Encryption - This section shows a summary of the encryption key that is set for the data feed. Organizations may or may not use encryption keys for their data feeds.
- - Select this button to set an encryption key for the data feed. Encryption keys are created on the Manage Keys page. See Key Management - Manage Keys.
- Notification - This section shows a summary of the recipients who are added and enabled to receive email notifications for the data feed.
- - Select this button to add and enable notification recipients.
- Last Run - This section shows a summary of the last time the data feed was run. This section is only populated if the feed has run at least once. Select the View More link to view all of the times the feed has run. See Edge Import - Data Feed Runs.
- Next Run - When the feed is enabled and a schedule is set, this section shows the next date and time at which the feed will run.
- Status - This section shows whether the feed is enabled or disabled. If the feed is ready to be enabled, an Enable/Disable toggle appears to the right of the feed name.
When editing a data feed, administrators with the appropriate permissions have the option to delete the data feed from the Overview tab. See Edge Import - Delete Data Feed.
File Setup Step
The File Setup step enables administrators to configure which files are included in the data feed. Excel and text/CSV file types are supported by data feeds.
If any files have been added for the data feed, they are displayed on this page. Administrators may select a file to modify or remove the file.
File Setup - Add File
To add a file to the data feed, select the button. This opens a flyout in which administrators must provide information about the file. Enter the following information about the data feed file:
- Category and Type - From the drop-down menu, select the data type that applies to the data in the data feed file.
- Configuration - From the drop-down menu, select the configuration that most closely matches your data.
- File Name Starts With - Enter the text that matches the beginning of the file name.
- This can be full file name with extension (e.g., users.txt) or just the beginning text of the file name (e.g., users). This enables organizations to use dynamic file names.
- This value must be unique across all files in the feed.
- When the feed runs, if there are multiple files that match this criteria, the feed does not process and an error is displayed.
- Include in feed - Select whether this file is included in the feed. This enables organizations to temporarily exclude certain files from the feed. A file must be included in the feed in order to have the file's data imported to the system.
- Select the button.
File Setup - Edit File
To edit a file in the data feed, select the file on the File Setup page. This opens a flyout in which administrators can edit the file information. See the File Setup - Add File section for information on each field.
File Setup - Run Feed
When at least one file is included in the feed, a button is available on the File Setup step. This button is only available if the administrator has permission to manually run data feeds.
When this button is selected, the feed is initiated and any files that are included in the data feed are processed. In executing a data feed manually, the current user permissions are applied.
File Setup - Check Files
When at least one file is included in the feed, a button is available on the File Setup step.
When this button is selected, the system checks the files that are included in the feed and confirms whether matching files are available in the FTP location.
- If a matching file is found, a green check mark is displayed next to the file name.
- If a matching file is not found, a red X is displayed next to the file name.
Scheduling Step
The Scheduling step enables administrators to set and view the schedule for when the feed should process.
Scheduling - Set Schedule
To set the frequency and time at which the data feed is processed, select the button. This opens a flyout in which administrators must provide scheduling information.

Enter the following information about the data feed schedule:
- Frequency - How often should this feed run? - Select whether the data feed should be processed hourly, daily, weekly, or monthly.
- Schedule - Using the scheduling options, specify when the data feed should be processed. These options vary depending on which frequency is selected.
- Summary - This section displays the next five run times based on the selected frequency and schedule. Administrators should review this schedule to ensure they have configured the data feed schedule as desired.
- Select the button.
Scheduling - Change Schedule
Once a schedule is set, the schedule is displayed on the Scheduling page. To change the schedule, select the button. This opens a flyout in which administrators can edit the scheduling information. See the Scheduling - Set Schedule section for information on each field.
Notifications Step
The Notifications step enables administrators to add and manage who should receive email notifications related to the data feed. Notifications can be triggered on the start and completion of a feed, as well as when there is an error. Notification emails contain links to view the feed run details in Edge Import.
Notifications - Add Notification to Feed
To add a notification for the data feed, select the button. This opens a flyout in which administrators must configure the notification.
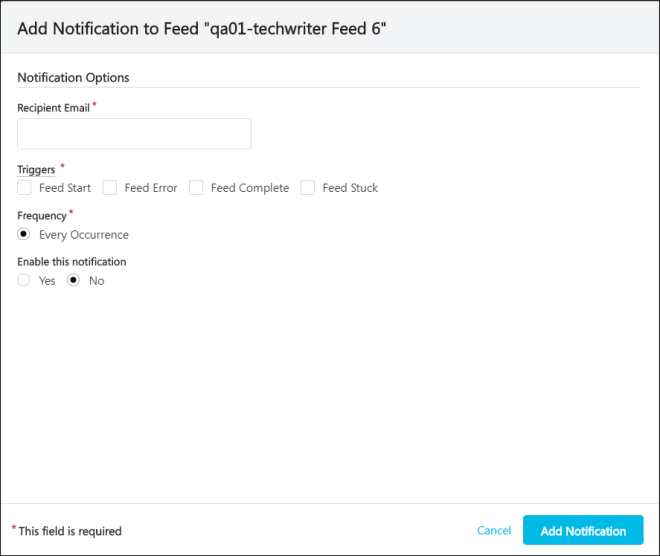
Enter the following information to configure the notification:
- Recipient Email - Enter the email address for the user who will receive the notification, when triggered.
- Triggers - Select which events should trigger the notification.
- Frequency - By default, all notifications are sent for every occurrence of the selected triggers.
- Enable this notification - Notifications can be enabled or disabled. When a notification is disabled, the configured recipient will not be notified when the selected triggers occur for the data feed.
- Select the button.
Notification - Update Notification
Once a notification is configured, the setting are displayed on the Notifications page. To update or remove a notification, select the corresponding notification. This opens a flyout in which administrators can edit or remove the notification. See the Notifications - Add Notification to Feed section for information on each field.
Change Log Step
The Change Log step displays a complete modification history for the data feed, including creation and any modifications.
To filter which log items are displayed in the table, select the button. This opens the Feed Runs Filter flyout. The following options are available:
- Changed Area - Select an area to view only changes that were made to the selected area (e.g., General, Files, Schedule, Notifications).
- Changed By - Select a user to view only changes that were performed by the selected user.