Load Resume Data - Step 3 - Upload
If you are uploading new data to the system, first select a template by clicking the Template link in the lower-left corner. This ensures the proper data is included and that it is in the proper format. In the template, columns that are red are required. See Load Data - Select Data Load Template.
The template for resume data contains the following standard fields:
- User ID - This is used to associate the resume data with a system user. This field is required.
- Entry ID - This is set by the administrator and is used to reference the resume data that is being loaded into the system. Entry IDs are not displayed within the system and must be tracked by the administrator in order to reference the data in the future. This field is required.
- When loading new resume data, a unique Entry ID must specified.
- When updating existing resume data, the Entry ID for the data that is being loaded must match the Entry ID for the existing data.
- Data that is manually created in the system cannot be updated using the Data Load Wizard because this data does not have an Entry ID.
- Culture ID - This specifies to which culture the resume data should be loaded. If a Culture ID is not provided, then the resume data is loaded with the culture of the administrator who is performing the data load.
- Delete - This field enables administrators to delete existing resume data in the system. The resume data that is being deleted must have an Entry ID, and the Entry ID must be provided in the Entry ID column.
- When this column is set to True, the data for the row is deleted from the database.
- When this column is set to False, the data for the row is not affected.
- When this column is empty or if an Entry ID is not provided for the row, the data for the row is not affected.
-
- Resume fields can be configured to be required. If a field is required on the Resume configuration page, then the field must be included in the data load.
As you are updating and formatting your data, prior to uploading the file click the Helpful Hints link in the lower-left corner. This document provides you with all of the proper formatting information for the data as well as necessary information for uploading a data file. When formatting the file of data, each column must have a title or header, which will be associated with a data field in the system.
If you need to add custom fields to the system in order to match them with a data field in your file, click the Define Resume Attributes link. This takes you to the Resume Administration page. You can add the necessary custom fields and then return to the Data Load Wizard.
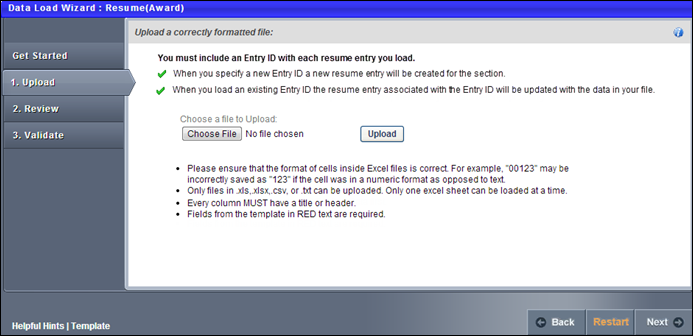
To upload a file of data
- Click the button and locate the file.
- You can only upload the following file types: .xls, .xlsx, .csv, .txt.
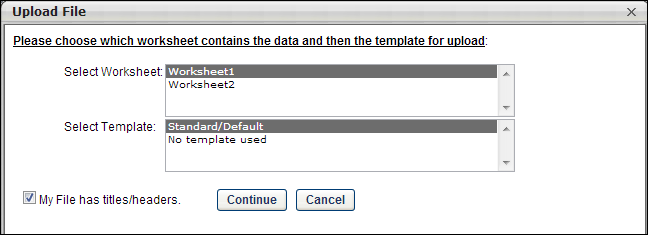
- Once the file is selected, click the button. An Upload File pop-up appears with different options depending on the type of file that is uploaded.
- Excel File (.xls, .xlsx). Select Worksheet (Excel files only) - Only one worksheet can be uploaded at a time, so if the Excel file has multiple worksheets, you must select the worksheet that you are uploading.
- Text, Comma, or Pipe Separated File (.txt, .csv). Select Delimiter (Tab, Comma, or Pipe Separated files only) - Select what delimiter (e.g., tab, comma, pipe) is used to separate records within the file. This enables the system to properly extract the data from the file.
-
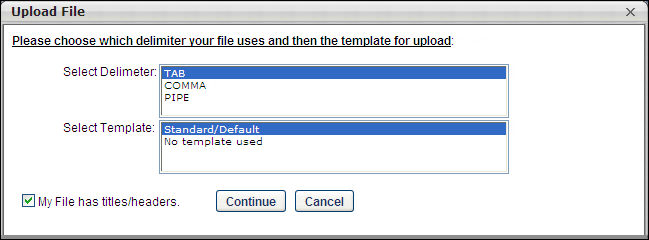
- Select Template - If you used a template to create the file, select the appropriate template. If no template is used, select the "No template used" option. If you have used the Data Load Wizard in the past and saved a template for this file type, that template is available here.
- My File has titles/headers - Data files should have titles or headers for each column of data. If the file you uploaded does not have titles or headers, deselect this option. Deselecting this option modifies the next step in the review process.
- After selecting the appropriate options, click . The file is uploaded and listed on the page.

If this is the wrong file or the wrong worksheet within the file, you can delete it by clicking the Remove icon ![]() to the left of the file title and upload another file. Alternatively, you can browse and upload a new file. When the correct file is uploaded, click to proceed to the Review step. See Load Resume Data - Step 4 - Review.
to the left of the file title and upload another file. Alternatively, you can browse and upload a new file. When the correct file is uploaded, click to proceed to the Review step. See Load Resume Data - Step 4 - Review.