After creating a data mapping template for each type of data that will be loaded, the compensation data feed must be configured.
To view and manage data feeds, go to Admin > Tools > Core Functions > Data Load Wizard. Then, click the Configure Feed link.
| PERMISSION NAME | PERMISSION DESCRIPTION | CATEGORY |
| Data Load Wizard - Compensation | Enables administrator to load compensation data via the Data Load Wizard. This permission also enables administrators to track data loads and manage data load templates. This is an administrator permission. | Data Load Wizard |
| Data Load Wizard - Feed Configuration: Compensation – Create | Enables administrator to access the Feed Summary page in order to create and edit compensation data feeds. This is an administrator permission. | Data Load Wizard |
| Data Load Wizard - Feed Configuration: Compensation – Run Feed | Enables administrator to access the Feed Summary page in order to manually run a compensation data feed once it has been created. This is an administrator permission. | Data Load Wizard |
| Data Load Wizard - Feed Configuration: Compensation - Save | Enables administrator to access the Feed Summary page in order to view and edit compensation data feeds. This is an administrator permission. | Data Load Wizard |
Create New Feed
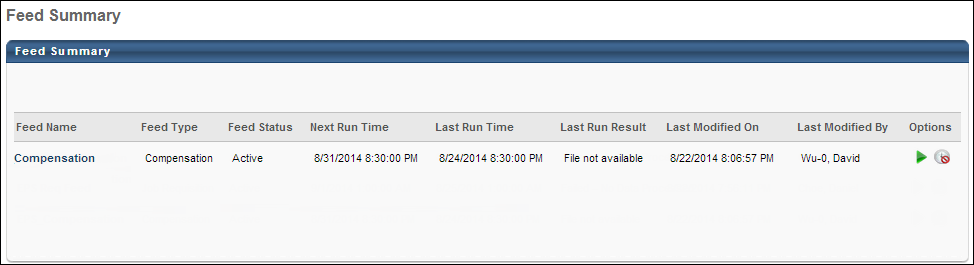
Only one compensation feed can be created. If a compensation feed already exists, you cannot create another, and you must edit the existing compensation feed. See the Configure Existing Feed section below for additional information.
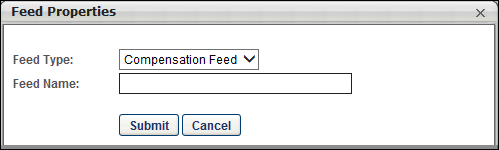
To create a compensation data feed, click the button. This opens the Feed Properties pop-up.
Specify the following information:
- Feed Type - From the drop-down menu, select Compensation Feed.
- Feed Name - In this field, enter a name for the compensation data feed, up to 100 characters.
Click the button to begin configuring the compensation data feed. This opens the Feed Configuration Page. See the Feed Configuration Page section below for additional information.
Configure Existing Feed
To edit an existing compensation data feed, click the feed name in the Feed Summary table. This opens the Feed Configuration page. See the Feed Configuration Page section below for additional information.
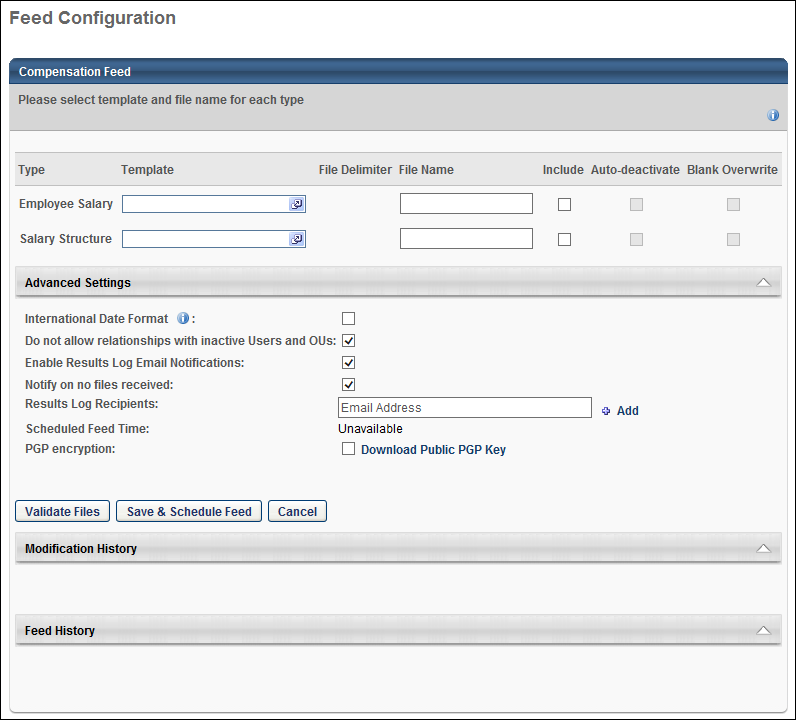
Feed Configuration Page
The following information and configuration options are available:
Compensation Feed Table
The following information is displayed in the Compensation Feed table:
- Type - This column lists each type of compensation data that is available to be loaded via the compensation data feed. This column cannot be modified.
- Template - This column displays the data mapping template that is used for the corresponding compensation data type. Data mapping templates must be created and saved via the Data Load Wizard prior to configuring the data feed. See Compensation Feed - Step 2 - Create Mapping Template.
- To select a template, click the Select icon
 . This opens the Template List pop-up, which displays each of the previously saved data mapping templates for the corresponding compensation data type. Select the appropriate template, and click . The selected template is displayed in the Template column. Note: If the wrong data mapping template is selected, the data may be loaded into the system incorrectly, or validation errors may occur when attempting to load files via the data feed.
 - To remove a selected template, click the Remove icon
 . A different data mapping template can then be selected.
- To select a template, click the Select icon
- Delimiter - This column displays the delimiter for the selected data mapping template. The delimiter was manually selected when the corresponding template was created. Verify that this delimiter is the same delimiter that is used in the data files that will be loaded via the data feed. This value cannot be modified. If this delimiter is incorrect, you must save a new data mapping template via the Data Load Wizard. See Compensation Feed - Step 2 - Create Mapping Template.
- File Name - In this field, enter the exact name of the file that is used for the data feed. The specified file must exist in the Datafeed folder in the FTP directory. There can be no variation to the file name. The file name must include the file extension. For example, a tab delimited .txt file named Employee_Salary must be specified as Employee_Salary.txt.
- The following file extensions are accepted: .txt, .csv, .xls, .xlsx, or one of these extensions followed by .pgp (if encrypted).
- Include - Select this option to activate the data feed for this data type. If this option is not selected, then the associated data type is not included in the data feed.
- To temporarily remove a file from the data feed, deselect this option.
Advanced Settings
The following options are available in the Advanced Settings section:
- International Date Format - Select this option if dates within data feed files are in international date format. This allows the system to properly read and interpret the date values when loading them into the system. Click the Information icon
 to view the supported international date formats.
 - Do not allow relationships with Inactive Users and OUs - Select this option to prevent subordinate users and OUs from being associated with an inactive user or OU. In general, it is advised to select this option, and it should only be selected during historic data loads. Having users or OUs associated with inactive relationships can create approval workflow issues. If this option is selected:
- For users, if a user's manager, approver, or some other dynamic relationship is deactivated, this causes an error during validation.
- For OUs, if a parent OU is deactivated, this causes an error during validation.
- Enable Results Log Email Notifications - Select this option to have the results of the data load emailed to the specified results log recipients. This log includes any errors with specific records. Alternatively, the results of the data load can be viewed on the Track Data Loads page. See Data Load Queue.
- Notify on no files received - Select this option to have an email notification sent to the specified results log recipients if no data file is provided for the data feed in the FTP directory when the data feed attempts to process.
- Results Log Recipients - Enter the email address of the person who should receive email notifications for the results log and when no files are received by the data feed. After entering an email address, click the Add link. Additional email addresses can be added by repeating the process.
- To remove a recipient, click the Remove icon
 for the recipient.
- To remove a recipient, click the Remove icon
- Scheduled Feed Time - This displays the day and time at which the data feed is next scheduled to run. To modify the data feed schedule, click the button.
- PGP encryption - Select this option if PGP (Pretty Good Privacy) encryption is to be used with the data feed files.
- To encrypt your data feed, you must first download the public PGP key by clicking the Download Public PGP Key link.
- After downloading the public PGP key, use this key to encrypt the data feed files. Contact your internal IT department for support with encrypting the data feed files.
Validate Files, Save & Schedule Feed, or Cancel
- Validate Files - Once a data feed is configured, click this button to validate the data files. See Compensation Feed - Step 4 - Validate and Schedule Feed.
- Save & Schedule Feed - Once the data files are validated, click this button to determine the data feed schedule and to save the data feed configuration. See Compensation Feed - Step 4 - Validate and Schedule Feed.
- Cancel - Click this button to discard any unsaved changes to the data feed configuration.