An online course or publication is an electronic learning course that can be completed asynchronously within the system or offline using the Offline Player. An online course is comprised of SCORM or AICC compliant files that are bundled into a zip file.
This topic relates to the legacy Course Publisher functionality. Your organization may be using the Content Uploader. See Content Uploader - Create an Online Course - Overview.
All uploaded files must be SCORM 1.2, SCORM 2004, or AICC compliant and in a zip file. Note: Currently, SCORM 2004 3rd edition is implemented. Backward compatibility is generally expected, and thus courses published in 2nd edition is likely to work properly, but it is advised that courses are created using SCORM 2004 3rd edition.
Up to 100 AICC courses or 250MB of SCORM courses can be zipped together and uploaded. Individual SCORM courses which exceed 250 MB in size may require upload by Cornerstone. Consult Global Customer Support about creating a work order request.
To create a new online course:
- Go to or . Then, click the Create New Publication link.
- Go to . Then, click the button and click the Online Class link.
Administrators can only access the Course Publisher if they have been granted a content license and they have the proper permissions. A content license can be granted on the Manage Licenses page. See Manage Licenses.
| PERMISSION NAME | PERMISSION DESCRIPTION | CATEGORY |
| Course Publisher Update |
Grants ability to update existing online training courses previously published via the course publisher. Administrators must also be granted a content license from the Manage Licenses page. This is an administrator permission. With the Oct '17 release, after the Content Publisher is activated in the system, users with this permission are automatically granted the permission to modify online classes. |
Learning - Administration |
Process to Create a New Course
The process of creating a new course is a multi-step process. Prior to using Course Publisher to configure and publish your course, a course provider must first author the course and package it into one of the accepted protocols (AICC, SCORM) as a zip file.
Once you have a zip file that contains the course files, follow these steps to configure and publish your course:
- On the Publication Information page, enter the basic information for the course. See the Publication Information section below for additional information.
- Browse for and upload the zip file that contains the course files. See the Upload Publication File section below for additional information.
- Click the Edit Publication icon
 from the Course Publisher page. See Course Publisher (Legacy) - Edit Course Before Publishing.
 - Click to publish the course.
- Configure the course in Course Catalog. When a new course is published, it is added to the Course Catalog, but no availability, evaluations, subjects, skills, or competencies are associated with that course by default. This information is configured by editing the course in Course Catalog. See Course Catalog Overview.
Troubleshooting Information
See Course Troubleshooting Guide.
See QUICK START GUIDE - Uploading Courses via Course Publisher.
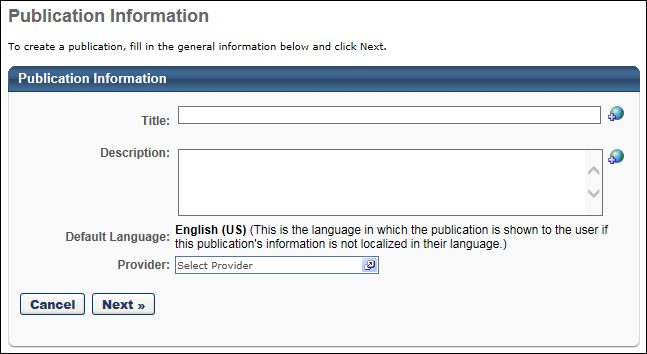
Publication Information
Enter the following information about your Online Course:
- Title - Enter title for publication (required). The title entered here is not the course title the user will see. This title labels the publication files for the administrator. The course title is created from the metadata from the zipped file. If multiple languages are enabled for the portal, click the Translate icon to localize the title into other available languages. The character limit is 500.
- Description - Enter description for publication. This is not the description for the course. The course description can be entered in Course Catalog after the published. If multiple languages are enabled for the portal, click the Translate icon to localize the description into other available languages.
- Default Language - This displays the default language for the course. This is the language that displays for users if a translation is not available for the publication title. The default language is set as the language of the administrator at the time they create the publication. This cannot be edited.
- Provider - To select a provider, click the search icon
 . This is required. Providers can be viewed within the Providers administration page. See Training Providers Overview.
 - Click .
Upload Publication File
- - Click this button to locate and select the zipped course file. Multiple courses can be uploaded in a publication, but must be uploaded in a single zipped file. Up to 100 AICC courses or 250MB of SCORM courses can be zipped together and uploaded.
Important: The Course Publisher cannot unzip multiple zipped files packaged within a single zipped file.
- - Click to upload file. Upload time is dependent on the size of your course files and your internet connectivity transfer rate for uploading. It is not uncommon for large course files to take up to an hour to load. If you navigate away from the page when uploading a course, the upload terminates.
- A pop-up window will open with progress indicator and will close when file has uploaded.
- You will be directed to a confirmation page after upload. Note: If course code functionality has been activated in your portal, a course code is automatically generated for the LO immediately after the administrator saves the new LO.
- Status will be Upload In Progress. When the status changes to Pending Publish, course can be viewed or published.
- Click and it will redirect you back to the Course Publisher page.
- Click the Edit Publication icon from the Course Publisher page. See Course Publisher (Legacy) - Edit Course Before Publishing.
- Click to publish the course. When a new course is published, it is added to the Course Catalog, but no availability, evaluations, subjects, skills, or competencies are associated with that course by default. This information is configured by editing the course in Course Catalog. See Course Catalog Overview.
Note: When creating a SCORM 2004 course, the Use SSL preference in Content Launching Preferences must be selected in order for the content to load and function properly.
Helpful Hints - Score Calculation
- When creating a new course or publication in which a score is calculated, in order for the system to calculate and display a score on the Training Details page, the maximum score must be defined (i.e., greater than zero) in the SCORM wrapper (max_score) and the user score must be defined (i.e., not equal to null).
- If the Score field does not appear on the Training Details page, then the maximum score is not defined in the SCORM wrapper.
- If the Score label does appear, but there is no value, then the user's score is not defined.
Helpful Hints - Weighted Scoring
- Weighted scoring can be applied for multi-sco SCORM courses.
- Weighted sections can be configured for a multi-sco SCORM course regardless of when the course was published.
- If weighted scoring is configured for existing courses, the changes apply for all users that are currently registered for the course and have not yet completed it.
- If various SCOs have different weights, the different weights are included when calculating the user's score to determine if a user has earned a passing score
- When a user completes part of an online course, the score that is displayed is weighted. For example, an online course has three sections. Section 1 is worth 50% of the total score. Section 2 is worth 25% of the total score. Section 3 is worth 25% of the total score. A user completes Section 1 and answers all of the questions correctly. They will have a score of 50%, even though they only completed one sections of the course.
- Once a user completes a multi-sco SCORM course with weighted scoring, their score is recorded and does not change if the user re-takes the course. In order for the user to receive a new score, they must complete a new instance of the course.
Note: The ability to apply weighted scoring for multi-sco SCORM courses is controlled by a backend setting that is turned off by default. To enable the setting for your portal, contact Global Customer Support.
Helpful Hints - SCORM 2004 Table of Contents
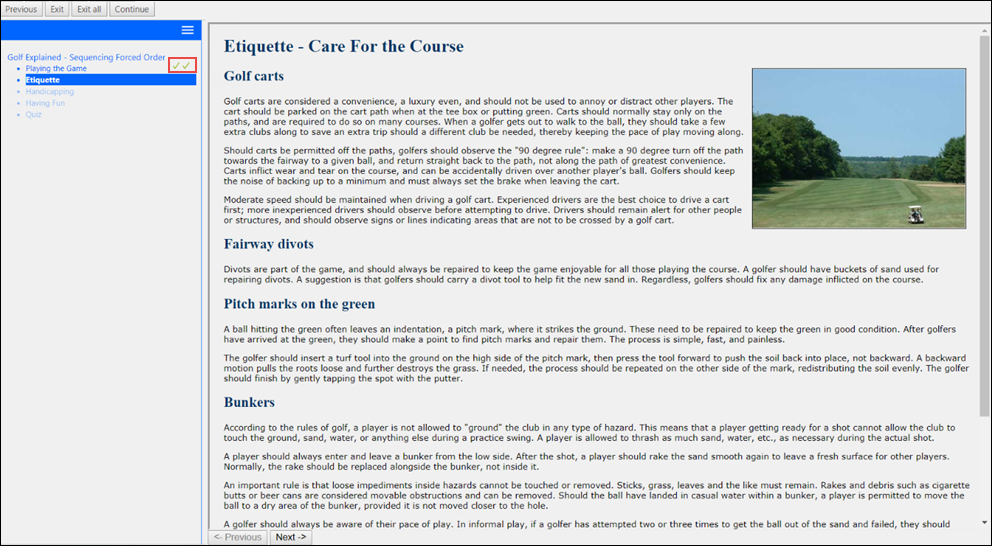
When the table of contents (TOC) is being used for SCORM courses, each SCO displays the learner’s progress. One green check mark indicates that the user passed the SCO, and a second green check mark indicates the SCO has been completed. These check marks allow learners to easily view which SCOs have already been completed so they don't need to re-open any chapters they have already completed.
In addition, a refresh mechanism ensures the SCOs are shown in their correct and updated state (enabled or disabled).