Salary Structures
To manage salary structures, go to .
The salary structure can be defined by one, two, or three organizational units. For example, the salary structure can be set by position (primary OU), then by location (secondary OU), and then by grade (tertiary OU). Each primary OU appears in the list. The salary structure can then be set just for each primary OU, or administrators have the option to set different salary structures at the secondary OU level within each primary OU. If a tertiary OU type is selected, then administrators can set different salary structures at the tertiary OU level within each secondary OU.
Define Salary Structure
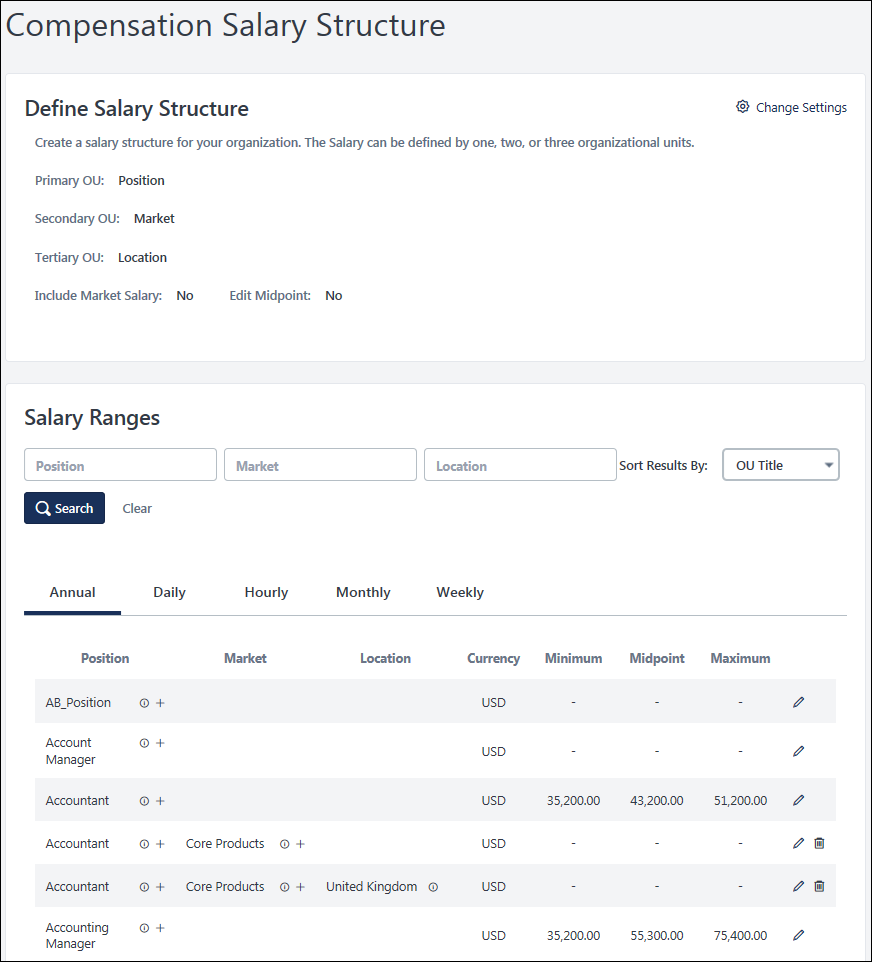
The Define Salary Structure section enables administrators to define the Primary, Secondary, and Tertiary OUs for the salary structure. In addition, administrators can set whether the salary structure includes the ability to set a Market Salary value or edit the midpoint values.
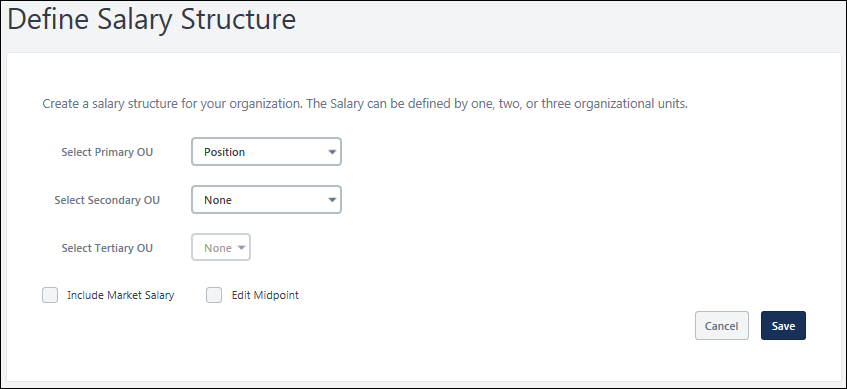
To edit the settings in the Define Salary Structure section, select the Change Settings link in the upper-right corner of the section. The page refreshes, and the following fields become editable:
- Select Primary OU - Select the primary OU by which salary ranges are set. This can be any OU type, including custom OU types.
- Select Secondary OU - Select the secondary OU by which salary ranges are set. This can be any OU type, including custom OU types.
- Select Tertiary OU - Select the tertiary OU by which salary ranges are set. This can be any OU type, including custom OU types.
- The Tertiary OU drop-down is disabled until a Secondary OU is selected. If the Secondary OU drop-down is set to None, then the Tertiary OU drop-down is also set to None. By default, no OU type is selected as the Tertiary OU.
- Include Market Salary - Select this option to also set the market compensation for each salary.
- Edit Midpoint - When this option is selected, the Midpoint column in the Salary Ranges section becomes editable. The administrator can edit or load midpoint values for each salary range. When this option is not selected, the system automatically sets the midpoint for all salary ranges as the mathematical midpoint between the minimum and maximum values of the salary range. The midpoint values cannot be edited or loaded when this option is not selected. Note: If this option is unchecked after the administrator edited midpoint values, a warning pop-up is displayed to confirm the action. This is because when the option is unchecked by the administrator, the system will override any edited midpoint values with the default values.
After defining the salary structure, select the button to save any changes. Or, select the button to discard any unsaved changes. The page is refreshed, and the Define Salary Structure section is read-only again.
Note: Modifying and saving a Salary Structure OU after it has been set and saved will clear any salary range data associated with the OU. For example, if you modify and save the Primary OU, this will clear all salary ranges for the Primary, Secondary, and Tertiary OUs. If you modify and save the Tertiary OU, this will clear any salary ranges for the Tertiary OU.
Note: Modifying and saving a Salary Structure OU after it has been set and saved impacts any Not Started or In Progress tasks that are using Promotion Criteria.
Search Salary Ranges
In the Salary Ranges section, administrators can search for a salary range by Primary, Secondary, or Tertiary OU if the OU types are defined for the Salary Structure. This enables administrators to search for and manage salary ranges for a specific OU or combination of OUs. Select the button after defining the search criteria. The Salary Ranges table displays salary ranges that match all specified OU types.
Additionally, administrators can use the Sort Results By drop-down menu to sort the salary ranges by OU Title, Date Created, or Date Modified. Selecting a new sort option automatically refreshes the salary ranges.
The Search functionality searches all wage type salary ranges (e.g., Annual, Hourly), but the results are displayed in their respective tabs.
Edit a Salary Range
To edit a salary range, select the Edit icon ![]() to the right of the salary range. This opens the Edit flyout for the salary range. At the top of the flyout, the Primary, Secondary, and Tertiary OUs for which the salary range is being edited are displayed if they are defined in the Salary Structure. For example, if Position is selected as the Primary OU, then the Primary field displays the Position OU for which the salary range is being edited.
to the right of the salary range. This opens the Edit flyout for the salary range. At the top of the flyout, the Primary, Secondary, and Tertiary OUs for which the salary range is being edited are displayed if they are defined in the Salary Structure. For example, if Position is selected as the Primary OU, then the Primary field displays the Position OU for which the salary range is being edited.
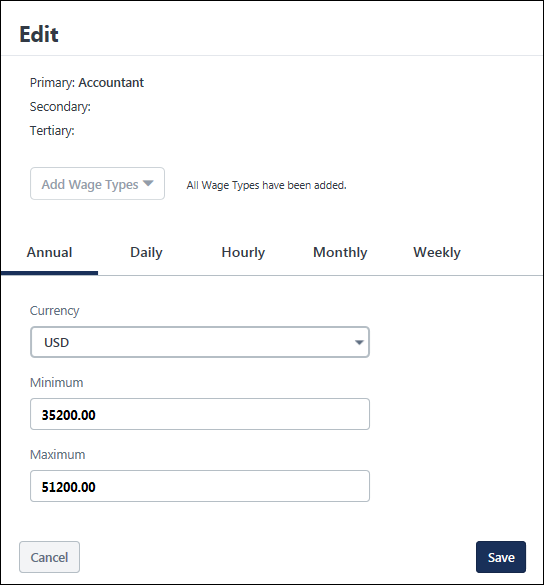
The flyout is separated into multiple tabs that represent each available wage type, such as Annual, Daily, Hourly, Monthly, and Weekly. When the flyout is opened, the tab that was selected in the Salary Ranges table is automatically selected within the flyout. Each tab displays the salary range for the selected wage type and OU combination. All tabs use the selected Primary, Secondary, and Tertiary OU structure, and the configuration options apply to all tabs.
- To add a wage type to the flyout for the selected OU combination, select the Add Wage Types drop-down, and then select all appropriate wage types. When editing the salary ranges for a primary OU, all available wage types are automatically added to the flyout.
- All annual salary ranges are displayed and validated based on the precision rate for the Annual Wage Type.
- All other wage type salary ranges are displayed and validated based on the precision rate for the currency and selected wage type.
The following fields may be available:
- Currency - Select the currency for the salary range. The salary range values are stored in the selected currency. The drop-down menu contains all currencies that are available in the portal. For example, if you have a position in the United Kingdom that needs salaries to be paid in British Pounds rather than the corporate currency of US Dollars, this option enables administrators to input the salary range in British Pounds, rather than needing to convert from British Pounds to US Dollars.
- Minimum - Enter the minimum salary for the corresponding wage type and OU combination.
- Midpoint - This field is only available if the Edit Midpoint option is selected in the Define Salary Structure section. Enter the custom midpoint value for the corresponding wage type and OU combination. The Compa-Ratio is calculated using the salary range midpoint values. The midpoint values must be between the minimum and maximum values of the salary range. By default, the midpoint value is set as the mathematical midpoint between the minimum and maximum values of the salary range. This is a required field if a minimum and maximum value is set for the salary range.
- Maximum - Enter the maximum salary for the corresponding wage type and OU combination.
- Market - This option is only available if the Include Market Salary option is selected in the Define Salary Structure section. Enter the market salary for the corresponding wage type and OU combination.
- Annualized Range - This option is not available on the Annual tab. Select this option for a salary range to indicate that the Minimum and Maximum values for the OU are annualized values. Selecting and deselecting this option does not automatically convert the salary ranges to Annual, so the values that are entered should correspond to the Annualized Range selection.
- If the Annualized Range option is selected, the organization is expected to provide annualized values for the salary range. All non-annual employees' rates are annualized by the system prior to being placed in the Salary Structure.
- If the Annualized Range option is not selected, the organization is expected to provide non-annual values for the salary range.
After defining the salary range, select the button to save any changes. Or, select the button to discard any unsaved changes.
View Salary Ranges
The Salary Ranges table is separated into multiple tabs that represent each available wage type, such as Annual, Daily, Hourly, Monthly, and Weekly. Each tab displays the salary ranges for the selected wage type and each OU combination. All tabs use the selected primary, secondary, and tertiary OU structure, and the configuration options apply to all tabs.
After setting the OU types that determine the salary structure, the administrator is able to set salary ranges for each combination of Primary, Secondary, and Tertiary OU.
- If a user's Tertiary OU does not have a set salary range, then the system uses the salary range for the user's Secondary OU.
- If a user's Secondary and Tertiary OUs do not have a set salary range, then the system uses the salary range for the user's Primary OU.
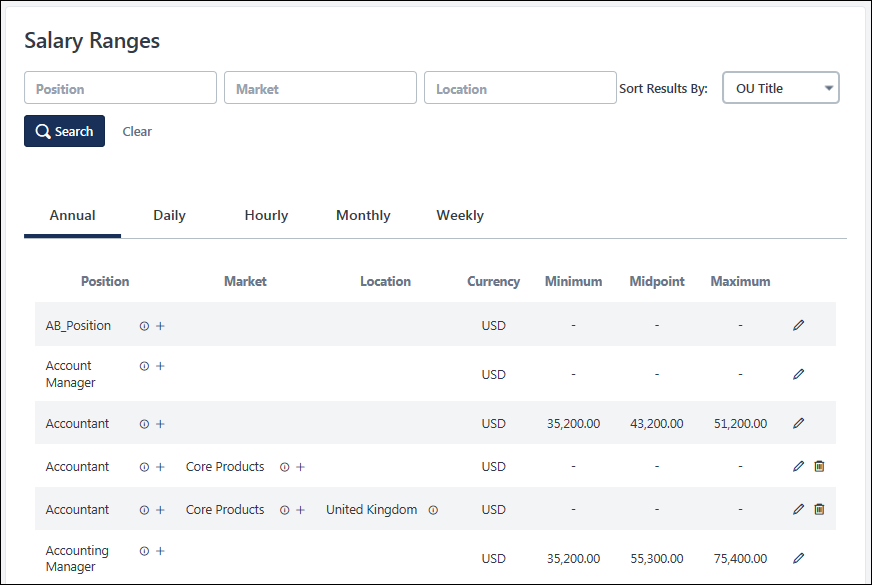
The following information is displayed for each OU combination in the Salary Ranges table:
- Primary OU - This displays the primary OU that corresponds with the salary range. For example, if Position is selected as the Primary OU, the column name is "Position," and this column displays each Position OU in the system.
- Secondary OU - This displays the secondary OU that corresponds with the salary range. For example, if Location is selected as the Secondary OU, the column name is "Location," and this column displays each Location OU in the system. This column is only available if a Secondary OU is defined in the Define Salary Structure section.
- See the Secondary and Tertiary OUs section for information on adding additional OUs to the salary structure.
- Tertiary OU - This displays the tertiary OU that corresponds with the salary range. For example, if Division is selected as the Tertiary OU, the column name is "Division," and this column displays each Division OU in the system. This column is only available if a Tertiary OU is defined in the Define Salary Structure section.
- See the Secondary and Tertiary OUs section for information on adding additional OUs to the salary structure.
- OU ID
 - To view the OU ID for an OU, hover the cursor over the ID icon.
 - Currency - This displays the currency in which the salary range values are displayed. For example, if USD is displayed, then this indicates that all values for the salary range are displayed in US Dollars.
- Minimum - This displays the minimum salary for the corresponding salary range.
- Midpoint - This displays the midpoint for the salary range. The Compa-Ratio is calculated using the salary range midpoint values. If both a minimum and maximum are not entered, the Midpoint does not display.
- Maximum - This displays the maximum salary for the corresponding salary range.
- Market - This displays the market salary for the corresponding salary range. This column is only displayed if the Include Market Salary option is selected in the Define Salary Structure section.
- Annualized Range - This column does not appear on the Annual tab. This column displays whether the salary range values are annualized values. If the salary range values are not annualized, then the values correspond to the selected wage type tab. For example, if the Hourly tab is selected, then the salary range values are hourly wage values.
Secondary and Tertiary OUs
If a secondary OU type is selected in the Define Salary Structure section, then administrators can add secondary OUs to the salary structure.
If a tertiary OU type is selected in the Define Salary Structure section, then administrators can add tertiary OUs to the salary structure.
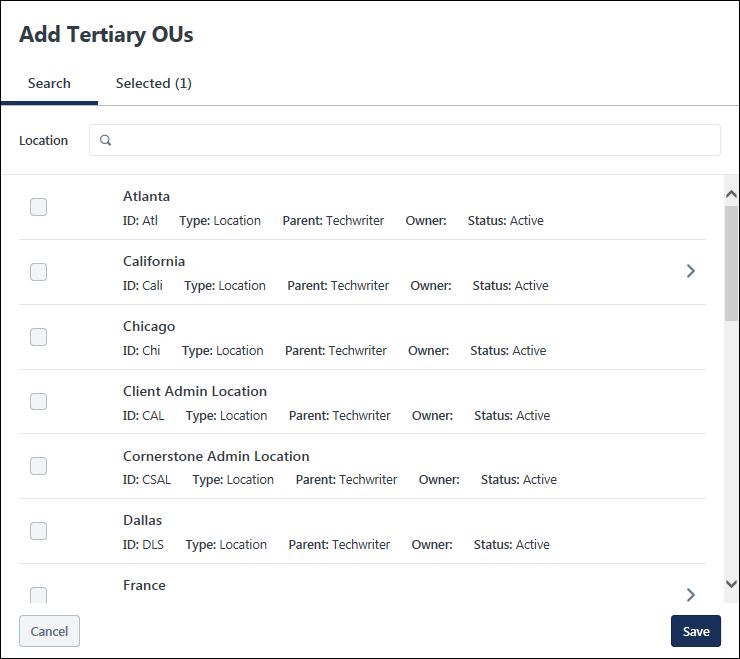
To add a secondary OU to the salary structure, select the plus icon to the right of a primary OU. Or, to add a tertiary OU, select the plus icon to the right of a secondary OU. The Add Secondary/Tertiary OUs flyout opens. The administrator can search for and select one or more specific OUs, and then select the Save button. The selected OUs are added to the Salary Ranges table. Once the OUs are available in the Salary Ranges table, then the administrator can edit and define the salary range for the OU.
To remove a secondary or tertiary OU's salary range from the salary structure, select the Remove icon ![]() to the right of the salary range. Removing a secondary OU salary range also removes any tertiary OU salary ranges that are associated with the secondary OU. If the Remove icon is clicked for a Secondary OU that has associated Tertiary OUs, a warning pop-up is displayed to confirm the deletion of the secondary OU and associated tertiary OUs. Note: Primary OUs cannot be removed from the Salary Ranges table.
to the right of the salary range. Removing a secondary OU salary range also removes any tertiary OU salary ranges that are associated with the secondary OU. If the Remove icon is clicked for a Secondary OU that has associated Tertiary OUs, a warning pop-up is displayed to confirm the deletion of the secondary OU and associated tertiary OUs. Note: Primary OUs cannot be removed from the Salary Ranges table.