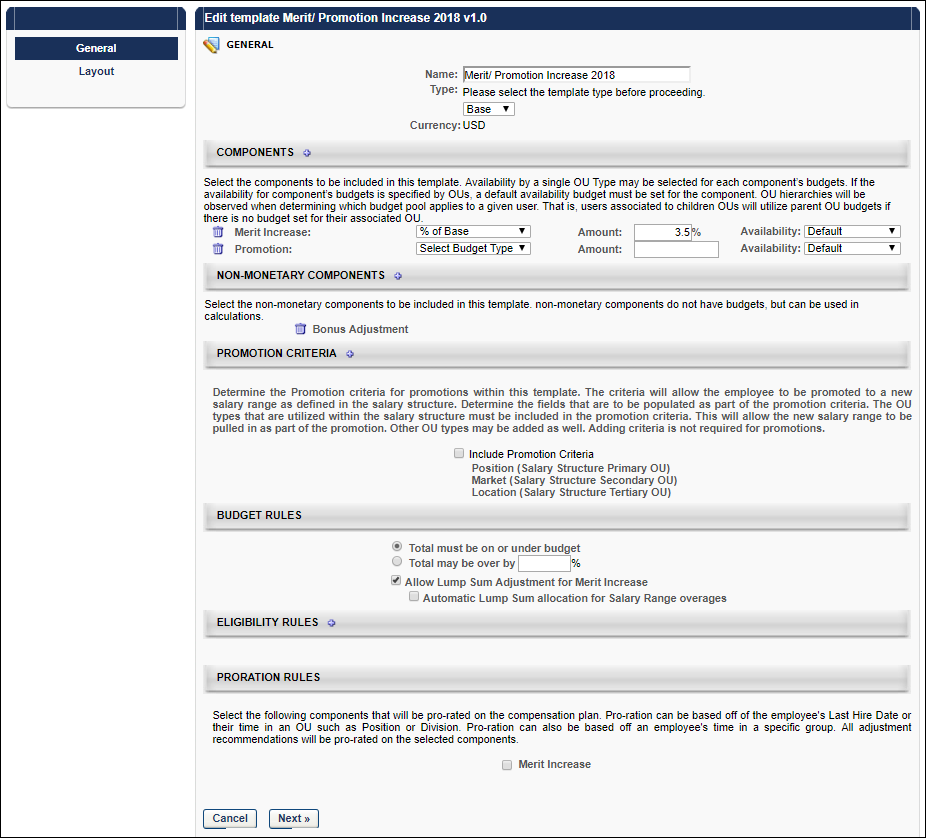
When creating a base type compensation template, the Compensation Template administration page is separated into two pages, the General page and the Layout page. The General page displays template details such as components, budget rules, eligibility rules, proration rules, etc. All layout details appear on the Layout page.
To access Compensation Plan Templates, go to .
- To create a new compensation template, click Create Compensation Template.
- To edit an existing compensation template, select the edit icon for the appropriate template.
| PERMISSION NAME | PERMISSION DESCRIPTION | CATEGORY |
| Compensation Plan Templates | Grants ability to create and manage compensation plan templates for base, bonus, and equity compensation. This permission cannot be constrained. This is an administrator permission. | Compensation - Administration |
Components
The components that are available are based on the option you selected in the Type field. You can add up to 20 components.
To select components:
- Click the plus icon to the right of the Components heading.
- Select the components to included in the template.
- Click . Each selected component is added to the template.
- Complete the following for each component:
- Budget Type - Select the appropriate budget type for each component. The available options are:
- % of Base - The budget is a percentage of the employee's most recent base salary within the period end date.
- Cascaded - A cascaded budget is cascaded from the top-level manager down to the lower-level managers. This means that the top-level manager creates their compensation totals from the budget and passes the remaining budget to the next lower manager, and so on
- Fixed Amount - The budget is a fixed monetary amount.
- None - No budget associated with the component
- Amount - In the Amount field, enter the allocated budget amount for each component. Note: If the budget type is None for the component, then the Amount field is not available. Compensation tasks that use a template with None selected as the budget type have the selected components as part of the task, but a budget is not associated with the component. When entering an amount as a percentage, one to three decimals may be entered in the percentage field, depending on the decimal precision. The decimal precision for percentages in compensation is controlled by a backend setting.
- Budget Type - Select the appropriate budget type for each component. The available options are:
Availability
To set the availability for a component budget, follow these steps:
- From the Availability drop-down list, select an OU type. A Select icon appears to the right of the drop-down list.
- After selecting an OU type, click the Select icon and select the appropriate OU. Note: You cannot select the same OU twice for a single budget component.
- After selecting an OU, a second line item is added for the component budget.
- The first line item has an Availability set to OU: Default. This component budget serves as the default budget for this component and cannot be deleted unless there are no other budgets for this budget type. Note: For Equity templates, if multiple budgets are available for a budget component, the payout method for all of those budgets matches the payout method for the default component budget.
- The second line item has the availability set to the selected OU. This OU specific budget can be deleted by clicking the Remove icon to the left of the component budget. If multiple OUs were selected, then each OU is set as a single line item for the budget component.
- Click the plus icon to the right of the default budget component availability to add another budget for the budget component.
Note: If no availability is selected for a component, then that component serves as the default component budget.
Non-Monetary Components
Enables administrators to select which non-monetary components are included in the template. When a non-monetary component is selected, this automatically includes the component in the Display Columns field on the Layout page.
Promotion Criteria
Note: This option is only available if a Promotion component is added to the template.
Determine the promotion criteria for promotions within the template. The criteria determines to which OUs the employee is being promoted.
Select the Include Promotion Criteria option to include promotion criteria in the template. When this option is selected, the primary, secondary, and tertiary OUs used in the salary structure are automatically included. The primary, secondary, and tertiary OUs are required in order to pull in the new salary ranges for the promotion based on the salary structure. Note: Secondary and tertiary OUs are only available if they are included in the salary structure.
The administrator can add additional OU types to the promotion criteria by clicking the plus icon to the right of the Promotion Criteria heading. Any additional OU types that are added will appear on the task for selection as part of promoting an employee on the task.
Editing Note: When editing an existing compensation template, if changes are made to the salary structure that impact the promotion criteria for the compensation template, then the impacted criteria are highlighted on the compensation template and the template must be saved to update the promotion criteria to the new salary structure. Until the template is saved, the salary ranges for promotions are not displayed in any task using the template. When the template is saved, the template and any tasks using the template are updated to match the new salary structure.
Budget Rules
Determine the budget rules for the template. The available options are:
- Total must be on or under budget - Select this option if the actual compensation totals from the compensation task must be on or below the set budget.
- Total may be over by - Select this option if the actual compensation totals from the compensation task may exceed the set budget. You must then specify the percentage by which the total may exceed the budget. One to three decimals may be entered in the percentage field, depending on the decimal precision. The decimal precision for percentages in compensation is controlled by a backend setting.
- Allow Lump Sum Adjustment for Merit Increase - Select this option to allow a lump sum adjustment to be allocated with the task.
- Automatic Lump Sum allocation for Salary Range overages - This option appears when the Allow Lump Sum Adjustment for Merit Increase option is selected. This option is checked by default. When checked, any amount of salary range overage for a particular employee is automatically taken from the employee's Merit Increase component and shifted to the Lump Sum component. Note: There must be a Merit Increase amount to shift to the Lump Sum. If there is no allocated Merit Increase amount, then the employee remains over the salary range. This option is only applicable if the following are true for the template:
- The template is a Base template.
- The Merit Increase component is added to the template.
- The Allow Lump Sum Adjustment for Merit Increase option is selected.
The Automatic Lump Sum allocation for Salary Range overages option can be deselected when editing the template and can also be configured when copying a template, provided that the template meets the above-mentioned configuration requirements.
- Automatic Lump Sum allocation for Salary Range overages - This option appears when the Allow Lump Sum Adjustment for Merit Increase option is selected. This option is checked by default. When checked, any amount of salary range overage for a particular employee is automatically taken from the employee's Merit Increase component and shifted to the Lump Sum component. Note: There must be a Merit Increase amount to shift to the Lump Sum. If there is no allocated Merit Increase amount, then the employee remains over the salary range. This option is only applicable if the following are true for the template:
Eligibility Rules
Determine the employees that are eligible to be included in the compensation task using this template. If an employee does not meet the eligibility criteria, then that employee can not receive an adjustment for the template type.
When specifying multiple eligibility criteria, the administrator can use either intersecting logic (AND logic) or combining logic (OR logic) to create the eligibility.
To set the eligibility for the template, follow these steps:
- Click the plus icon to the right of the Eligibility Rules heading.
![]()
- This adds a Select Criteria drop-down list and hides the plus icon. From the drop-down list, select the appropriate metrics to use to determine the template eligibility. Then, click the Select icon to select a specific criterion. The available drop-down options are OU, Group, or User Fields and Metrics. The User Fields and Metrics option includes performance and succession metrics and hire date.
- After selecting a criterion, the criterion is displayed in the Eligibility Rules section with AND and OR options. If a User Fields and Metrics option was selected, you must set the operator values for the field. See User Fields and Metrics Options below for additional information.

- To add an additional criterion, click either the AND link to use intersecting logic or click the OR link to use combining logic. Intersecting logic makes the template available to only the employees that match all of the criteria. Combining logic makes the template available to all employees that match at least one of the criteria. When you click the AND or OR link, an additional criterion is added to the Eligibility section. Note: When you add an additional criterion, the logic that is selected must be used for all eligibility criteria.
- After selecting another criterion, the new criterion is displayed in the Eligibility Rules section with the option to add another criterion. If you previously clicked the AND link, then another AND link is available, and if you previously clicked the OR link, then another OR link is available. If a User Fields and Metrics option was selected, you must set the operator values for the field. See User Fields and Metrics Options below for additional information.

User Fields and Metrics Options
From the drop-down list, select the appropriate operator for each metric (Greater Than, Less Than, Equals, Not Equal To, Greater Than or Equal, Less Than or Equal).
In the field, enter the appropriate value for each metric.
For example, if the employee must have scored higher than 60% on their performance review to be eligible for a compensation adjustment using this template, then select the appropriate performance review as the metric. Select Greater Than as the operator. In the field, enter 60.
See Performance Review Section Score Metrics.
Proration Rules
Proration enables an organization to prorate compensation if the employee has not been with the company or in the position for the entire compensation period. For example, if an employee is hired in April and the compensation period is the calendar year, then the employee has only been in their position for 75% of the compensation period. The organization may choose to prorate the compensation adjustment based on the shortened compensation period.
Proration may be based off of the employee's Last Hire Date, their time in an OU such as Position or Division, or Last Salary Change Date. Bonus and Equity components can be prorated by Individual Targets. Proration can also be based off an employee's time in a specific group. All adjustment recommendations are prorated on the selected components. Note: Base components cannot be prorated by Individual Targets. See Proration with Individual Targets.
Components - Select the components that are prorated on the compensation plan. Only the components that are selected in the Components section appear in this section.
Criteria - For each selected component, you must then select the appropriate proration criteria for the selected components. Note: The Criteria drop-down list does not appear until the component is selected. The following options may be available:
- Last Hire Date
- Last Salary Change Date - See Proration by Last Salary Change Date.
- Time in OU
- Important: Administrators can only prorate components within a template by one criterion. Multiple criteria cannot be used in the same template.
Retroactive Proration From - This option is only available if Last Hire Date is selected from the Criteria field. This option enables administrators to retroactively prorate the component. See Proration by Last Hire Date - Retroactive Proration.
Next/Cancel
- Click Next to proceed to the Layout tab. See Base Compensation Template - Layout.
- Click to discard any unsaved changes.