The Approval Workflow tab enables administrators to define the approval rules for the learning object (LO).
Design Note: An updated interface is available for this page, which can be enabled by administrators in Feature Activation Preferences. With the new design, the functionality of the page is unchanged.
To access the Course Catalog, go to . Search for the LO to which you want to apply an approval workflow and click the Options drop-down arrow next to that LO. Click the Edit link and navigate to the Approval Workflow tab.
| PERMISSION NAME | PERMISSION DESCRIPTION | CATEGORY |
| Approval Template Administration - View | Grants ability to view approval templates that can be applied to learning objects. Defaults must be overridden at the learning object level by those who create and manage them. This permission can be constrained by OU, User's OU, and Training Type. This is an administrator permission. | Learning - Administration |
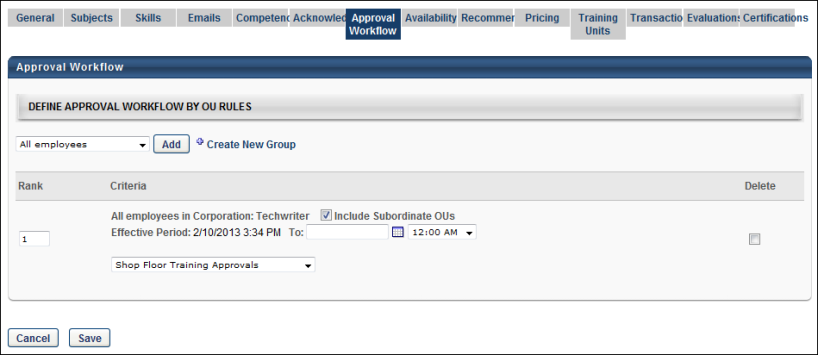
Define Approval Workflow by OU Rules
In the Approval Workflow panel, administrators define the approval rules for the LO. Each criterion that is selected can have its own approval workflow. For example, all users in the Sales division can have one approval workflow, while all users in the Accountant position can have another approval workflow.
For users who require approval but do not meet any of the criteria defined for the rule, the default template that is defined at the LO type level is used. If a default template is not defined at the LO type level, then approval is automatically granted.
Note: Approval rules at the LO level overwrite the approval rules that are defined on the user record.
Note: Custom approval workflows set for an LO in the course catalog only apply to training requests. Completion requests are NOT affected. Completion requests refer to the approval workflow set for the LO type in Approval Workflow Default Preferences.
Criteria
To add criteria for the approval workflow:
- Select an organizational unit (OU) type from the Criteria drop-down. You can also select all employees or a specific user.
- Click the Search icon to search for a specific OU within that OU type.
- Once the criteria are defined, click . The criteria display in the Define Approval Workflow by OU Rules table.
Repeat these steps as necessary to add more criteria. There is no limit to the number of criteria that can be added.
Define Approval Workflow by OU Rules Table
The following information appears for each rule in the table:
Rank
This column displays the order in which the rules are ranked. Rules are initially ranked in the order in which they are added to the table. You can edit the rank by entering a different positive whole number in the box. The numbers in the rank box do not need to be consecutive. There is no character limit for the rank box.
The order is important for users that meet the criteria for multiple OUs. For such users, the rule with the highest rank applies. The order is also important when an approval rule is deleted. See the Delete section below for more information.
Criteria
This column displays the following information:
- OU Criteria - This displays the name of the OU to which the rule applies.
- Include Subordinate OUs - Check or uncheck this box to include or exclude the subordinate OUs of the parent OU. The box is checked by default.
- Effective Period - The effective period is the date and time during which the rule is effective for the OU. The start date is automatically populated as the current date and time at which the OU criterion was added to the table. The start date and time cannot be edited.
- Approval Workflow Template - Select an approval workflow template from the drop-down. The templates that are available to select are the templates that are within the administrator's permission constraints for managing approval templates. By default, "None" is selected in the drop-down.
In the To: field, enter the end date of the approval workflow effective period. You can also click the Calendar icon to select a date from the calendar. The end date must be a future date; it cannot be the current date or a past date. In the time field, select the time at which the approval workflow effective period ends. The To: field and time field are not required. If an end date is not entered, then the approval workflow remains in effect as long as the LO is active or until the rule is deleted.
Note: At least one approval workflow template must already be created in order to select a template other than the system-generated template. Templates are created by the administrator on the Define Approval Template page. See Define Approval Template.
Delete
Select the Delete box in the Delete column to remove the rule. Rules can be deleted at any time, even if the LO is currently on a user's active transcript.
Considerations
When an approval rule is removed from an LO that is currently in a user's transcript, the following considerations apply based on the status of the LO in the user's transcript:
- For any status other than Pending Approval or Pending Completion Approval, deleting a rule applies the next applicable rule in the workflow to the user.
- If the status is either Pending Approval or Pending Completion Approval, deleting a rule applies the next applicable rule in the workflow to the user and also applies any applicable approvals that the user has already received. Example:

- If the user is moved to a different OU while the LO is in a Pending Approval or Pending Completion Approval status, then the next applicable rule applies for the LO. Note: If there are no applicable approval rules at the LO level, the LO type level, or the preferences level after a user is moved to a different OU, then approval is automatically granted.
Save or Cancel
Once all fields are completed, click . Or, click to cancel the changes to the page. Note: Clicking returns you to the Search Results page in Course Catalog. If you have not saved changes on other tabs for the LO, then those changes are lost upon clicking .